I think is a relevent topic due to the "show us yer stuff" thread. I'm starting it because I've tried to take some pics for that thred and haven't come up with anything close to useable. I am using a Sony Cybershot DSC-P32 3.2 mega pixel camera with 4x digital zoom and no physical zoom. Anyone more knowledgable have any hints or tips on how to get a decent close-up with this thing? Is it even possible with something this ancient? lol
Thanks,
Mike
Digital photography
Moderators: dnichols, GHQ, Mk 1
-
SSgtBuck
- Posts: 57
- Joined: Wed Aug 29, 2007 4:45 am
- Location: Maine, USA
Digital photography
Rock is dead, long live paper & scissors
-
Mk 1
- E5
- Posts: 2383
- Joined: Fri Dec 24, 2004 3:21 am
- Location: Silicon Valley, CA
I too use a Sony 3.2Mpel camera of a "certain age".
I have never managed picks of the quality that others here put up. But that's OK, 'cause my painting doesn't quite stand up to the scrutiny of such excellent photos. If my painting is just "adequate", then maybe my photography should be so too.
Anyways, here is what I have found.
1 ) Good lighting. Lots of light. Not direct sunlight, though. Bright reflections off the side of a house on a sunny day, or two or three lamps should do.
2 ) A very steady camera. For me this was one of the biggest issues. The older Sonys have relatively slow sensors = long exposure times. Particularly true in lower light levels. You have GOT to stabilize the camera. I bought a little table-top tripod to help me out. But I don't often use it as a tripod. More often as a mono-pod (ie: all legs folded together) at some angle diagonally or sideways off of a stack of boxes or books ... whatever it takes to get me to the right height, but to have me braced when I actually take the picture.
3 ) Don't get close. Don't even try. 2 feet (60cm) away seems to be about best. No zoom. Nada. Take your picture from a reasonable distance. To get that "close up" that you want, edit your picture down by leaving it at full resolution and cropping all the extraneous stuff out. You want about 640x480 for a forum posting, but your original will be about 3X as big, in each dimension, as that. So you can cut it down to about 1/3 as wide, 1/3 as high, and get rid of 8/9ths of the original picture. Winds up looking reasonably tight.
4 ) Focus. Hmmm. Here its a bit of a trick. My Sony, and yours, I expect, will want to focus on the ground the tank is sitting on (whatever the surface is). What you want to do is point your camera at the tank, push your button to the half-push "auto-focus" stop, and wait for the little green box to form on your viewfinder. Then, HOLDING the button to retain that focus, you want to BACK OFF of your model by about an inch or so. Then finish pushing the button to take the picture. This is why I wind up using my tripod as a mono-pod. I can pivot it about an inch, and still remain braced.

Here is an example. Notice how only one of the howitzers is actually in focus. That tells you how limited your focal depth really is ... only one can be in focus at a time, because if its an inch off either way, its out of focus!
And note that at full resolution, the original picture was 3X larger in each direction! No zooming, no re-sizing though. Just cropping (cutting away the extra), to get it down to this size.
Then, if/as you get something that's even close, POST IT UP! We'll all appreciate it, and you'll appreciate how we laugh and mock you. (No, we won't actually do that! We'd all love to make suggestions on how you might improve your work, whether your painting or your photography. We'll keep all of our snickering and mocking private!)
I have never managed picks of the quality that others here put up. But that's OK, 'cause my painting doesn't quite stand up to the scrutiny of such excellent photos. If my painting is just "adequate", then maybe my photography should be so too.
Anyways, here is what I have found.
1 ) Good lighting. Lots of light. Not direct sunlight, though. Bright reflections off the side of a house on a sunny day, or two or three lamps should do.
2 ) A very steady camera. For me this was one of the biggest issues. The older Sonys have relatively slow sensors = long exposure times. Particularly true in lower light levels. You have GOT to stabilize the camera. I bought a little table-top tripod to help me out. But I don't often use it as a tripod. More often as a mono-pod (ie: all legs folded together) at some angle diagonally or sideways off of a stack of boxes or books ... whatever it takes to get me to the right height, but to have me braced when I actually take the picture.
3 ) Don't get close. Don't even try. 2 feet (60cm) away seems to be about best. No zoom. Nada. Take your picture from a reasonable distance. To get that "close up" that you want, edit your picture down by leaving it at full resolution and cropping all the extraneous stuff out. You want about 640x480 for a forum posting, but your original will be about 3X as big, in each dimension, as that. So you can cut it down to about 1/3 as wide, 1/3 as high, and get rid of 8/9ths of the original picture. Winds up looking reasonably tight.
4 ) Focus. Hmmm. Here its a bit of a trick. My Sony, and yours, I expect, will want to focus on the ground the tank is sitting on (whatever the surface is). What you want to do is point your camera at the tank, push your button to the half-push "auto-focus" stop, and wait for the little green box to form on your viewfinder. Then, HOLDING the button to retain that focus, you want to BACK OFF of your model by about an inch or so. Then finish pushing the button to take the picture. This is why I wind up using my tripod as a mono-pod. I can pivot it about an inch, and still remain braced.
Here is an example. Notice how only one of the howitzers is actually in focus. That tells you how limited your focal depth really is ... only one can be in focus at a time, because if its an inch off either way, its out of focus!
And note that at full resolution, the original picture was 3X larger in each direction! No zooming, no re-sizing though. Just cropping (cutting away the extra), to get it down to this size.
Then, if/as you get something that's even close, POST IT UP! We'll all appreciate it, and you'll appreciate how we laugh and mock you. (No, we won't actually do that! We'd all love to make suggestions on how you might improve your work, whether your painting or your photography. We'll keep all of our snickering and mocking private!)
-Mark 1
Difficile est, saturam non scribere.
"It is hard NOT to write satire." - Decimus Iunius Juvenalis, 1st Century AD
Difficile est, saturam non scribere.
"It is hard NOT to write satire." - Decimus Iunius Juvenalis, 1st Century AD
-
Extra Crispy
- E5
- Posts: 992
- Joined: Fri Jul 28, 2006 7:56 pm
- Location: Edgewater, NJ
- Contact:
-
Mk 1
- E5
- Posts: 2383
- Joined: Fri Dec 24, 2004 3:21 am
- Location: Silicon Valley, CA
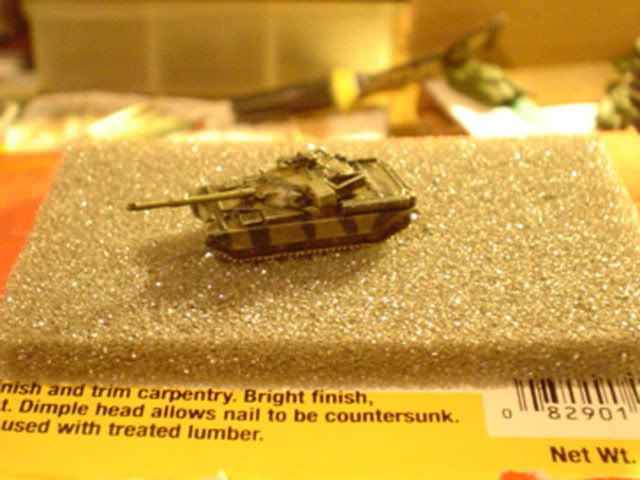
Hey, not bad. Certainly better than my early efforts!SSgtBuck wrote:ok, here is my first attempt. No tripod but was better than anything I have come up with yet.
Looks to me like the focus is still a little bit off. But maybe the blur is from not being stabilized well enough. Hard to say.
If the focus is off, it is not long. Looks like it may be a bit short. In other words you are focused in front of the tank rather than behind it. So if you did pull back after focussing, as per my suggestion, you pulled back more than was needed. That or the camera decided to focus on the edge of the foam pad rather than on the tank (which seems reasonably likely).
When you perform the focus, you should get a green "box" on your LCD viewfinder. Actually, you'll just see the corners of the box, which will be wider than it is tall. Those green corners will outline the box in the view that the camera has chosen to focus on. So see where that box occurs before you take your picture. If it is not around your target tank, then release, move the camera a bit, and re-focus to see if you catch the tank more fully.
Also, even without a tripod, you can set up some mechanism to stabilize your shot. I use a shoe-box or two. One set wide for low-angles, two for medium low angles, one one end for higher angles, two on end for very high angles, etc.
I prefer taking higher angle shots (looking down on the model). I find that it is a bit easier to focus, as there is less likelyhood of having something above the tank, or below the surface the tank is on, than there is of having something in front of, or behind the tank that the camera chooses to focus on. Also, with a downward angle my photos are less cluttered up with who-knows-what that's in the room.
One more thing. Looks like your photo may have been taken under flourescent lights. If not flourescents, than under a single kind of other light. The coloring comes out kind of yellow. This, and kind of green, are common photographic "footprints" of flourescent lighting. A small and cheap reading lamp with an incandescent (ie: regular) lightbulb, or even a flashlight, can reduce this off-coloration. To prevent too much one-sided lighting and shadowing, try having more than one source of light -- maybe there is general room lighting overhead, and a reading lamp to one side. If you are still too one-sided in the lighting (you'll see the shadows, the camera may see one side of your tanks as all white), you can put a plain white box, or piece of paper propped up, or something white, on the other side of the tank from the light source. You may not see much light reflecting from a white surface, but the camera will.
Just some ideas ...
-Mark 1
Difficile est, saturam non scribere.
"It is hard NOT to write satire." - Decimus Iunius Juvenalis, 1st Century AD
Difficile est, saturam non scribere.
"It is hard NOT to write satire." - Decimus Iunius Juvenalis, 1st Century AD
-
tstockton
- E5
- Posts: 715
- Joined: Sat Apr 16, 2005 10:55 pm
- Location: Indiana
- Contact:
If I may, a couple of "tricks" if you don't have (or don't want to use) a tripod...
(1) An ordinary bean bag will actually serve much the same purpose -- and is great for low-angle shots. Set the bean bag down, push a small depression in the bag, and nestle the camera in the depression. There is usually enough "play" in the bean bag to allow you to make small adjustments in aim.
(2) Use the self-timer to trigger the shutter. Set up the camera for self-timer (8 to 10 seconds seems to be the "norm") -- set your shot -- then trigger the self-timer and step back while the camera does its work!
Of course, many of the new cameras have some sort of an "image stabilization system" (kinda like the gyrostabilizers in a tank turret!?)... and the next camera I purchase will have that feature, since as I am getting older, my hands are not quite as steady as they were years ago... sigh
One other note -- while direct sunlight tends to cast harsh shadows, having plentiful light will generally help by forcing the lens to a smaller aperture -- thus increasing the depth of field (i.e., the "zone" in which objects appear in focus). The opposite tends to be true as well -- the less light is available, the larger the aperture on the lens must be, and thus a narrower depth of field. Photograhers have used this "trick" for years, to have the object being photographed "pop out" while the background appears as an indistinct "blur".
Hope this helps!
Regards,
Tom Stockton
"Well, I've been to one World's Fair, a picnic, and a rodeo, and that's the stupidest thing I ever heard come over a set of earphones. You sure you got today's codes?"
-- Major T. J. "King" Kong in "Dr. Strangelove"
-- Major T. J. "King" Kong in "Dr. Strangelove"
-
Hugewally
- E5
- Posts: 133
- Joined: Wed Jun 21, 2006 10:30 pm
- Location: Largo, FL USA
- Contact:
The bean bag is a very good photography tool. Use it with the cameras shutter release timer. You can also get a mini-tripod for only a couple of bucks... Run a Google search for mini-tripods to get an idea of the choices out there.
For your focus, check the camera manual to see the the minimum focusing distance, you can't get any closer than what is says.
Next thing is lighting. You need lots of it. Not just for the front of the model, but for ambient lighting too. The more lighting you have will allow you to use a slower shutter. A slower shutter speed will give you a greater depth of field aperture setting (larger aperture number). What does all that mean? More of the image will be in focus. http://en.wikipedia.org/wiki/Depth_of_field
Don't worry too much about the type of lighting if you're using a digital camera as the auto white balance should take care of that (no more green photos from fluorescent light bulbs). Hopefully your camera came with some type of image processing software. That should allow you to adjust the light levels/brightness, colors and the sharpness of the image.
Martin