hey its been hell of a ride! Im getting the hang of things and I'll get some pics up of the sample packs Ive been practicing on asap.
Right now Im buying an airbrush. All the advice Ive gotten here has been excellent and I cant thank you guys enough for the warm reception so I instictivley came to this forum while I was looking at airbrushes. Ive always been a staunch advocate for hand painting when it came to models but you cant get a soft-edged camo scheme at this scale by hand unless you are extremely talented so Im buying an airbrush.
I was thinking aztek but Im open to opinions. What size nozzles? 30mm 40mm?
What do you guys use?
P.S. Im a carpenter and have air compressors.... will these "universal" adapters they all come with work?
airbrush
Moderators: dnichols, GHQ, Mk 1
-
sdkfzfanatic
- Posts: 18
- Joined: Tue Nov 10, 2009 3:52 am
- Location: Maine, USA
airbrush
"At least the tanks are getting smaller!" - wifes reaction to micro armour.
-
dougeagle
- E5
- Posts: 726
- Joined: Thu Mar 23, 2006 10:07 am
- Location: Northern Alberta
Hi,
I can't answer your question about Aztek airburshes as I've use Paasche in the past. But, I think you would want the smallest tip you can get for it if you want the soft edges. Once you do, practice on an old model or paper or something before you try it on one of your mini's.
As for air compressors...I have a small air compressor that is mainly used for small air tools like a stable gun and works just fine. However, make sure that you have a regulator and a moisture trap for it. The moisture trap is just that...will stop the excess water from entering into your airbrush via airline...this will cause extra water to get mixed with your already thinned paint...not good You should be able to find adapters from the compressor to your airbrush by checking out different hobby stores and such.
Hope this helps
I can't answer your question about Aztek airburshes as I've use Paasche in the past. But, I think you would want the smallest tip you can get for it if you want the soft edges. Once you do, practice on an old model or paper or something before you try it on one of your mini's.
As for air compressors...I have a small air compressor that is mainly used for small air tools like a stable gun and works just fine. However, make sure that you have a regulator and a moisture trap for it. The moisture trap is just that...will stop the excess water from entering into your airbrush via airline...this will cause extra water to get mixed with your already thinned paint...not good
Hope this helps
Doug
A goal is not always meant to be reached, it often serves simply as something to aim at.
Bruce Lee
A goal is not always meant to be reached, it often serves simply as something to aim at.
Bruce Lee
-
HHaase
- Posts: 10
- Joined: Sat Jan 09, 2010 10:21 am
- Location: Long Island, NY
- Contact:
I personally use an Iwata, and absolutely love it. I have an HP-SB, but if I were to do it again I'd probably go with an HP-B.
In the past I've tried a couple Badger models (150 and 360), and while they were ok for larger models and broad painting, I don't think they would be up to the task of micro-armor.
The Aztek's I've seen hit or miss reviews of. Some folks love them, others seem to utterly hate them.
-Hans
In the past I've tried a couple Badger models (150 and 360), and while they were ok for larger models and broad painting, I don't think they would be up to the task of micro-armor.
The Aztek's I've seen hit or miss reviews of. Some folks love them, others seem to utterly hate them.
-Hans
-
sdkfzfanatic
- Posts: 18
- Joined: Tue Nov 10, 2009 3:52 am
- Location: Maine, USA
thank you both, think I have it narrowed down Im just fretting about compatibility with my air compressors, I have several large and small. Im ordering online and Im trying to make sure I get everything. Nothing is worse than having to wait a week because you didnt get everything you needed. The comp I will probably use is a pancake compressor 150 PSI (more than enough Im sure) with built in reg and moisture trap. Straight off the reg is 1/2 inch female thread, I of course have a 1/2 inch male to 1/2 inch quick change male on this. The brushes Im looking at all come with "universal" adapters. Anyone know what this "universal" adapter might be? I just want to know if I need to buy an adapter as well and there are NO hobby shops around here so if I can get everything I need in one order it would be great. Any help is appreciated. Thanks in advance.
"At least the tanks are getting smaller!" - wifes reaction to micro armour.
-
dougeagle
- E5
- Posts: 726
- Joined: Thu Mar 23, 2006 10:07 am
- Location: Northern Alberta
Sounds like you're on the right track. I forgot to mention that my compressor is a Clarke 2gal air compressor. As for the universal adapters...not sure. Unless of coarse they are talking about adapters from the airbrush to the air compressor, otherwise it could just be an adapter for their airbrush line...confused  Which leads me to this...are you looking at another manufacturer for airbrushes?
Doug
A goal is not always meant to be reached, it often serves simply as something to aim at.
Bruce Lee
A goal is not always meant to be reached, it often serves simply as something to aim at.
Bruce Lee
-
sdkfzfanatic
- Posts: 18
- Joined: Tue Nov 10, 2009 3:52 am
- Location: Maine, USA
compressor adapter; as in a piece to ensure that the airbrush hose (which comes with all the brands Im looking at) will connect properly with my compressors regulator or 1/4 quick connect I have on it now. The manufacturers are all very vauge about the size and fittings on the lines they provide. (They assume you will buy thier compressor)
"At least the tanks are getting smaller!" - wifes reaction to micro armour.
-
Mk 1
- E5
- Posts: 2383
- Joined: Fri Dec 24, 2004 3:21 am
- Location: Silicon Valley, CA
I don't have an airbrush. Never have. So can't provide any advice on which to get.
But while you are waiting for your airbrush to come in, if you want to get that soft-edged effect to brush painting, try this technique...
Use water-thinned acrylics. Put on the camo pattern that you want soft-edged reasonably heavy -- in a thick layer (doesn't have to be thick brush strokes, just a thick layer of paint). Let it dry for about 1/2 hour. Maybe 10 minutes more, or less, depending on your paints. In my experience with Polly-S acrylics, 30 minutes is about right.
Now go back and do a plain water wash. No tinting. Just brush (more like dab) water onto the model. Let it sit for ~30 - 45 seconds (enough time to dab water onto two or three more models). Then wick it off with your brush, squeezing the brush in your paint rag between wickings to remove most of the water. No brush-strokes while removing the wash. Just wicking by touching the wet model with the brush.
Repeat the process as needed. Each time you do it, you will soften the camo a little.
If the paint was not applied in a reasonably thick layer, you may also dilute the color, and can even get some show-through of the lower levels in the middle of your patterning. So some care might be used in not washing too many times. Brushing, rather than just dabbing, when you wick will increase the softening of the edges of the camo pattern, but will also increase the dilution of the pattern itself. So depending on the effect you want, you might try brushing the water off.
This approach also works with pen-inked camo patterns.
Hope that helps.
-Mark 1
Difficile est, saturam non scribere.
"It is hard NOT to write satire." - Decimus Iunius Juvenalis, 1st Century AD
Difficile est, saturam non scribere.
"It is hard NOT to write satire." - Decimus Iunius Juvenalis, 1st Century AD
-
sdkfzfanatic
- Posts: 18
- Joined: Tue Nov 10, 2009 3:52 am
- Location: Maine, USA
Mark, thank you. This is going into the notebook (23 pages already) of micro armor doctrine. Im anxious for the airbrush but as I said I tend to favor handpainting with a brush and this technique will be very handy. Thanks again.
"At least the tanks are getting smaller!" - wifes reaction to micro armour.
-
Mk 1
- E5
- Posts: 2383
- Joined: Fri Dec 24, 2004 3:21 am
- Location: Silicon Valley, CA
I've been looking through my photos to see if I have any that show the results of this technique.sdkfzfanatic wrote:... I tend to favor handpainting with a brush and this technique will be very handy.
About the best I've come to so far are a few images of my Italian light armor:
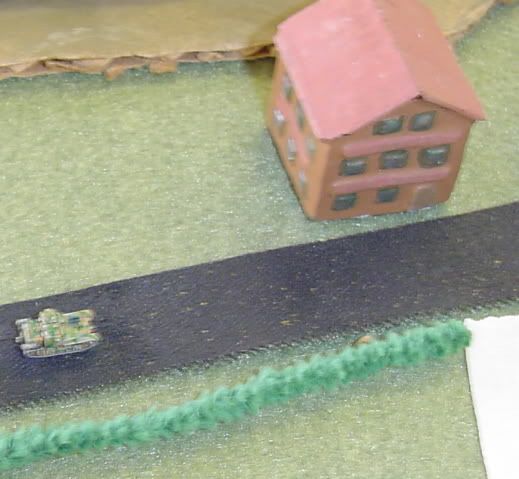
This is a mid-game photo of one of my Italian L3s charging up a road to square off against the French in 1940.

Here is a posed pic that also shows some of my L3s (even though the intent was to show the M11s).
My L3s were painted with a base-coat of Italian Desert Yellow. Then I added a fairly tight squiggley pattern of green using a razor-point green pen. Then I did two or three water washes as described above. With pen-and-ink I found less impact from the amount of time I waited... whenever I washed it seemed to work. But it was more important to wick rather than brush the wash off ... when I brushed the results were very poor ... basically washed away the pattern. But wicking, and then allowing ample time for the remaining water to fully dry, and then repeating the process two or three times, worked well.

By comparison my Italian AB-41 armored cars have seen the exact same paint + pen approach, but were only washed once (with my normal darkened wash -- for weathering and detailing). You may observe that the camo lines are far more clearly edged.
Hope that helps.
-Mark 1
Difficile est, saturam non scribere.
"It is hard NOT to write satire." - Decimus Iunius Juvenalis, 1st Century AD
Difficile est, saturam non scribere.
"It is hard NOT to write satire." - Decimus Iunius Juvenalis, 1st Century AD
-
6mmwargaming
- E5
- Posts: 347
- Joined: Sun Mar 11, 2007 9:30 am
- Location: New Zealand
- Contact:
Hi
I brought a Delta airbrush (chinese knock off) and it is good for base colours but it srtruggled to do camo on 1/300th vehicles. I tried thininng the paint and dropping the pressure down but it was tough to get consistent results. Then I got my hands on a Iwata HP-CH and it is great for fine lines (about 1mm thick), has a finer spray, good sized cup and clogs less.
However Iwata are expensive so you may want to look around.
You definitely want a compressor with a flow regulator and a moisture trap. I find I spray with a pressure between 20-30psi so i dont know if a builders compressor will handle that well. Mine is a Delta compressor without a tank and seems to work well. Most of the adapters are 1/4 inch although I brought a cheap hardware store airbrush and it was slightly different!
I tend to use my Delta of basecoats and the Iwata for detailed work. Basecoating models with an airbrush gives you much more control over how much paint you cover it with and I find I see a lot more detail on the models after a basecoat than with a brush coat.
One useful tip i found out recently was that baby wipes are great for cleaning you airbrush with (as well as bottoms)! I couldnt find and spare cloths so I raided the babies supply of wipes and they were brilliant. They remove acrylic paint very well and dont tend to leave fibres in the brush to clog it.
Cheers
kieran
-
sdkfzfanatic
- Posts: 18
- Joined: Tue Nov 10, 2009 3:52 am
- Location: Maine, USA
6mm, thank you that was very helpful. Im looking at iwata HP's right now and think I will go with the B or SB model. After looking at the aztecs I found the smallest nozzle is .30mm and not recomended for acrylics. The info on the adapter size was very welcomed, my own digging has found most airbrushes have a 1/4 or 1/8 inch male quick connect. As far as the compressor Im using, its my smallest one and will easily regulate 20-30psi accurately as well as having the moisture trap/filter.
"At least the tanks are getting smaller!" - wifes reaction to micro armour.
-
6mmwargaming
- E5
- Posts: 347
- Joined: Sun Mar 11, 2007 9:30 am
- Location: New Zealand
- Contact:
Its sounds like you are on the right track. Its a learning curve to get the hang of it so practice on stuff you dont mind throwing out or stripping And you will spend a lot of time cleaning it (get some window cleaner - the blue stuff like windex)
Then of course you have to worry about different paint brands and which type of thinner to use!
My Iwata has a .3mm nozzle and will definitely spray acyrlics (thats all I spray) but you want the paint to has the consistency of milk.
Quick release adapters are handy if you switch airbrush during a session. Somethings I wish I had them but not often. Another thing regarding compressors is that some people prefer one that has a tank. I've never tried one but I believe it is meant to be better.
Cheers
Kieran