So I am trying to paint up a Panther D with a somewhat mottled look similar to this:http://www.network54.com/Forum/110741/t ... iew+Thread
My airbrush doesn't quite cut it at this scale for something like this, so I have been trying to create this look with a brush. So far i have been very unsuccessful at getting anywhere near this look.
Does anyone have any techniques they use when trying to mimic a sprayed on camouflage?
Thanks!
Steve
Painting Techniques for Sprayed Camouflage
Moderators: dnichols, GHQ, Mk 1
-
Dog Smack
- E5
- Posts: 162
- Joined: Wed Apr 09, 2008 7:02 am
-
BattlerBritain
- E5
- Posts: 628
- Joined: Fri Apr 29, 2005 7:00 pm
- Location: Somerset, UK
-
Cav Dog
- E5
- Posts: 897
- Joined: Wed Dec 29, 2004 1:12 am
http://www.wwpd.net/2011/06/german-camo ... orial.html
This may be a bit much for this scale but it seems to work. I have seen other tutorials where the camo is applied beginning with a fairly translucent coat and then adding a deeper and more opaque coat to the center of the camo pattern similar to the above link.
This may be a bit much for this scale but it seems to work. I have seen other tutorials where the camo is applied beginning with a fairly translucent coat and then adding a deeper and more opaque coat to the center of the camo pattern similar to the above link.
Tactics are the opinion of the senior officer present.
-
Extra Crispy
- E5
- Posts: 992
- Joined: Fri Jul 28, 2006 7:56 pm
- Location: Edgewater, NJ
- Contact:
-
Dog Smack
- E5
- Posts: 162
- Joined: Wed Apr 09, 2008 7:02 am
Fellas,
Thanks for the tips. I'll give them a shot. I agree that what I'm trying to achieve is much easier in a larger scale....but I don't care! I want my 1/285 minis to look like the 1/35 scale models!!!! Or at least I can try to make them look like that. Hopefully I'll have some results worth sharing.
Steve
-
piersyf
- E5
- Posts: 625
- Joined: Sat Oct 04, 2008 1:59 pm
- Location: Melbourne Australia
It very much depends on the type of paint you use. You haven't stated your preference.
Acrylics dry fast, so the best way to get a soft edge is dry stipple (like dry brushing, only a more jabbing motion... go over the middle of the area again to increase the paint coverage there).
If you use oils and mix your own paint colours you can utilize the wet in wet capacity of the slow drying times.
I've tried using retarders in acrylics to achieve the same thing, but it doesn't work quite the same way, unfortunately.
In water colour painting (applicable to acrylics) there's 'glazing'. Water colour also uses a wet canvas to avoid 'scarring' or hard edges when the paint dries. Basically this means using a heavily thinned paint (like a filter) and painting over a damp mini. You want the filter wash to be only just dense enough to see. Yoy'll need about 3 coats before you can start thickening the paint towards the centre of your band of colour.
There is no right or wrong, only decisions and consequences.
-
Gompel
- E5
- Posts: 163
- Joined: Tue Dec 02, 2008 3:21 pm
- Location: The Netherlands
- Contact:
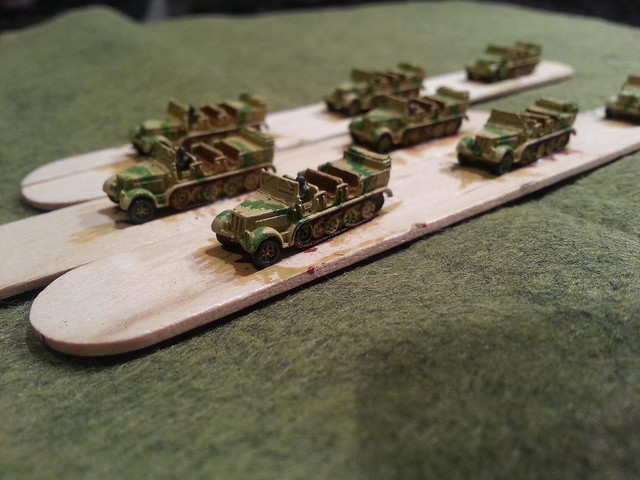
At this scale I think a brush is fine to give it a sprayed look.
Here's my best attempt, all done with brushes and Vallejo model color paint:

I primed the miniature in a light gray color. Then brushed on the yellow watered down paint. After that, the also water down green and brown so that the yellow underground comes through a bit. At this point my colours were lighter than you would want them for the final look. The last bit is the hardest and you need to practise a little and see what you like. I add some kind of a wash to the whole model. It's more like a transparent layer of paint. It's a mixture of a grey brownish paint, water and matt medium. The matt medium is very important because if you water down the paint too much it won't look nice when dried (puddles of paint dry up messy) and the paint won't be thick enough to stay on the flat surfaces. This layer blends all the other layers so you get rid of the sharp edges, especially if you look from a distance. The layer also darkens the crevasses. After that, I did a dry brush in the same yellow as the base color.
Here's my best attempt, all done with brushes and Vallejo model color paint:
I primed the miniature in a light gray color. Then brushed on the yellow watered down paint. After that, the also water down green and brown so that the yellow underground comes through a bit. At this point my colours were lighter than you would want them for the final look. The last bit is the hardest and you need to practise a little and see what you like. I add some kind of a wash to the whole model. It's more like a transparent layer of paint. It's a mixture of a grey brownish paint, water and matt medium. The matt medium is very important because if you water down the paint too much it won't look nice when dried (puddles of paint dry up messy) and the paint won't be thick enough to stay on the flat surfaces. This layer blends all the other layers so you get rid of the sharp edges, especially if you look from a distance. The layer also darkens the crevasses. After that, I did a dry brush in the same yellow as the base color.
-
pmskaar
- E5
- Posts: 2195
- Joined: Sun Apr 17, 2005 5:45 am
Sprayed on Camouflage
Very nice work on the Hetzer, Gompel.
Pete
Pete