Quick question about basing inf. on bases. When you all do your inf. stands ie. HQ, CO, Squads, eng. How many do you usually mount per base? I'm taking basing individual inf. figures.
fullmetaljacket
Question about basing inf.
Moderators: dnichols, GHQ, Mk 1
-
fullmetaljacket
- E5
- Posts: 407
- Joined: Sun Mar 20, 2005 2:18 am
- Location: Warsaw, Indiana
-
Extra Crispy
- E5
- Posts: 992
- Joined: Fri Jul 28, 2006 7:56 pm
- Location: Edgewater, NJ
- Contact:
Well, I'm basing for Flames of War and other similar scale rule sets. So team bases are 4-6 and command bases are usually 2 or 3 as are other small bases like FOOs, snipers, etc.
Here you can see my Germans. The majority of the bases are half normal FoW size (25 x 16mm). The smaller bases are 15x15mm. The color baeds are a unit ID system. 1st platoon gets 1 red bead, 2nd gets 2, third gets 3. So each company has a color. Command stands get a white bead. Special stands get another bead of another color to ID special weapons or whatever.

Here you can see my Germans. The majority of the bases are half normal FoW size (25 x 16mm). The smaller bases are 15x15mm. The color baeds are a unit ID system. 1st platoon gets 1 red bead, 2nd gets 2, third gets 3. So each company has a color. Command stands get a white bead. Special stands get another bead of another color to ID special weapons or whatever.
Mark Severin
Owner, Scale Creep Miniatures
Author DeepFriedHappyMice.com
Owner, Scale Creep Miniatures
Author DeepFriedHappyMice.com
-
BattlerBritain
- E5
- Posts: 628
- Joined: Fri Apr 29, 2005 7:00 pm
- Location: Somerset, UK
My bases are about the same size, 25mm by 15mm for a squad and 15mm by 15mm for a crew, eg HMG or Bazooka.
Here's a close in shot of some examples of Germans:

I use 5 figures for a squad, 2 to 3 for a crew. Any more and the stand looks crowded, plus you can get more stands.
88mm gun crews are a bit bigger at about 40mm by 40mm, or whatever size you need to fit them on. I use 40thou plastic card as my basing material. Some use MDF, which is now popular:

Some example Russians:

Here's a close in shot of some examples of Germans:
I use 5 figures for a squad, 2 to 3 for a crew. Any more and the stand looks crowded, plus you can get more stands.
88mm gun crews are a bit bigger at about 40mm by 40mm, or whatever size you need to fit them on. I use 40thou plastic card as my basing material. Some use MDF, which is now popular:
Some example Russians:
Last edited by BattlerBritain on Mon Jul 17, 2017 2:31 am, edited 1 time in total.
-
Mech
- Posts: 12
- Joined: Thu Sep 04, 2014 4:29 am

-
Mk 1
- E5
- Posts: 2383
- Joined: Fri Dec 24, 2004 3:21 am
- Location: Silicon Valley, CA
Re: Question about basing inf.
I base my figures for squad-per-stand rules, but with a back-up capability to do fireteam-per-stand if needs be.fullmetaljacket wrote:When you all do your inf. stands ie. HQ, CO, Squads, eng. How many do you usually mount per base? I'm taking basing individual inf. figures.
I have tried many approaches. This is what I have settled on.
I put 4 figures per full-strength squad. In most cases these 4 figures will represent 8-12 men. I don't worry too much about not having enough figures ... there seem to be enough to make a platoon look like a bunch, and to make a company look like a LOT of men!
I use 3 figures for special-purpose squads. These are generally squad-sized units but not equipped as normal infantry squads. Could be engineering squads, or gun crews, or unit HQs (if the HQ has a squad-sized compliment of men).
I use 2 figures to represent half-squads. These are usually weapons teams. Can be command or commo or medical or vehicle crew teams, whatever. They are fewer than 8-12 men.
This makes it easy for me to distinguish them on the battlefield, and yet makes for a pretty nice appearance.
By way of example here are my Romanians:
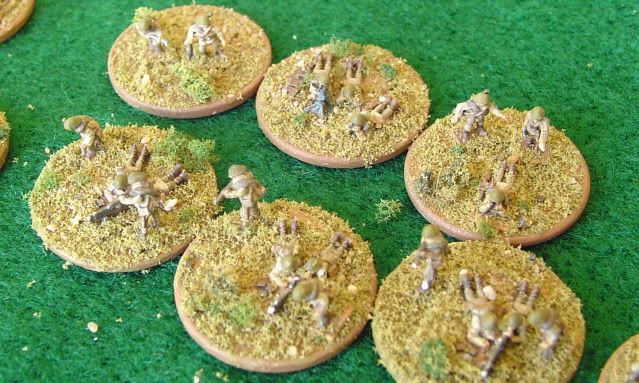
Here is a platoon. In 1941 the Romanian platoon was larger than most. I have it as 4 squads, with a full-sized platoon HQ squad, and a 60mm mortar squad. For later war I might remove one of the squads, but add a tank-hunter team (2-man team shown).

The company makes a pretty big collection of figures. (A company HQ adds commo and medical teams as well.)

The arty is served by a forward observer team, and a commo team (field telephone, no radios for my poor Romanian infantry!). Making the commo teams separate gives me the ability to provide very restrictive commo ... they have limited movement, and command or FO teams need to be co-located with them when they want to send or receive messages.

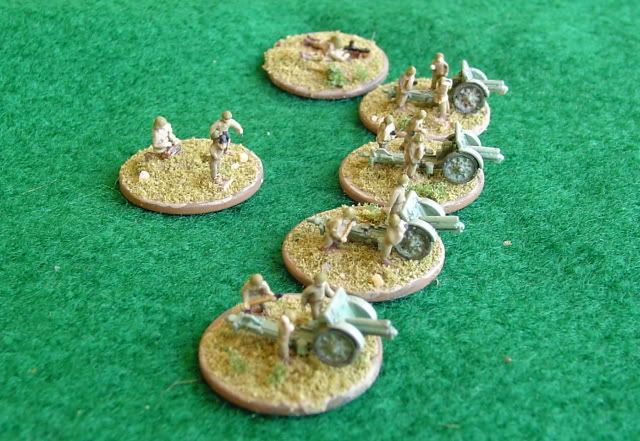
Arty and AT gun crews are mounted to bases, but the guns are loose, and can be placed on the base as needed. I can use the same gun crew bases for different weapons, depending on the scenario.
The basing is consistent ... everything mounted on a penny. The difference in the number of figures makes it all clear enough for me on the table, and matches well with most of the rules I play. If needs be, I have mounted some all-rifles 4-man bases that can be used with the rifles + LMG bases to make squads if I wind up playing rules that are fire-team based, but I have such a strong distaste for such rules that this is an outside chance.
Your mileage may vary.
-Mark 1
Difficile est, saturam non scribere.
"It is hard NOT to write satire." - Decimus Iunius Juvenalis, 1st Century AD
Difficile est, saturam non scribere.
"It is hard NOT to write satire." - Decimus Iunius Juvenalis, 1st Century AD
-
Nepty
- E5
- Posts: 111
- Joined: Mon Nov 28, 2011 7:57 pm
Penny bases
Great Idea,
you get to keep your pennies instead of spending them.
Nice job
you get to keep your pennies instead of spending them.
Nice job
-
Cav Dog
- E5
- Posts: 893
- Joined: Wed Dec 29, 2004 1:12 am
I usually use 5/8" styrene squares. Evergreen and others sell strips of styrene that are 24" long x 1 1/4" wide x .020" thick. I cut them into 5/8" long strips and then cut those in half.
Here are a couple of examples:
 [/img]
 [/img]
 [/img]
Bases aren't finished yet.
 [/img]
I also found a 1" round stencil cutter so I experimented with round bases cut from .010" think sheet styrene:
 [/img]
 [/img]
I also made some field works for AT guns, AA guns and mortars out speckling compound and styrene shapes all based on a styrene base.:
 [/img]
 [/img]
 [/img]
Here are a couple of examples:
[/img][/img][/img]Bases aren't finished yet.
[/img]I also found a 1" round stencil cutter so I experimented with round bases cut from .010" think sheet styrene:
[/img][/img]I also made some field works for AT guns, AA guns and mortars out speckling compound and styrene shapes all based on a styrene base.:
[/img][/img][/img]Tactics are the opinion of the senior officer present.
-
Hoth_902
- E5
- Posts: 1538
- Joined: Wed Jun 18, 2014 11:08 am
- Location: Pacific Northwest
- Contact:
-
Extra Crispy
- E5
- Posts: 992
- Joined: Fri Jul 28, 2006 7:56 pm
- Location: Edgewater, NJ
- Contact:
I use the same system for all my figures 15mm and under:
(1) Paint the base a dark color (doesn't matter what color - green, blue, brown - anything to kill the reflection of the steel.
(2) Using white glue, slightly thinned, cover the base with blue then dip in fine sand with a little small ballast mixed in for texture. Let dry overnight.
(3) Apply brown ink wash to sand. Let dry overnight.
(4) Dry brush with a light tan - Bone, Dark Sand, etc. Just not white.
(5) Apply splotches of white glue and dip in preferred flock mixture.
(6) OPTIONAL: On large bases with open space (like deployed artillery guns) add one or two pieces of grass clumps, just to break things up a tad.
(7) Spray with preferred lacquer (I like Testor's DullCoat)
(8) Paint edge of base Olive Green.[/list]
Mark Severin
Owner, Scale Creep Miniatures
Author DeepFriedHappyMice.com
Owner, Scale Creep Miniatures
Author DeepFriedHappyMice.com
-
Mk 1
- E5
- Posts: 2383
- Joined: Fri Dec 24, 2004 3:21 am
- Location: Silicon Valley, CA
My approach to the basing is somewhat simpler than Extra Crispy's.
1 ) Paint the pennies. I use cheap craft-store acrylic paints. My current preferred color is "mushroom" (a very dull brown). But chose your own preferred "dirt" color. The detailing of the pennies is not very important ( ). Even full coverage is not important. But you do want to get reasonable coverage on the edges. Let dry for about 20 minutes. More if you have something to do. Leave 'em in the sun, even, if it's a nice day. The sunshine bakes the finish nicely and makes it very tough.
2 ) Mix some of the same paint into acrylic gel medium in a tub. Just enough paint to give it the same tint. Don't worry about any residual transparency in the medium.
3 ) Put big globs of the tinted gel medium onto some pennies. I find that 3 or 4 pennies at a time is about the right quantity. Smush it around with a paint brush to reasonably cover the top of each penny.
4 ) Chose the already-painted infantry figures you plan to base on a penny. Push them down into the glob of gel medium on the penny. Use a small (not micro-fine, just small) paintbrush to dab a bit of the gel medium onto the top of the molded-on figure bases between and around the figures' feet (or their bodies if prone). Do this with all 3 or 4 stands.
5 ) Dribble some sand / ballast, and some small RR shrubbery, around the figures on the pennies. Then bury the pennies in flocking. Yep, just pour a bunch of flocking on top until they are buried. Leave them for about half an hour (while you do 3 or 4 other sets of 3 or 4 stands).
6 ) Gently pick up the stands and tap them on their sides. The excess flocking will fall off. Collect this excess to be re-used for later sets of stands. Use a clean dry paintbrush to wipe any residual flocking off of the figures on the stand.
7 ) After another hour or so of drying time, spray with dullcote.
In about 2 1/2 to 3 hours I can base a company of infantry.
If you don't know what acrylic medium is, it's the stuff that acrylic paints are made from. Basically it is un-tinted paint. If you get gel medium, it will have the texture of pudding. Much easier to work with than white glue, and it has excellent adhesion (you can buy acrylic glues too ... same stuff, different label. If you buy it as gel medium you get A LOT more for your money). So you are using one product that can provide both the texture/depth and the adhesion you want on your stand. And it holds color as well as the paint you are using, which is, after all, the same stuff!
So the acrylic gel medium will hold the figures onto the base, give texture to the base, provide the color to the base, and hold the shrubbery and flocking onto the base, all in one.
And one great advantage of using pennies is that I never find I am just a few bases short of completing my project. I can always find a few more pennies between the sofa cushions if need be.
Works for me.
1 ) Paint the pennies. I use cheap craft-store acrylic paints. My current preferred color is "mushroom" (a very dull brown). But chose your own preferred "dirt" color. The detailing of the pennies is not very important (
2 ) Mix some of the same paint into acrylic gel medium in a tub. Just enough paint to give it the same tint. Don't worry about any residual transparency in the medium.
3 ) Put big globs of the tinted gel medium onto some pennies. I find that 3 or 4 pennies at a time is about the right quantity. Smush it around with a paint brush to reasonably cover the top of each penny.
4 ) Chose the already-painted infantry figures you plan to base on a penny. Push them down into the glob of gel medium on the penny. Use a small (not micro-fine, just small) paintbrush to dab a bit of the gel medium onto the top of the molded-on figure bases between and around the figures' feet (or their bodies if prone). Do this with all 3 or 4 stands.
5 ) Dribble some sand / ballast, and some small RR shrubbery, around the figures on the pennies. Then bury the pennies in flocking. Yep, just pour a bunch of flocking on top until they are buried. Leave them for about half an hour (while you do 3 or 4 other sets of 3 or 4 stands).
6 ) Gently pick up the stands and tap them on their sides. The excess flocking will fall off. Collect this excess to be re-used for later sets of stands. Use a clean dry paintbrush to wipe any residual flocking off of the figures on the stand.
7 ) After another hour or so of drying time, spray with dullcote.
In about 2 1/2 to 3 hours I can base a company of infantry.
If you don't know what acrylic medium is, it's the stuff that acrylic paints are made from. Basically it is un-tinted paint. If you get gel medium, it will have the texture of pudding. Much easier to work with than white glue, and it has excellent adhesion (you can buy acrylic glues too ... same stuff, different label. If you buy it as gel medium you get A LOT more for your money). So you are using one product that can provide both the texture/depth and the adhesion you want on your stand. And it holds color as well as the paint you are using, which is, after all, the same stuff!
So the acrylic gel medium will hold the figures onto the base, give texture to the base, provide the color to the base, and hold the shrubbery and flocking onto the base, all in one.
And one great advantage of using pennies is that I never find I am just a few bases short of completing my project. I can always find a few more pennies between the sofa cushions if need be.
Works for me.
-Mark 1
Difficile est, saturam non scribere.
"It is hard NOT to write satire." - Decimus Iunius Juvenalis, 1st Century AD
Difficile est, saturam non scribere.
"It is hard NOT to write satire." - Decimus Iunius Juvenalis, 1st Century AD