Pete's Place
Moderators: dnichols, GHQ, Mk 1
-
redleg
- E5
- Posts: 3880
- Joined: Fri Dec 17, 2004 11:02 am
- Location: Riverside, CA
Re: Pete's Place
Fantastic work Pete! The sots with the washed and unwashed vehicles side by side is brilliant! Sometimes I ask myself if a wash is really worth the trouble and you have answered that question with a resounding YES!
-
Tanker Mike
- Posts: 78
- Joined: Sat Oct 23, 2004 11:51 pm
- Location: Indiana
Re: Pete's Place
Yes please!! How about some details?Hoth_902 wrote: ↑Tue Jun 25, 2024 1:05 amPete,
Amy I correct in assuming that you are using an acrylic wash over the Enamel paint? This does not appear to be just a pin wash where you have applied the wash so that it goes only into the cracks, but also appears to stain all of the paint.. This would lead me to believe that you use a wash over the dull coat paint or apply a clear dull coat and then the wash.. Is that correct? Please provide some details to your wash process.
Great Job how ever you do it.
-
pmskaar
- E5
- Posts: 2210
- Joined: Sun Apr 17, 2005 5:45 am
Re: Pete's Place
Thanks very much, Hoth, Redleg, and Tanker Mike! I appreciate it.
The formula is not a secret at all as I used the basic old GHQ recipe from years ago. I will provide the details in my next post.
The formula is not a secret at all as I used the basic old GHQ recipe from years ago. I will provide the details in my next post.
-
foxbat
- E5
- Posts: 304
- Joined: Tue Dec 29, 2009 2:01 am
- Location: France
Re: Pete's Place
Excellent job, thanks for sharing your techniques. Kudos on painting the wheel bandages at that scale, really impressive! 
-
pmskaar
- E5
- Posts: 2210
- Joined: Sun Apr 17, 2005 5:45 am
Re: Pete's Place
Thank you very much, Foxbat!
Here is my basic wash formula plus some other things I use in my painting.
The formula I use is an old GHQ formula that I think I saw in their painting guides that used to come with the Combat Commands. There was also a painting guide in the old Avalon Hill Advanced Squad Leader rule book believe it or not.
From these painting guides I learned a couple things. 1. The wash makes the vehicle "pop". 2. Applying a coat of "dust" with an airbrush.
GHQ had a formula for a Turpentine based black wash consisting of 7 parts turpentine to 1 part paint for the upper part of the vehicle. For the roadwheels and chassis/lower hull they suggested 4 parts turpentine to 1 part paint.
For my black wash, I used Humbrol #33 Matt Black mixed with Grumbacher Artists Turpentine although I have been using Windsor and Newton Distilled Turpentine lately because Michael's does not seem at have Grumbacher any more - at least the one near me. Both of these work fine.
I also have developed a dark brown wash for lighter colored vehicles such as North Africa and German Dunkelgelb. This one is #33 Matt Black combined with #98 Chocolate Brown. These are enamel based paints that I use.
For both my washes, I have, over the years, discarded the exact GHQ formula proportions and maybe am closer to the 1-4 than the 1-7 range. This is because of how I do it.
Here is my method.
1. Coat entire vehicle with the wash and let sit for a couple hours or even a day. At this stage, the wash is all over the vehicle and while it does settle into the recesses, there will still be wash that settles where you don't want it, namely flat surfaces and even raised areas.
2. Take a small amount of clear turpentine and use a flat brush soaked in the turpentine to wipe over the vehicle. You are looking to get the wash off the flat and raised areas and down into the recesses where it belongs.
* I give credit to my good friend, Begemot, for this step. It is not in the manual and I was having to go back and dry brush the vehicle to get rid of the dark spots on the flat and raised areas. This is much simpler and better. Having washed the whole vehicle, the wash will make the overall vehicle look just a bit darker but not too much.
3. Let the vehicles stand for a bet. They will dry off after a while and then proceed to step 4.
4. Pin wash the areas you wand to emphasize with more wash. Panel lines and other areas may need a bit more wash to bring them out. I add more wash with a fine brush to these areas only and let dry.
5. Using smaller brushes, I wipe the excess wash into the recessed areas to make them stand out better. Sometimes the wash does not always want to stay in the panel lines. I have been doing this for years now and find that a bit of patience helps. You might have to touch up some areas more than once.
6. Bake. Once I am satisfied that the wash is exactly where I want it and the excess is off the model I now bake the model in my toaster oven. My wife has nixed the idea of baking them in our oven but the toaster oven works great.
The models are placed on a wooden board (I have an old one just for this). I then carefully put the board in the oven and set the temperature for 200 degrees and bake for 20 minutes. This sets the wash and evaporates the excess turpentine.
7. After things cool, I check the models again to be sure I don't have any additional wash to apply in a particular area. If I do, I add some wash to the particular area and repeat steps 4-6. If not, I now add highlights to the raised areas with a small brush to make them stand out a bit more. The highlights are just the paint color with a bit of extra white added to taste. I am more of a subtle kind of guy so try not to over emphasize things here.
8. Apply decals if you want. I won't go into the details here of how to do that.
9. "Dust" the vehicle. For this, I mix up a light earth tone with a bit of white in one of my Testors jars. I add plenty of paint thinner so that when shaken up it looks more like dirty water.
I have an airbrush and then spray the mixture over the model with the emphasis on the back deck and suspension areas and a bit on the front as well. I also make a pass or two over the rest of the vehicle but very lightly. Spray from a distance as you definitely don't want the wash to pool.
*You might want to use an old model or two to use as a test vehicle first to make sure the wash is not too thick or thin and get the technique down.
10. Apply Dullcoat or other matt varnish over the vehicle. I use Testors Matt Varnish aka Dullcoat out of my airbrush.
11. The metal work. I go over my tow cables and sometimes the MGs with Humbrol Metalcoat Gun Metal, 27004. This is delicate work and I hit those areas with a bit of this color and lightly burnish it with the tip of a finishing nail. Not looking for really shiny here just a hint of metallic at this scale.
I do the same for my tracks. I have had some issues with Humbrol Metalcoat 27003 Polished Steel lately. That was my go-to but I either got a bad batch or something but it gunks up when I add thinner to it rather than thinning evenly. I have sort of solved the problem by using a number 2 pencil on the end connectors and cleats and then burnishing with a finishing nail. In this case, it will be shiny but that is okay as the metal areas get polished by the sand and grit as they make contact with the ground.
That is basically it. If anyone has more questions I will try to answer them.
Thanks!
Last edited by pmskaar on Mon Jul 01, 2024 1:13 am, edited 1 time in total.
-
Mortis57
- E5
- Posts: 344
- Joined: Thu Jan 21, 2010 5:38 pm
- Location: Wirral, England
-
pmskaar
- E5
- Posts: 2210
- Joined: Sun Apr 17, 2005 5:45 am
Re: Pete's Place
Whoopsie! I meant Humbrol #33 Matt Black, Gazza. Sorry about that. I will see if I can edit it to give the correct color. Maybe it was too early in the morning, I don't know what happened there.
-
pmskaar
- E5
- Posts: 2210
- Joined: Sun Apr 17, 2005 5:45 am
Re: Pete's Place
Correction has been made.
-
foxbat
- E5
- Posts: 304
- Joined: Tue Dec 29, 2009 2:01 am
- Location: France
Re: Pete's Place
Thanks!

I am accustomed to working with acrylics, using a Citadel black wash for my ships. But I think this could work fine too for vehicles in bigger scales than 6mm.
This is brilliant! I'd have never thought of it.. Take a small amount of clear turpentine and use a flat brush soaked in the turpentine to wipe over the vehicle. You are looking to get the wash off the flat and raised areas and down into the recesses where it belongs.
* I give credit to my good friend, Begemot, for this step. It is not in the manual and I was having to go back and dry brush the vehicle to get rid of the dark spots on the flat and raised areas. This is much simpler and better. Having washed the whole vehicle, the wash will make the overall vehicle look just a bit darker but not too much.
I am accustomed to working with acrylics, using a Citadel black wash for my ships. But I think this could work fine too for vehicles in bigger scales than 6mm.
-
pmskaar
- E5
- Posts: 2210
- Joined: Sun Apr 17, 2005 5:45 am
Re: Pete's Place
Thanks very much, Foxbat! I will again give credit to Begemot for coming up with this step. It is brilliant in its simplicity and effectiveness.
-
traveller
- Posts: 38
- Joined: Fri Sep 11, 2015 4:09 am
Re: Pete's Place
Hi Pete, I've come rather late to the party, but I've looked through all this post and I'm in awe of your efforts. Everything is absolutely fantastic, vehicles, ships and scenery is to the highest standard I've seen. I had trouble seeing some of the photos of your work as they wouldn't load. Is that a problem for all or only me. Deep in the depths of the thread you said that you would do a small tutorial on how you paint you naval pieces. Did you ever do that? Would love to know a few of your dark arts to producing results that put my efforts to shame. Thanks for your contributions to improving everyones finished models. From a grateful modeller.
-
pmskaar
- E5
- Posts: 2210
- Joined: Sun Apr 17, 2005 5:45 am
Re: Pete's Place
Thank you very much for those kind words and welcome aboard, Traveller! I really appreciate that.
As far as the photos go, I have not heard from anyone else that they are having problems seeing them on the GHQ Forum. I upload my photos through Flicker and it seems to work just fine.
Tutorials. I may do a tutorial on ships and maybe on aircraft as well. I will have to look to see if I have ever done any others here except for the one on washes that I did just a couple days ago. It has been a few years since I finished or even started a ship. I have lots of them that need to be painted and only a few painted in my collection. I hope to rectify that in the coming months. I also need to paint some of my own aircraft. All the aircraft I have painted were for GHQ and their catalog back in the day.
Here are a couple pictures of some of the work I did for GHQ. Lately I have been busy painting more tanks for my Afrika Korps.

F-35B
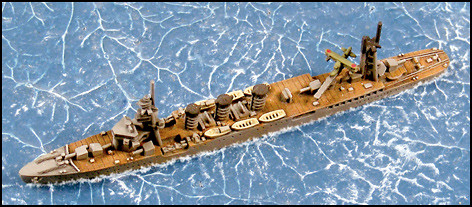
IJN Light Cruiser Kuma
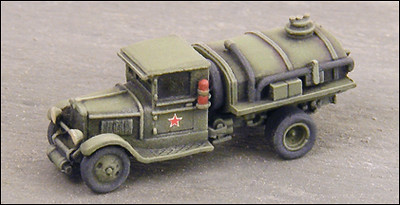
Russian Zis 5 Fuel Truck
As far as the photos go, I have not heard from anyone else that they are having problems seeing them on the GHQ Forum. I upload my photos through Flicker and it seems to work just fine.
Tutorials. I may do a tutorial on ships and maybe on aircraft as well. I will have to look to see if I have ever done any others here except for the one on washes that I did just a couple days ago. It has been a few years since I finished or even started a ship. I have lots of them that need to be painted and only a few painted in my collection. I hope to rectify that in the coming months. I also need to paint some of my own aircraft. All the aircraft I have painted were for GHQ and their catalog back in the day.
Here are a couple pictures of some of the work I did for GHQ. Lately I have been busy painting more tanks for my Afrika Korps.
F-35B
IJN Light Cruiser Kuma
Russian Zis 5 Fuel Truck
-
Mortis57
- E5
- Posts: 344
- Joined: Thu Jan 21, 2010 5:38 pm
- Location: Wirral, England
Re: Pete's Place
I've just had a look through the first 8 pages, and it does appear that some images aren't showing up - they just show the text 'image'. If you click on the upwards pointing arrow after 'pmskaar wrote:' it should take you to the post in question.
Here are a few of the posts (assuming this works)
- all images don't show
- all images don't show
- the image doesn't show
- Some of the river/stream photos don't show
- all images don't show
- all images don't show
- all images don't show
-
pmskaar
- E5
- Posts: 2210
- Joined: Sun Apr 17, 2005 5:45 am
Re: Pete's Place
That is very interesting, Gazza. I did notice that the images are now gone. Not sure what happened exactly. It also appears that this problem occurred in July 2020 but maybe there are others. I now have 80 pages of Pete's Place so I don't know right now.
-
redleg
- E5
- Posts: 3880
- Joined: Fri Dec 17, 2004 11:02 am
- Location: Riverside, CA
Re: Pete's Place
Awesome work Pete! I love that Zis5 Fuel Truck!