Thank you very much, Foxbat and Redleg!
Hi Hoth! I am working on your question. Right now, I believe the rods on the rear right fender are part of the gun cleaning kit but not yet 100% sure yet. I did take a few pictures today. I am awaiting feedback from some other guys to see if they have a different take on these.
Pete's Place
Moderators: dnichols, GHQ, Mk 1
-
Hoth_902
- E5
- Posts: 1565
- Joined: Wed Jun 18, 2014 11:08 am
- Location: Pacific Northwest
- Contact:
Re: Pete's Place
Pete,
Thank for looking into this for me and giving me your opinion. I think I was able to identify all three tools on the forward right fender. Its an ax, the engine crank and a little hook thing.. So that gets me one step closer to everything. I have seen pictures for the rear right that would seem to be what you are talking about.. but the molded tool is hard to make out.. Then on the left side there is a long rectangular thing mid vehicle on the fender and one further back that is on the rear left fender... Ugh... getting closer though.
Thank for looking into this for me and giving me your opinion. I think I was able to identify all three tools on the forward right fender. Its an ax, the engine crank and a little hook thing.. So that gets me one step closer to everything. I have seen pictures for the rear right that would seem to be what you are talking about.. but the molded tool is hard to make out.. Then on the left side there is a long rectangular thing mid vehicle on the fender and one further back that is on the rear left fender... Ugh... getting closer though.
-
pmskaar
- E5
- Posts: 2210
- Joined: Sun Apr 17, 2005 5:45 am
Re: Pete's Place
Hi Hoth
Here are some pictures that I have gotten of other models and even a real vehicle. The bore brush kit consists of wooden rods with metal ends. One of the pieces is the actual brush itself which on the model we are talking about is on left rear over the fender on the side. That should probably be painted a dark gray I think.

This model is closer to the older GHQ Panzer IVF2 with the rods on the left side.

Another view with brush on the bottom of the stack. Looks like a medium gray color from here.

Here is another model Panzer IVF2 showing the cleaning kit plus other tools.

This picture shows the right side of a Panzer IV with tools.

Another Panzer IVF2 with a different arrangement.

Here is the a real Panzer IVF2 somewhere in Russia showing the tool layout. The cleaning rods are prominent here and the brush appears dark gray to black in color in this black and white photo.
Here are some pictures that I have gotten of other models and even a real vehicle. The bore brush kit consists of wooden rods with metal ends. One of the pieces is the actual brush itself which on the model we are talking about is on left rear over the fender on the side. That should probably be painted a dark gray I think.
This model is closer to the older GHQ Panzer IVF2 with the rods on the left side.
Another view with brush on the bottom of the stack. Looks like a medium gray color from here.
Here is another model Panzer IVF2 showing the cleaning kit plus other tools.
This picture shows the right side of a Panzer IV with tools.
Another Panzer IVF2 with a different arrangement.
Here is the a real Panzer IVF2 somewhere in Russia showing the tool layout. The cleaning rods are prominent here and the brush appears dark gray to black in color in this black and white photo.
-
Hoth_902
- E5
- Posts: 1565
- Joined: Wed Jun 18, 2014 11:08 am
- Location: Pacific Northwest
- Contact:
Re: Pete's Place
Hey Pete,
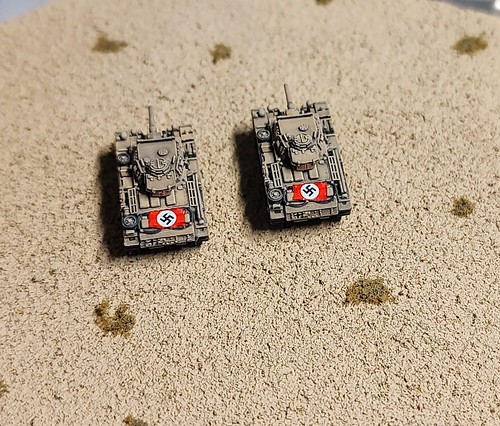
Thanks for all the model pictures and the time put into my question. It really helps out. I think the only thing I am struggling is two pieces on left side and 1 on the right.. See the figure below..
Ugh.. I hate looking at my stuff so close.. they look worse than I thought they did.. LOL. I am my own worst critic. But hey, they are getting there.
-
Hoth_902
- E5
- Posts: 1565
- Joined: Wed Jun 18, 2014 11:08 am
- Location: Pacific Northwest
- Contact:
Re: Pete's Place
Pete,
Another question I had for you. I am going to place an order for the I-94 Aerial recognition flags for my tanks... The ones you have done, just makes them pop. The question I have, is when you set them, do you just lay the decal over and let its set flat and contour to what its attached too or do or can you bunch the decal up a little and then set it and seal it? I feel it looks like you just lay down the decal and let it conform to whats underneath as it sets.
Another question I had for you. I am going to place an order for the I-94 Aerial recognition flags for my tanks... The ones you have done, just makes them pop. The question I have, is when you set them, do you just lay the decal over and let its set flat and contour to what its attached too or do or can you bunch the decal up a little and then set it and seal it? I feel it looks like you just lay down the decal and let it conform to whats underneath as it sets.
-
pmskaar
- E5
- Posts: 2210
- Joined: Sun Apr 17, 2005 5:45 am
Re: Pete's Place
After much deliberation and checking things over, here is Judge Pete's ruling.

The two rods, side by side, on the right rear fender area are gun cleaning rods from what I can tell. Not all Pz IVFs had the exact same tool layout apparently as the pictures of the large scale models and the real thing attest. The gun cleaning rods should be wood with metal ends. The picture of the real Panzer IVF2 shows these as pretty shiny but mine are more dull.

From what I can tell on the two items that you pointed out, the one on the left rear is probably a crow bar/pry bar. The other bar that is forward of that is some sort of bar with an eyelet. I am not sure what this is for, exactly. Both are bare steel it appears and you can check out the models I have posted here for further confirmation. Panzer IVF2 model #431 on the turret shows these items pretty well.
The sculpting on this Panzer IVF2 and the other newer Panzer IV models leaves a bit to be desired. The road wheels and tracks are excellent but the drive sprocket is totally wrong and the idler wheel could be better. Some of the proportions seem off and some of the tool sculpting seems rather basic which is probably why it is hard to tell what some of these are. The tools are much better on some of the other GHQ models and trying to ID things is not too hard.
I would love to see GHQ redo the Panzer IV series with all new sculpts. I find the older Panzer IVs such as the D, F1, Jagdpanzer IV, and a few others are actually better in some respects.
Good luck, Hoth! I hope I have been of help.
The two rods, side by side, on the right rear fender area are gun cleaning rods from what I can tell. Not all Pz IVFs had the exact same tool layout apparently as the pictures of the large scale models and the real thing attest. The gun cleaning rods should be wood with metal ends. The picture of the real Panzer IVF2 shows these as pretty shiny but mine are more dull.
From what I can tell on the two items that you pointed out, the one on the left rear is probably a crow bar/pry bar. The other bar that is forward of that is some sort of bar with an eyelet. I am not sure what this is for, exactly. Both are bare steel it appears and you can check out the models I have posted here for further confirmation. Panzer IVF2 model #431 on the turret shows these items pretty well.
The sculpting on this Panzer IVF2 and the other newer Panzer IV models leaves a bit to be desired. The road wheels and tracks are excellent but the drive sprocket is totally wrong and the idler wheel could be better. Some of the proportions seem off and some of the tool sculpting seems rather basic which is probably why it is hard to tell what some of these are. The tools are much better on some of the other GHQ models and trying to ID things is not too hard.
I would love to see GHQ redo the Panzer IV series with all new sculpts. I find the older Panzer IVs such as the D, F1, Jagdpanzer IV, and a few others are actually better in some respects.
Good luck, Hoth! I hope I have been of help.
-
Cav Dog
- E5
- Posts: 898
- Joined: Wed Dec 29, 2004 1:12 am
Re: Pete's Place
A pry bar is probably right, used for busting tracks etc and the bar with the eyelet is more than likely the Wehrmacht edition of a lug wrench…
Tactics are the opinion of the senior officer present.
-
pmskaar
- E5
- Posts: 2210
- Joined: Sun Apr 17, 2005 5:45 am
Re: Pete's Place
Hi Cav Dog and thank you!
That makes sense to me as a former tanker. On these models in particular it is difficult to tell which is why I checked out pictures of the actual vehicle and well as models to see these up close. I admit that I don't always know things.
That makes sense to me as a former tanker. On these models in particular it is difficult to tell which is why I checked out pictures of the actual vehicle and well as models to see these up close. I admit that I don't always know things.
-
chrisswim
- E5
- Posts: 7342
- Joined: Wed Dec 15, 2004 11:22 pm
- Location: Jacksonville, FL
Re: Pete's Place
The Supreme Pete Court has ruled.
Determined the answer. I concur, not that it matters.
Nice deductive reasoning.
Determined the answer. I concur, not that it matters.
Nice deductive reasoning.
Chris
-
Hoth_902
- E5
- Posts: 1565
- Joined: Wed Jun 18, 2014 11:08 am
- Location: Pacific Northwest
- Contact:
Re: Pete's Place
Pete,
Thanks for the detailed research work. That helps a lot. When I tried to figure what the tools were, I was not sure but though they were what you pointed out. You are right, the molds on these pieces are not the best. Regardless, I have enough to more forward. Thanks for assisting me in moving forward with my model work.
Another question I had for you. I am going to place an order for the I-94 Aerial recognition flags for my tanks... The ones you have done, just makes them pop. The question I have, is when you set them, do you just lay the decal over and let its set flat and contour to what its attached too or do or can you bunch the decal up a little and then set it and seal it? I feel it looks like you just lay down the decal and let it conform to whats underneath as it sets.
-
pmskaar
- E5
- Posts: 2210
- Joined: Sun Apr 17, 2005 5:45 am
Re: Pete's Place
Hi Hoth
When doing the German aerial recognition flags, I put some clear gloss ( Micro Coat Gloss) on the area where the flag goes. I then put the flag down and fix it in place with some Micro Set. Finally, I add some Micro Sol, 1 coat only, to settle the decal to conform to the details. I only use 1 coat as I don't want the decal to look like it was painted on in this case, unlike the German crosses and tactical numbers.
When doing the German aerial recognition flags, I put some clear gloss ( Micro Coat Gloss) on the area where the flag goes. I then put the flag down and fix it in place with some Micro Set. Finally, I add some Micro Sol, 1 coat only, to settle the decal to conform to the details. I only use 1 coat as I don't want the decal to look like it was painted on in this case, unlike the German crosses and tactical numbers.
-
chrisswim
- E5
- Posts: 7342
- Joined: Wed Dec 15, 2004 11:22 pm
- Location: Jacksonville, FL
-
pmskaar
- E5
- Posts: 2210
- Joined: Sun Apr 17, 2005 5:45 am
Re: Pete's Place
Thank you very much, Chris!
-
redleg
- E5
- Posts: 3885
- Joined: Fri Dec 17, 2004 11:02 am
- Location: Riverside, CA
Re: Pete's Place
Beautiful tanks Pete! Always blown away by the detail on your vehicles!
-
pmskaar
- E5
- Posts: 2210
- Joined: Sun Apr 17, 2005 5:45 am
Re: Pete's Place
Gametime! Another North Africa 1942 game with the British and Germans facing off once again.
We had a great game of Mein Panzer at Imperial Outpost Games in Glendale, AZ this last Saturday, October 19th. For this one, I had 2 German players each with a company of tanks and 2 British players each commanding a tank squadron.
This time, I mixed things up a bit. Instead of the usual all Crusader IIs vs Panzer IIIs, I added a Grant squadron in lieu of one Crusader squadron and for the Germans, I gave them one mixed company of Panzer IIIs and IVs. Both German players also got 1 platoon each of 3 Panzer IIs as well.
It was time to get some of those vehicles I have been adding over the last few months into the action...finally.
I also varied the terrain a bit with two larger hills and two small hills.
The main geographical objectives were the crossroads in the village plus 2 designated hilltop hexes. There were also points to be scored for knocking out or brewing up enemy tanks as well.
The game lasted 5 turns or just over 2 hours once we got going. The Germans were able to seize the crossroads for the points. Neither hilltop was as yet occupied although it appeared that the British would get one and the Germans the other.
Losses on both sides were fairly heavy. The Grant squadron was reduced from 3 troops plus the HQ troop down to 1 troop plus the CO tank. The last troop was making a gallant stand on the hill facing the mixed German Pz III/IV company with support from a platoon from the Pz III company.
On the British left side, the Crusaders had only lost 1 tank so far but had virtually eliminated a Panzer III platoon on the German right.
We called the game after 5 turns although I had it slated for 6 to 8 turns but a couple guys had to take off. We awarded the Germans the victory but with a couple more turns I think it would have been close.
Here are a few pictures of the action.

Here is a picture taken by Tim Kulinski, one of the German players, showing the starting forces from the German side. The mixed Pz III/IV company is on the left with the Pz III company on the right. Across the table are the Grants and Crusader IIs.

Getting ready to roll. I had to bring at least a couple of players up to speed on the rules since it had been a while for them. They did great once things got going.

The battle begins as both sides move onto the map.

The Crusader squadron on the British left engages the German Pz III platoon to its front.

On the British right, the Grants are taking heavy casualties. Two troops plus the 2IC tank would be lost this day.

The action in the center. One troop of Crusaders has gone hull down on the small hill while the Germans consolidate in the village. The Panzer II platoon is occupying the crossroads while a Panzer III platoon moves up.

Another view of the action on the German left as they push against the remaining Grant troop. The Germans lost a couple Panzer IIIs to brew-ups being totally destroyed. Several others were knocked out. The Grant with the 2IC was also brewed up.

Here are is the situation when we called the game at the end of Turn 5. The Grants were roughly handled but the Crusaders are almost intact.
The Germans have taken some heavy losses especially to a couple Pz III platoons.
I want to thank the players, Rob B., Tim K., Richard F. and John C. for coming out for a great game. I also want to thank Imperial Outpost Games in Glendale, AZ for letting me host the game in their fine store.
I will try to run another game next month. This time I am looking at either Normandy or possibly Russian Front.
We had a great game of Mein Panzer at Imperial Outpost Games in Glendale, AZ this last Saturday, October 19th. For this one, I had 2 German players each with a company of tanks and 2 British players each commanding a tank squadron.
This time, I mixed things up a bit. Instead of the usual all Crusader IIs vs Panzer IIIs, I added a Grant squadron in lieu of one Crusader squadron and for the Germans, I gave them one mixed company of Panzer IIIs and IVs. Both German players also got 1 platoon each of 3 Panzer IIs as well.
It was time to get some of those vehicles I have been adding over the last few months into the action...finally.
I also varied the terrain a bit with two larger hills and two small hills.
The main geographical objectives were the crossroads in the village plus 2 designated hilltop hexes. There were also points to be scored for knocking out or brewing up enemy tanks as well.
The game lasted 5 turns or just over 2 hours once we got going. The Germans were able to seize the crossroads for the points. Neither hilltop was as yet occupied although it appeared that the British would get one and the Germans the other.
Losses on both sides were fairly heavy. The Grant squadron was reduced from 3 troops plus the HQ troop down to 1 troop plus the CO tank. The last troop was making a gallant stand on the hill facing the mixed German Pz III/IV company with support from a platoon from the Pz III company.
On the British left side, the Crusaders had only lost 1 tank so far but had virtually eliminated a Panzer III platoon on the German right.
We called the game after 5 turns although I had it slated for 6 to 8 turns but a couple guys had to take off. We awarded the Germans the victory but with a couple more turns I think it would have been close.
Here are a few pictures of the action.
Here is a picture taken by Tim Kulinski, one of the German players, showing the starting forces from the German side. The mixed Pz III/IV company is on the left with the Pz III company on the right. Across the table are the Grants and Crusader IIs.
Getting ready to roll. I had to bring at least a couple of players up to speed on the rules since it had been a while for them. They did great once things got going.
The battle begins as both sides move onto the map.
The Crusader squadron on the British left engages the German Pz III platoon to its front.
On the British right, the Grants are taking heavy casualties. Two troops plus the 2IC tank would be lost this day.
The action in the center. One troop of Crusaders has gone hull down on the small hill while the Germans consolidate in the village. The Panzer II platoon is occupying the crossroads while a Panzer III platoon moves up.
Another view of the action on the German left as they push against the remaining Grant troop. The Germans lost a couple Panzer IIIs to brew-ups being totally destroyed. Several others were knocked out. The Grant with the 2IC was also brewed up.
Here are is the situation when we called the game at the end of Turn 5. The Grants were roughly handled but the Crusaders are almost intact.
The Germans have taken some heavy losses especially to a couple Pz III platoons.
I want to thank the players, Rob B., Tim K., Richard F. and John C. for coming out for a great game. I also want to thank Imperial Outpost Games in Glendale, AZ for letting me host the game in their fine store.
I will try to run another game next month. This time I am looking at either Normandy or possibly Russian Front.