
Show us yer stuff!
Moderators: GHQ, dnichols, Mk 1
-
panzergator
- E5
- Posts: 3693
- Joined: Thu Oct 08, 2015 3:44 am
-
redleg
- E5
- Posts: 4136
- Joined: Fri Dec 17, 2004 11:02 am
- Location: Riverside, CA
-
BurtWolf
- E5
- Posts: 1086
- Joined: Sun Feb 03, 2013 11:48 pm
- Location: Rochester, NY
Hoth I feel your pain - I gotten slowly better and more efficient at tires - it’s the tiny ones (and bogey wheels) that kill me now... I look at the catalog and see some of the Crazy good work there and I just cannot wrap my head around how guys are getting individual Lugnuts painted! There is a true natural skill to this I think.
Chris - I love that shot - a sea of antennas!
Mk1 I couldn’t agree more about the caravan look, I like individualizing the pieces within reason. An added piece of stowage, different colored canvas, one muddy or than the next, etc.. I also like the thought of having captured equipment in the ranks, especially transport.
Chris - I love that shot - a sea of antennas!
Mk1 I couldn’t agree more about the caravan look, I like individualizing the pieces within reason. An added piece of stowage, different colored canvas, one muddy or than the next, etc.. I also like the thought of having captured equipment in the ranks, especially transport.
-
BurtWolf
- E5
- Posts: 1086
- Joined: Sun Feb 03, 2013 11:48 pm
- Location: Rochester, NY
My recent pandemic lockdown work to date - mish mash of packs I had laying around so American, Canadians and Germans (40-41, post 43 and Afrika Korps) so far:

Here are some Afrika Korps with new paint scheme inspired by PolishGI. I simply mixed 50/50 light mud and yellow ochre to get that sandy mix - I like it and am going to stick with it for now... My photo does poor justice probably because the sunlight is washing it out (or I'm bad at Iphone picture taking more likely) but trust me it looks dusty!

Some early war Germans, trying to get mud splatter on the vehicles and it is not coming out the way I want it to - any thoughts or hints would be helpful.

Lastly, some artillery. I regret not putting figures in but was afraid that the scale difference may be too pronounced. These suckers are small! Probably to scale but I just could not see stuffing a crew in there.

Here are some Afrika Korps with new paint scheme inspired by PolishGI. I simply mixed 50/50 light mud and yellow ochre to get that sandy mix - I like it and am going to stick with it for now... My photo does poor justice probably because the sunlight is washing it out (or I'm bad at Iphone picture taking more likely) but trust me it looks dusty!
Some early war Germans, trying to get mud splatter on the vehicles and it is not coming out the way I want it to - any thoughts or hints would be helpful.
Lastly, some artillery. I regret not putting figures in but was afraid that the scale difference may be too pronounced. These suckers are small! Probably to scale but I just could not see stuffing a crew in there.
-
Mk 1
- E5
- Posts: 2383
- Joined: Fri Dec 24, 2004 3:21 am
- Location: Silicon Valley, CA
Civil war cannons ...
100mm or 75mm cannons ...
Good guesses. Cannons got you very close. But you have set your sights too high.

Perhaps my original pic was not enough of a close-up. Or there wasn't enough light. So here's a bit of a better look.

They are British gun turntables!

-Mark
100mm or 75mm cannons ...
Good guesses. Cannons got you very close. But you have set your sights too high.
Perhaps my original pic was not enough of a close-up. Or there wasn't enough light. So here's a bit of a better look.
They are British gun turntables!
-Mark
Last edited by Mk 1 on Mon May 25, 2020 1:12 am, edited 1 time in total.
-Mark 1
Difficile est, saturam non scribere.
"It is hard NOT to write satire." - Decimus Iunius Juvenalis, 1st Century AD
Difficile est, saturam non scribere.
"It is hard NOT to write satire." - Decimus Iunius Juvenalis, 1st Century AD
-
Mk 1
- E5
- Posts: 2383
- Joined: Fri Dec 24, 2004 3:21 am
- Location: Silicon Valley, CA
I have tried to do some bogey wheels, but eventually gave up. Except for occasionally painting the tire on an extra bogey that is carried on the hull somewhere. But this comes in part from my observation of tanks first-hand over the years -- bogies may have rubber rims (or not, in some cases), but the amount of dust, rust, and mud on them makes it almost impossible to see black rubber, even at 1-to-1 scale.BurtWolf wrote:Hoth I feel your pain - I gotten slowly better and more efficient at tires - it’s the tiny ones (and bogey wheels) that kill me now...
So I rely on my dry-brushing and washes to give some flavor to my tanks' bogey wheels.
I am pretty sure that's all just an effective use of dry-brushing. At least that's how I do it.I just cannot wrap my head around how guys are getting individual Lugnuts painted!


For example, here are a couple pics of my Romanian R-2 tanks. In the close-up you may see that the rivets on the hull and turret are all highlighted. But I assure you, I did not paint each and every one! It was all done with dry-brushing.
My problem is that whole "within reason" bit.Mk1 I couldn’t agree more about the caravan look, I like individualizing the pieces within reason. An added piece of stowage, different colored canvas, one muddy or than the next, etc..
I currently have some US tank destroyers on my workbench. I am afraid I have lost all sight of reason.
I have had a few M10s (from another vendor) in my "active forces" box since about forever. But more recently I have acquired some GHQ M10s and M36s, and I am trying to build a proper company of TDs for ETO based on M10s with a few M36s.

But alas, I set a pretty high bar for myself with my M3 TDs that I did about 12 years ago.

Not only did I put crews in the tracks, but I also put camo nets on them in a variety of locations. Proper stowage guidelines from the FM aside, it seems that in theater the crews put their nets many places on the tracks, including over the front of the gunshield. So again, a bit of variety was in order.
And lest anyone conclude I went far overboard with dry brushing, I might add that I made a deliberate attempt to duplicate how US Army units used mops or brooms to splash stripes of local mud all over their vehicles, which was a fairly common approach to breaking up the stand-out green vehicles in Tunisia.
So with all of that as background, I am now working on a company of TDs that has M10s from two vendors that I want to blend together, and M36s, and they are all open-topped, but I can't just drop arty crew figures in like I could with the M3s, so I'm painting and clipping mortar crews and kneeling gun crews and arty crews and gun-at-hip infantry figures and what-not, but for 15 vehicles that's a LOT of painting, clipping, and fitting (the company only needs 12, but the TDs come in packs of 5, and doing up all 15 gives me flexibility for how many M10s vs. M36s I might deploy in any given scenario).
And then I'm adding rolled tarps and kit stowage to diversify the GHQ models a bit so the other vendor's M10s don't stand out so much. And then of course the GHQ models have all that delicious detailing, like towing cables and tools on the hulls, that deserve detailing too. And of course I am d@mned fool enough to paint my white stars (and circle-stars), which is a bit of a pain.
In total ... OOFTAH! this set of TDs is taking a long time! We'll see if they look worthy, or just a mess, when I'm done.
-Mark
-Mark 1
Difficile est, saturam non scribere.
"It is hard NOT to write satire." - Decimus Iunius Juvenalis, 1st Century AD
Difficile est, saturam non scribere.
"It is hard NOT to write satire." - Decimus Iunius Juvenalis, 1st Century AD


-
PolishGI
- E5
- Posts: 833
- Joined: Wed Jun 19, 2013 2:57 am
- Location: SW USA
Mark, nice setup for the infantry! Trucks look great.
Haha You guys are discussing the misery of almost everyone on this board… wheels and tires… lol
Nice job on the color scheme Burt. I like it. Who can say what the right shade is? So many different variations of colors, new and faded…
Wow, Chris, looks great. How many pieces do you have? I fear you will respond with... what era? what country? what conflict? Your question needs to be more specific! LOL
It is way cool to see more and more people posting. Such great work from so many different vantage points. Very cool. Thank you to all, your work helps keep me going and motivated.
More WIP pics here in MY THREAD.


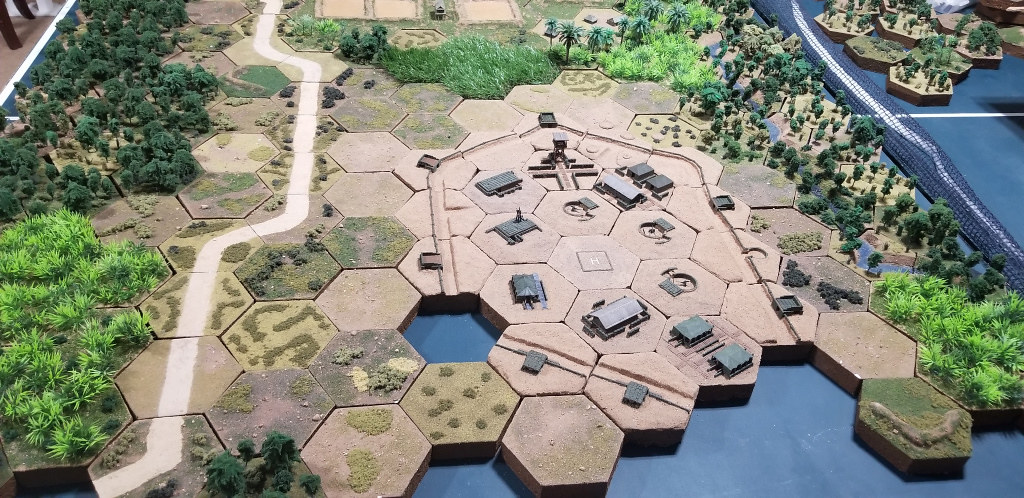

Initial crater markers as per Burt’s request.

Haha You guys are discussing the misery of almost everyone on this board… wheels and tires… lol
Nice job on the color scheme Burt. I like it. Who can say what the right shade is? So many different variations of colors, new and faded…
Wow, Chris, looks great. How many pieces do you have? I fear you will respond with... what era? what country? what conflict? Your question needs to be more specific! LOL
It is way cool to see more and more people posting. Such great work from so many different vantage points. Very cool. Thank you to all, your work helps keep me going and motivated.
More WIP pics here in MY THREAD.
Initial crater markers as per Burt’s request.
 Charlie don't surf!
-
BurtWolf
- E5
- Posts: 1086
- Joined: Sun Feb 03, 2013 11:48 pm
- Location: Rochester, NY
Mk1 - can’t wait to see those TDs and all the extras you add. You’re right about dry brushing and I have to give you credit. Yesterday I was painting some bogey wheels on some Pzkw IV F1s and trying out a new method of painting them - paint solid rubber color and then going back and trying to paint the interior of them. Ugggghhh... Mind numbing task especially since I had aN average paintbrush and 50 year old eyes. It looks like a totally cobbed job, so I repainted them solid rubber and just dry brushed. I was thinking of your comments about the bogey wheels looking dusty and dirty and hardly rubber like. Wouldn’t you know that it looks pretty darn good that way, so hats off to you!
Polish - that game board is excellent, inspiring, and ready for war. I hope you are gaming on it soon.
Barrels! I saw barrels!!!! Your 3D printing?? They look good from here are you happy with them? Can you 3D print smaller bits of stowage and extra wheels etc?
Polish - that game board is excellent, inspiring, and ready for war. I hope you are gaming on it soon.
Barrels! I saw barrels!!!! Your 3D printing?? They look good from here are you happy with them? Can you 3D print smaller bits of stowage and extra wheels etc?
-
BurtWolf
- E5
- Posts: 1086
- Joined: Sun Feb 03, 2013 11:48 pm
- Location: Rochester, NY
-
Hoth_902
- E5
- Posts: 1663
- Joined: Wed Jun 18, 2014 11:08 am
- Location: Pacific Northwest
- Contact:
So I have a somewhat unorthodox way of painting tires. Its a method my buddy uses to paint the control panel for his aircraft. Most of my base coats are painted using enamels. Model masters or die... LOL.. actually not so true anymore. Anyway, back on topic. I think take an acrylic mixture of German Grey and Nato Black. I was told Just Black was too much, so I took everyone's advice and love the results.. So about 90% to 95% German Grey and a little bit of the Nato Black.. I don't have an exact mixture because i have been doing small batches.. So some tires come out darker and others look more faded like they have been in use. So I paint the Acrylic mixture over the enamel base coat, as close as i can get to edge.. If I go over a little bit, Its ok. I try to make the wheels look as round as I can so that even if I got over the rim, from a distance people will think its spot on.
So... What is the benefit to this, you might ask... Because everyone knows its hard to paint Acrylic over Enamels.. or at least I learned quick. You have to have enough paint on the brush so it covers the area.. Too little paint and the acrylic will smeer on the enamel. Enamels have a slight gloss to them and so the surface, I am guessing, is a little bit slicker.. No worries though, when it dries, you can come back over with another layer of the Acrylic and it will cover the area. Takes some practice..
Finally, if I messed it up really bad, I take some acrylic thinner, after it dries and I use a paint brush to cover the area in the rim I want to remove. It will remove the tire color but leave the base coat untouched because enamel is stronger than Acrylic and your good.
So final step. Unless you like the dirty look, which some people clearly do, you can then come over with a layer or two of the base coat on just the rim. This works good because the rim is recessed and it makes it harder to over paint on to the dark color for the wheel. It seems to work for me. But I still make some bad mistakes and like BurtWolf, at least for modern vehicles, I just paint the whole rim black and it gives some variations to my vehicles.
If you have questions, please contact me and I will try and help.
So... What is the benefit to this, you might ask... Because everyone knows its hard to paint Acrylic over Enamels.. or at least I learned quick.
You have to have enough paint on the brush so it covers the area.. Too little paint and the acrylic will smeer on the enamel. Enamels have a slight gloss to them and so the surface, I am guessing, is a little bit slicker.. No worries though, when it dries, you can come back over with another layer of the Acrylic and it will cover the area. Takes some practice.. Finally, if I messed it up really bad, I take some acrylic thinner, after it dries and I use a paint brush to cover the area in the rim I want to remove. It will remove the tire color but leave the base coat untouched because enamel is stronger than Acrylic and your good.
So final step. Unless you like the dirty look, which some people clearly do, you can then come over with a layer or two of the base coat on just the rim. This works good because the rim is recessed and it makes it harder to over paint on to the dark color for the wheel. It seems to work for me. But I still make some bad mistakes and like BurtWolf, at least for modern vehicles, I just paint the whole rim black and it gives some variations to my vehicles.
If you have questions, please contact me and I will try and help.