Besides bats, there was a "Pigeon project" to create a bomb guided by pigeons.
The British studied the possibility to train pigeons to carry a bomb like the bats.
But the most fantasious was actually infiltrating British pidgeon among German pidgeoms to disrupt or at leastdisturb their large pigeon system. This was done using fake idntification rings and parachuting the pigeons on German territory. It seems that it worked someway.
scratch building
Moderators: dnichols, GHQ, Mk 1
-
Nazgul
- E5
- Posts: 343
- Joined: Thu Jan 13, 2005 1:24 pm
- Location: Mid Missouri
More clutter for the highway . . . or they could be part of the 455th Senior Militia (The Happy Campers)  .
.
Might do a wrecker and a few fire trucks before starting on the boards. (Good therapy )


And yes . . . I'm eyeballing doing a trailer park. Not sure for the stats for the residents combating an invading army, but you KNOW they have firearms.
Might do a wrecker and a few fire trucks before starting on the boards. (Good therapy


And yes . . . I'm eyeballing doing a trailer park. Not sure for the stats for the residents combating an invading army, but you KNOW they have firearms.
-
whoa Mohamed
- E5
- Posts: 414
- Joined: Tue Nov 04, 2008 10:33 pm
- Location: Central TX
-
Nazgul
- E5
- Posts: 343
- Joined: Thu Jan 13, 2005 1:24 pm
- Location: Mid Missouri
Not much to say.
I started by cutting 0.8mm sheet styrene into strips 8mm wide. I also took 0.75 and 0.5mm sheets and made strips 3mm and 2mm wide (for AC units and vent covers).
The wheels are the standard 3.2mm tube 7mm long with 2mm rod 6mm long inside.
I got the basic dimensions off the internet for the RVs and travel trailers, then cut the strips to length. I made a tube with 8mm wide strips for the top and bottom and 8mm strips between the 2 giving a rough 9.5mm height. I took scrap pieces of 8mm and boxed the whole thing in. Using left over 0.5 strips 1mm wide I glued them where the front had a ridge (for the front of the RV it was at the top of the lower angle). Then using more 8mm strips I created the angled edges, puttied, and sanded. The smaller raised areas were 1 - 2 mm strips sanded to shape. I used 2 x 2 mm pieces for the vent covers and 3mm x 4mm for the AC units. The doors were cut from 0.05mm sheet plastic 3mm x 7mm. Windows were 0.05mm cut 3mm and 2mm wide, then to length. I used white paint to represent the edges of the panes. 1mm rod was used for the soil stacks on the RVs and the Propane tanks on the trailers.
The RV with the truck front was a left over casting from when I did panel trucks and I added pieces of plastic to bulk it out. Puttied and sanded to shape. The smaller brown trailer (and all of the small trailers are 1mm too high) was layered pieces of plastic over the box shape.
I used a round rat file to make the recesses across the bottom of the trailers for the wheels and glued them in place. The trailer hitch is 1x1mm plastic strip cut to length. I used scrap plastic to level the trailers so that they might looked parked and to make them level with the vehicles I've bought or made.
Sprayed painted white and painted. I used Ultra tip Sharpies for the small stripes. I used a fine tip brush with acrylic wash (old GW) and painted around the raised sections for effect.
They are supposed to be around 1:300 scale, but fit well with the Micro Scale 1:240 vehicles I bought. I still use 1mm = 1 foot for the small stuff like vehicles. Much easier for converting plans.
A lot of trial and error, but they look fairly good. Once you make the basic box shape it all falls into place and using the strips to create the sloped fronts sped things up by eliminating a lot of sanding. It probably took longer to wait for the putty and glue to dry than it did making them.
Hope this helps.


-
whoa Mohamed
- E5
- Posts: 414
- Joined: Tue Nov 04, 2008 10:33 pm
- Location: Central TX
-
PostHumanRepublican
- E5
- Posts: 138
- Joined: Wed Jul 10, 2013 12:39 am
- Location: Gulf Breeze, Florida
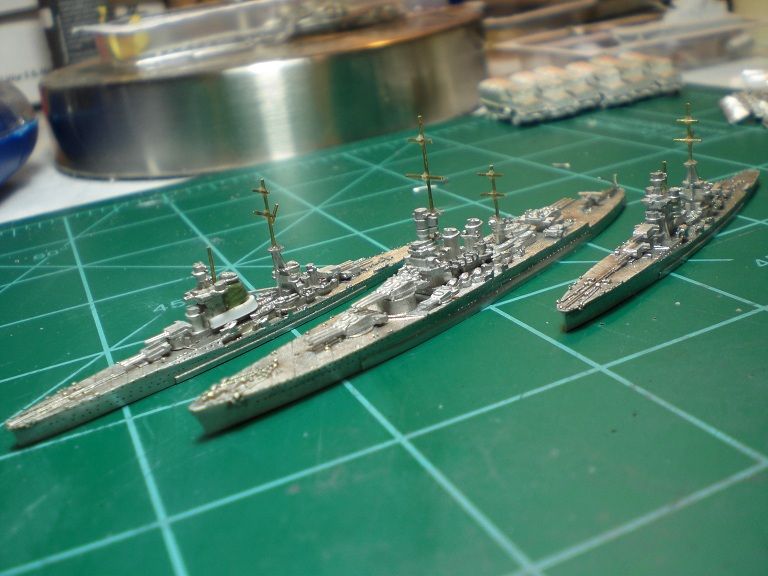
Ok so my descent into ship madness is starting to get the better of me. I've started putting masts on some of my Italians. I'm pretty sure the Littorio battleship's main mast is too tall but I need opinions. Are the Zara and Pola masts about right?
My Blog (covers Micro Armor, Micronauts, hobby tricks, and step by step how tos)
http://omnijackalsden.blogspot.com/
http://omnijackalsden.blogspot.com/
-
TAMMY
- E5
- Posts: 865
- Joined: Wed Jan 27, 2010 12:09 am
- Location: MILANO, ITALY
It is difficul to say from the picture. Who is the manufacturer of Pola?
The mast are too high.
In scale they should be (from the floatimg line)
LittorioClass: 20mm forerd and 14,2mm rear (more or less the top of the main director)
Zara: forward 12mm, rear 18mm
Pola: no forwasrd mast, reara little more than 14mm
A few comments on colors.
Pola and Zara were never camouflaged.. Fiume wasd the only one camouflaged just one month before her sinking.
I haver seen the Bonfigliettion your site. You have painted it as it may have appeared from middle 1941, but the white/red stripes are in the wong direction. They should be the other way round, from right to left. Moreover they should be wider, generally there were 10-12 stripes.
Ubicumque et semper
-
PostHumanRepublican
- E5
- Posts: 138
- Joined: Wed Jul 10, 2013 12:39 am
- Location: Gulf Breeze, Florida
Thanks for the info. The Bonfiglietti isn't done. The aircraft recognition markings on it were painted onto the photo digitally just so I could get an idea of what it would look like.
The Pola is GHQ's Zara that I modified poorly. I thought the masts seemed a bit tall but I had no measurements so I was just eyeballing it based on pictures. I can just pull them off and snip off a bit from the bottom and reglue them.
The Pola is GHQ's Zara that I modified poorly. I thought the masts seemed a bit tall but I had no measurements so I was just eyeballing it based on pictures. I can just pull them off and snip off a bit from the bottom and reglue them.
My Blog (covers Micro Armor, Micronauts, hobby tricks, and step by step how tos)
http://omnijackalsden.blogspot.com/
http://omnijackalsden.blogspot.com/
-
Donald M. Scheef
- E5
- Posts: 1629
- Joined: Sun Jun 25, 2006 2:24 am
- Location: Waukegan, Illinois USA
Please take the following values with a grain of salt - they were obtained by measuring illustrations in Conways's All the World's Fighting Ships and Breyer's Battleships and Battlecruisers. Both books used 1/1250 scale drawings.
For refererence, I used the distance from waterlline to the top of the main rangefinder. This seemed to give the most consistent values.
For Roma (the Littorio class ship illustrated):
- distance from waterline to top of rangefinder = 2.61 cm ~ 32.6 m = 107 ft
- distance from waterline to top of mainmast = 2.69 cm ~ 33.6 m = 110 ft
- distance from waterline to top of foremast = 3.89 cm ~ 48.6 m = 160 ft
- ratio of mainmast to rangefinder = 1.03
- ratio of foremast to rangefinder = 1.49
For Pola (no illustration of Zara):
- distance from waterline to top of rangefinder = 2.26 cm ~ 28.3 m = 93 ft
- distance from waterline to top of mainmast = 3.64 cm ~ 45.5 m = 149 ft
- no mainmast shown in Conway's illustration
- ratio of mainmast to rangefinder = 1.61
It's a bit difficult to judge from PostHumanRepublican's photo because it is not perpendicular to the waterline, but I estimate the following ratios:
- Littorio mainmast to rangefinder = 1.12
- Littorio foremast to rangefinder = 2.00
- Pola mainmast to rangefinder = 2.25
My conclusion is that the Littorio's mainmast is about correct but Littorio's foremast and Pola's mainmast are significantly too high.
Don S.
-
PostHumanRepublican
- E5
- Posts: 138
- Joined: Wed Jul 10, 2013 12:39 am
- Location: Gulf Breeze, Florida
On Littorio I have 29mm from waterline to top of main mast. On the Zaras I have 22mm from waterline to top of rear mast.
*edit* my ship terminally is obviously bad. When I said main mast on the littorio I meant the tall one or foremast.
*edit* my ship terminally is obviously bad. When I said main mast on the littorio I meant the tall one or foremast.
My Blog (covers Micro Armor, Micronauts, hobby tricks, and step by step how tos)
http://omnijackalsden.blogspot.com/
http://omnijackalsden.blogspot.com/
-
Donald M. Scheef
- E5
- Posts: 1629
- Joined: Sun Jun 25, 2006 2:24 am
- Location: Waukegan, Illinois USA
Actually, there is nothing wrong with your terminology; I was using terminology that applies strictly to sailing ships. Tradition has carried this over to newer types of ships.
On a three-masted ship with square sails, the first mast from the bow is always the foremast, the second the mainmast, and the third the mizzenmast. For two-masted sailing ships, the terminology is USUALLY foremast and mainmast. However, if the first mast is significantly larger, this is called the mainmast and the second is the mizzenmast.
In the case of the Littorio, and continuing the pattern used in sailing ships, it would be reasonable to call the forward mast (much larger than the other) the mainmast.
Don S.
-
dragon6
- E5
- Posts: 309
- Joined: Wed Jan 31, 2007 12:40 pm
- Location: Oklahoma
PostHumanRepublican you might look at the yahoo 1/4800 group. There is some discussion on priming the Frosted Ultra Detail models. I think your primer isn't sticking and that undermines the entire painting scheme.
You'll have to join to read the comments of course
http://groups.yahoo.com/neo/groups/1-48 ... s/messages
is the location
You'll have to join to read the comments of course
http://groups.yahoo.com/neo/groups/1-48 ... s/messages
is the location
Ray
-
PostHumanRepublican
- E5
- Posts: 138
- Joined: Wed Jul 10, 2013 12:39 am
- Location: Gulf Breeze, Florida
Thanks I'll check it out! I would agree that the primer isn't sticking as all of it came off easily with my dremel tool with brush head. Going to scrub the model with 91% alcohol to try and remove any leftover 3d printing magic dust.
My Blog (covers Micro Armor, Micronauts, hobby tricks, and step by step how tos)
http://omnijackalsden.blogspot.com/
http://omnijackalsden.blogspot.com/
-
dragon6
- E5
- Posts: 309
- Joined: Wed Jan 31, 2007 12:40 pm
- Location: Oklahoma
If I understand correctly the problem is wax. The White Strong Flexible models do not use it when being printed. It might be that the wax is filling in the spaces.PostHumanRepublican wrote:Thanks I'll check it out! I would agree that the primer isn't sticking as all of it came off easily with my dremel tool with brush head. Going to scrub the model with 91% alcohol to try and remove any leftover 3d printing magic dust.
This yahoo message concerns that
http://groups.yahoo.com/neo/groups/1-48 ... sages/1864
Looking at his models, cleaned with the Bestine, they resemble the WSF printed models but with greater detail. He has not painted his stripped models or, at least, not commented on it if he has.To properly clean Shapeways FUD, you need to soak the models in Bestine (Best Test rubber cement thinner). Detergent doesn't get all the wax off. Bestine will completely remove the wax. One side effect of this is that once the wax is gone, the smoothing effect of the wax is gone as well, and what remains is the FUD material, which will look a bit pebbly. However, that's what it looks like without the wax; it's not etched or anything. An image of the results can be found in the Photos section under my "1/4800 Shapeways Evaluation" album.
I know the 1/144 scale aircraft modelers love Shapeways but they mostly seem to purchase their models in WSF. I suppose that being significantly larger, 1/144 vs 1/2400, they get enough detail in the lesser material. I read that many use clear acrylic to fill the gaps in the WSF, often Johnson's Klear or whatever it's current name is. That might work for the FUD but then again it might fill in the details on a 1/2400 scale model.
this is a Lupo in FUD

This is a Lupo in WSF

The FUD model was cleaned with warm water and soap then soaked in Simple Green but it did not remove the wax and it has problems with primer sticking.
Ray