Painting advise needed

This is a general forum for all types of posts related to Military models.

Moderators: dnichols, GHQ, Mk 1

Rusty
Posts: 78
Joined: Tue Sep 20, 2005 12:03 pm
Location: New Zealand

Painting advise needed

Post by Rusty »

Hi all

Well ive done it now, finally bought my first GHQ models 8)

Just have to wait for them to arrive, now before they do arrive i need your advise on paints and brushes. What size brushes do you use and what paints do you use. I have access to Vallejo and Humbrol.

Ive painted with vallejo quite a bit and have used the Humbrols in the past but not for ages. So im after feedback how to use them, thinning painting, drybrushing ect

Any advise you can offer would be greatly appreciated

fullmetaljacket
E5
Posts: 407
Joined: Sun Mar 20, 2005 2:18 am
Location: Warsaw, Indiana

Post by fullmetaljacket »

I prefer Vallejo paints when i paint my micro armor. Just make sure to prime all your models first really helps when it comes to painting them. I prime German and Italian black, British, US and Russian Grey. Brush sizes just depends on what I'm painting usually a size 1 or 2 at the biggest some of my infantry i use a 10/0. Citadel, and Poly S make some good paints to. The one good thing about Humbrol is they leave no paint brush marks, but me personally i really dont like enamels.

FMJ

Luca
E5
Posts: 364
Joined: Fri Feb 18, 2005 11:52 pm
Location: SLC

Post by Luca »

I prefer Umbrols, because they have a wide range of greens and greys. I also prefer them because it is much more easyer to thin them with turpentine. Used with care, and with a very thin brush (5/0), it is possible to drawn very thin lines and shades wich I always found difficult to do with the Vallejos, wich dry up very fast. For this reason I prefer the latter when painting infantry, because you have to do lots of little particulars without wasting time.

Mk 1
E5
Posts: 2383
Joined: Fri Dec 24, 2004 3:21 am
Location: Silicon Valley, CA

Post by Mk 1 »

I like acrylics. I've used Humbrol, and agree that the tones are nice. But I like to paint indoors, and I hate getting wasted by the fumes. So it is water-thinned acrylics for me.

I keep a small cup of water with me when I paint. (I mean SMALL, smaller than a drinking cup ... like a medice dose cup or large bottle cap.). I often dip my brush into the water to wet it before I pick up the paint. Or not. Depends on the consitancy I want.

As to brushes... whatever you get for most of the work .. get the SMALLEST you can for the details. It really can't be too small.
-Mark 1
Difficile est, saturam non scribere.
"It is hard NOT to write satire." - Decimus Iunius Juvenalis, 1st Century AD

Rusty
Posts: 78
Joined: Tue Sep 20, 2005 12:03 pm
Location: New Zealand

Post by Rusty »

next question then, what colour do you prefer to prime with black or white?

fullmetaljacket
E5
Posts: 407
Joined: Sun Mar 20, 2005 2:18 am
Location: Warsaw, Indiana

Post by fullmetaljacket »

depends for me on country.

Germany = Black
Italy = Black
US = Grey
Russia = Grey
British = Grey

Mk 1
E5
Posts: 2383
Joined: Fri Dec 24, 2004 3:21 am
Location: Silicon Valley, CA

Post by Mk 1 »

White.

Tried beige, black, and grey. I like white better. In all cases. Tanks, trucks, cars, infantry, airplanes. White for me.

In my opinion, at this size of model/figure the lighter undertone helps scale the base color and bring out some of the detail.
-Mark 1
Difficile est, saturam non scribere.
"It is hard NOT to write satire." - Decimus Iunius Juvenalis, 1st Century AD

1ComOpsCtr
E5
Posts: 389
Joined: Fri Apr 14, 2006 3:03 am
Location: Midwest
Contact:

Post by 1ComOpsCtr »

Rusty,

Don't let the "super painters" scare you...

You can also prime in the basic color of the vehicle in question. By that I mean, you could use spray olive drab, or any color you want to use as the most prevalent one on the AFV, truck, or whatever. You don't have to go to all the detail some painters go to when you are just beginning to collect or game in this scale.

By painting a Sherman basic OD, followed up with a black wash for the shaded areas and grill work, followed by a lighter shade of OD for initial highlights, followed by a lighter OD final light drybrush, apply decals, add a layer of mud and/or dust, followed by a protective sealant, you will have a good beginning paint job.

Don't go crazy the first few you paint until you get comfortable with the scale... Add detail as you see fit. You will find you need some very small brushes for most detail work, both "long" line brushes and shorter stubby brushes (both 10/0 if you can find them) for the different types of strokes and tasks you will find you need for this scale detail work. Always add the proper markings to your vehicles before you clear coat them, don't put it off, ...becasue they will never get finished once you start gaming with them. It's hard to go back...

You can just spray and play a basic color for your tanks if you want, but that isn't as much fun. You will learn something new every time you sit down, just be patient.

Will,
ComOpsCtr
"He who fights with monsters should look to it that he himself does not become a monster." - Friedrich Wilhelm Nietzsche, 1844-1900

Rusty
Posts: 78
Joined: Tue Sep 20, 2005 12:03 pm
Location: New Zealand

Post by Rusty »

1ComOpsCtr wrote:Rusty,

Don't let the "super painters" scare you...

You can also prime in the basic color of the vehicle in question. By that I mean, you could use spray olive drab, or any color you want to use as the most prevalent one on the AFV, truck, or whatever. You don't have to go to all the detail some painters go to when you are just beginning to collect or game in this scale.

By painting a Sherman basic OD, followed up with a black wash for the shaded areas and grill work, followed by a lighter shade of OD for initial highlights, followed by a lighter OD final light drybrush, apply decals, add a layer of mud and/or dust, followed by a protective sealant, you will have a good beginning paint job.

Don't go crazy the first few you paint until you get comfortable with the scale... Add detail as you see fit. You will find you need some very small brushes for most detail work, both "long" line brushes and shorter stubby brushes (both 10/0 if you can find them) for the different types of strokes and tasks you will find you need for this scale detail work. Always add the proper markings to your vehicles before you clear coat them, don't put it off, ...becasue they will never get finished once you start gaming with them. It's hard to go back...

You can just spray and play a basic color for your tanks if you want, but that isn't as much fun. You will learn something new every time you sit down, just be patient.

Will,
ComOpsCtr
Now thats an answer ive been looking for, great advise. I know how hard it is to go back and finish a vechile once you start playing thats why i will paint fully before i play. As for undercoat of the basecolour its a good idea but i think i will stick to white in most cases for the lighter stuff. I will have to experiment and see what primer works best for me.

fullmetaljacket
E5
Posts: 407
Joined: Sun Mar 20, 2005 2:18 am
Location: Warsaw, Indiana

Post by fullmetaljacket »

only real reason i prime is it helps with getting the paint to stick good and get a good even coat. and by no means I'm I a super painter. :)

FMJ

Pitfall
E5
Posts: 204
Joined: Tue Mar 14, 2006 5:18 am
Location: South Bend, IN
Contact:

Post by Pitfall »

You can get various water-based "retarders" to add to acrylic paints to keep them fron dryng too fast. THat way you can do various techniques like wet-blending.

To prevent brush marks, don't use too much paint and use a flowing agent for latex paints. I use a commercial product called Floetrol. Just less than a drop will help your paint flow better.
I wish I had something witty to say...

Mk 1
E5
Posts: 2383
Joined: Fri Dec 24, 2004 3:21 am
Location: Silicon Valley, CA

Post by Mk 1 »

1ComOpsCtr wrote:

Don't let the "super painters" scare you...
....................Image....................

Whoa! Do I stand accused of being a "super painter"? Should I be confused, or amused, or flattered, or offended? Perhaps just surprised!

Rusty:

I assure you I am not in the league of Ritter, JB, CAMA, or others I could name. If nothing else, my eyesight isn't good enough for their level of work (bother with whether my hand is steady enough).

I have collected and painted micro-armor for wargaming (not for show) for over 30 years now. I had managed to get to a level of decent detailing (painting the tow-cables and tools, radiator grills, and patriotic slogans on my KV-1s), but it was only when I started on this forum that I learned the techniques of weathering that make the "magical" results I was describing.

One of the great joys of this forum is that you can read and see the results of a variety of techniques and approaches, you can experiment a little, and you can find some that work for you and that you like. Yes, don't be scared of the "super painters". Don't be scared of not doing it "right". There is no right, and no wrong. There are techniques that provide interesting results.

I would offer this observation of the difference between 1ComOps' approach and mine. He advocates spraying your base-coat as a primer, and then doing two rounds of dry-brushing -- one to lighten, and one to highlight. I advocate using a spray white primer, then a spray of base-coat, and then doing one round of dry-brushing to highlight.

In my case, I think you can get almost the same effect with a higher production throughput. I typically spray 20 or so models at a time. Spraying 20 models is a LOT faster than dry-brushing 20 models.

If it is a nice sunny day, I can spray the base-coat over the primer after about 2 hours' drying time (I find my wife is far more ameanable to my leaving my fresh-sprayed models in the sun, then to my putting them in the oven!) . The white primer under the base-coat will lighten the base-coat, and if you have a reasonable touch with the spray can (continuously sweeping back and forth from about 12-18 inches) you will also get a little highlighting from the white undercoat.

Oh, and if you place your models on corregated cardboard cut-outs to hold them while you are spraying, you'll get BOTH winter and summer terrain elevation features as a side-benefit! :lol:

Image

Image
A game played in my garage, showing Russian armor painted with my approach, and also showing my terrain-on-the-cheap technique which provides elevations as a by-product. A felt cloth over the table, with corregated cardboard cut-outs (pieces taken from almost every box that comes into the house) that have been used as the base for a few spray-paintings, and painter's tape for roads, rivers, etc. I collect micros for wargaming first, show-and-tell a distant second.

But choose a technique that works for you. Give it a try, and tell us how you've managed. Show us some piccies. We'll offer some more hints. It's fun! For us, at least. We love to look at pics! :wink:
-Mark 1
Difficile est, saturam non scribere.
"It is hard NOT to write satire." - Decimus Iunius Juvenalis, 1st Century AD

Rusty
Posts: 78
Joined: Tue Sep 20, 2005 12:03 pm
Location: New Zealand

Post by Rusty »

@ MK1

Nice pics there MK 1, so what you do is take a can of white and a can of green spray the white, spray the green. Then take the same shade green as the spray add some white and drybrush?

Mk 1
E5
Posts: 2383
Joined: Fri Dec 24, 2004 3:21 am
Location: Silicon Valley, CA

Post by Mk 1 »

Rusty pondered:
... so what you do is take a can of white and a can of green spray the white, spray the green. Then take the same shade green as the spray add some white and drybrush?
Close.

More precisely:

1) Spray with a can of white primer. I look for primers, not just white spray paint. I have used just white colored paint in the past. Not a bad result. But I believe the primer gives better adhesion. The paint job, when you're done, will last longer.

Then I let it dry. As noted, if I can leave them out on a sunny day, about 2 hours. If I have to leave them indoors (in my garage), maybe 4-5 hours. I will often prime in the morning on a weekend day, then go off to do some activity, then base-coat in the afternoon or evening. But, as with the oven-baking that Ritter recommends, I find that the primer or paint dries a little nicer if baked in the sun.

2) Spray with a can of base-coat. For my Soviets, I use a medium green. For my US WW2 forces I use olive green.

Once more, allow it to dry. About 2 hrs in the sun, or more if not. If I prime on Saturday morning, and base-coat on Saturday afternoon, then I can spend my Saturday night doing the rest of the brush-work.

3) I wash the whole model with heavily diluted grimy black or oily black. These are actually names of Polly-S colors. Grimy black is actually a VERY dark brown, or a light black with hints of brown. Oily black is a VERY dark blue-grey, or a light black with hints of blue-grey.

When the wash has set a bit, to a sticky point, I beat it up with a sable brush. Call this an optional technique. Just a heavily diluted black wash will do even without the beating.

4) Then I dry-brush with lightened green. I could use the same medium green, lightened with some white, or some light tan, or some white and yellow. But in my case, I have found a ready-in-the-bottle shade that works well enough, so that I don't have to mix my own for dry-brushing. It is a Polly-S shade called Sahara Sand. It is a green-tinted beige.

I dip the brush, then squeeze it in my paint-rag. Then brush all over the model. It brings out the highlights.

5) Then the detailing. Tracks and MG barrels are a must for me, while grills, stowage, tools, headlights I consider to be optional ... however much I care to do on a particular model at a particular time.

Image
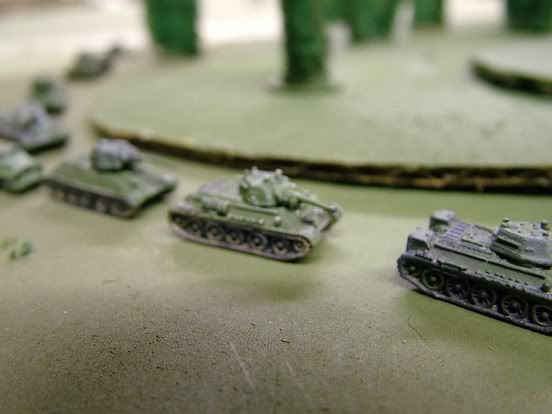
Here is an example of the result. As I mentioned, not at the level of artistry of some around here, but certainly at a level pleases MY eye when wargaming.

In this case it is a posed picture that I used as a prelude to a wargame.* I feel it shows the effects of the priming, washing and dry-brushing quite well.

The KV-1s in front have been painted exactly as I describe above. In particular, they had a white primer under the medium green. Lots of detailing, too.

The KV-2s that follow did NOT have white as their undercoat. They were a very dark color, which when I bought it was labelled as olive drab, but was more like black-green. These are OLD GHQ models -- I bought and painted them in the early 1970s, priming them with a beige, and then spraying them with the black-green. I have only recently re-painted them, starting with step 2 above (just spraying over their original very dark black-green).

Note the difference in base shade between the KV-1s and the KV-2s. The KV-1s come out lighter, which is the "scale effect" you want on models this small.

Most (if not all) of the older GHQ models were re-mastered in the 1990s. The older molds did not have anywhere near the wonderful detail of their "new molds". Add to this that my KV-2s have about 4 layers of spray paint on them by this point, so whatever detail there was has been subdued even more. But you can clearly see the impact of the dry-brushing bringing up a lot of the scant detail on these models.

Then look at the ZIS-6 fuel truck up at the top of the picture. This model is still in the state of my "prior art" -- how I painted before I learned the weathering and highlighting techniques we discuss here. It has been spray primed, and spray painted medium green, and detailed. But no washes or dry-brushing.

Notice the differences?


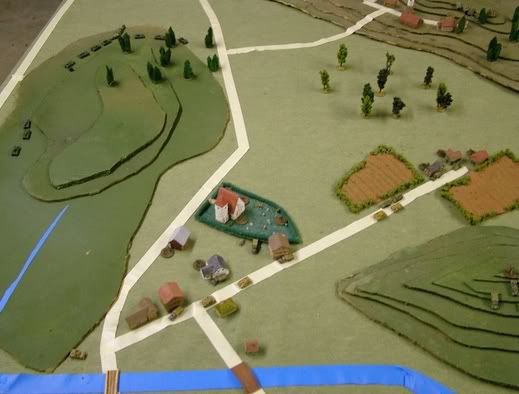
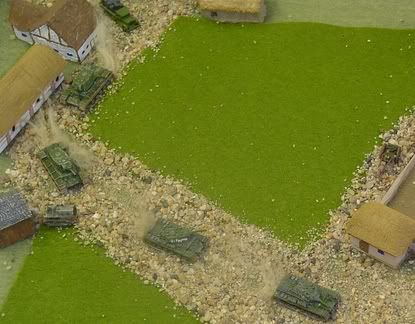
*Note: For my games I like it when neither side enters a game knowing what the the forces are on the other side, and I use paper chits to represent un-spotted units on the wargame table. Together, these simple techniques cut down significantly on the perfect "God's eye view" that plagues too many wargames. However, in one Barbarossa game I offered some "aerial recon photos" for the German players, to give them the advantage of aerial supremacy that the Germans actually had coming in to most early war battles. So my German commanders got to see some pictures of the Soviet forces on their approach march to the battlefield. This was one.
-Mark 1
Difficile est, saturam non scribere.
"It is hard NOT to write satire." - Decimus Iunius Juvenalis, 1st Century AD

Rusty
Posts: 78
Joined: Tue Sep 20, 2005 12:03 pm
Location: New Zealand

Post by Rusty »

Sounds good MK 1, now when you say beat it up a little do you mean when its almost dry but still wet then run the brush over the model fairly fast back and forth?

Also what advise can people advise for painting the Infantry. just got a few to practive on and wondering how hard they are to paint really, do you prime them wash them ect

Lend me your secrets

Post Reply