Page 1 of 1
White wash
Posted: Sun Mar 11, 2007 7:44 am
by Mickel
Folks
I'm about to start a small winter '42/'43 force for both sides on the eastern front. The original plan was to paint everything white, but that's probably going to be a bit boring. So I'm thinking that some stuff should get a white wash over the green or grey of the base colour.
I use a white spray on undercoat and Humbrol enamels for top coat. To to achieve the white wash I thought I'd do the base grey/green colour, but not get too fussy about it. Then I'd get some left over Tamiya (yuck) white acrylic, thin it down a bit and wash it over the tanks. Follow that by a thin black wash and dirty dry brush, especially around the running gear.
Any other suggestions? At some point I'll be doing the same for western front, winter '44/'45.
Mike
Posted: Sun Mar 11, 2007 9:21 pm
by tstockton
Mickel,
Seems to me that a "kind-of drybrushing" the white might work better than thinning it -- keep just a little more white paint on the brush -- painting the "more exposed" areas, while leaving the "undercolor" visible in cracks, crevases, etc. And then do your blackwash and "dirty" drybrushing, etc.
Sounds like the results will be pretty cool -- if you could, I'd love to see pictures of your finished armor when you get them done!
Regards,
Tom Stockton
whitewash
Posted: Sun Mar 11, 2007 11:49 pm
by mluther
I agree with Tom. But then do some drybrushing with the darker undercolor. The whitewash wears off on the more exposed surfaces. On any of the areas that have heavy traffic, i.e., tank riders, that area is going to be whitewash free. This is also the chance to add some bright color/recognition sign to the top of the tank. It makes a nice contrast to the mainly white vehicle to see a red stripe or triangle on the top of the turret.
Mark
Posted: Mon Mar 12, 2007 8:55 pm
by Cav Dog
These were first primed gray, then painted Vallejo off white, then dry-brushed with pz red brown and dark yellow. A little missippi mud was added for weathering around the running gear. Not diorama quality, but good enough for gaming IMHO.

Winter Whitewash
Posted: Sat Mar 17, 2007 5:23 am
by pmskaar
Grant
Really excellent work on that Pz IVF2. Some of the best winter stuff I've seen! Really great.
Pete - Binpicker, Out!
Posted: Mon May 07, 2007 11:56 am
by Mickel
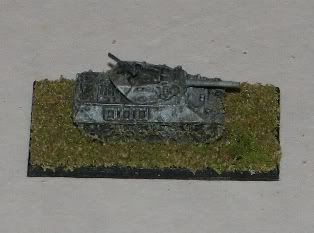
Waddayareckon? It's painted as per the method I described, however I took your advice and didn't thin the white - just a dryish brush. I might have underdone the white a bit, but I was a little concerned about over doing it.
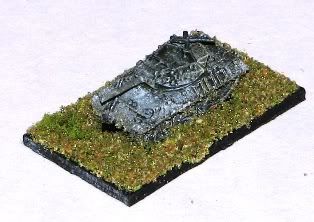
This one has the 'auto-correct' thing on, which I guess assumes the background is white, which isn't strictly true, so it's all a little bright. The actual shade is somewhere between them.
I'll find a suitable snow cover to put over the base to make it fit the camo a bit more. Muggins forgot to brush out the suspension before taking the pic, so that flock isn't there any more.
Mike
Posted: Fri May 11, 2007 1:49 am
by hauptgrate
I have seen pictures of many different application methods: brushing, brooms, rags, just throwing it on, etc. In 1941 the Germans sometimes resorted to bedsheets and piles of real snow -- both also done by U.S. forces in 1944. Also, all winter camo was temporary -- the white paints issued were meant to wash off rather easily. So..... almost any technique of application and weathering will work for your models. It might even be cool to use different techniques on different models to add variety.
Posted: Sat May 26, 2007 10:58 am
by Hugewally
These must be 20 years old by now, but they're just a sampling of the winter stuff we had back then.
KV-IIs Notice that the middle tank wasn't completely white washed. I also tried to show with the painting, a more complete coverage on the front half of the other vehicles as compared to a thinner or quickly applied paint in the rear half.
I think you'll find that most of the vehicles that got winter paint mainly had the paint applied on the surfaces that would 'normally' face the enemy, so the backside would be left in the standard paint scheme.
And as mark mentioned above, foot and hand traffic areas (along with spilled fuel) will have the paint either worn off/ thinned or covered with mud.

Posted: Sat Jun 16, 2007 11:05 am
by Mickel
Another attempt. This time a Hetzer.
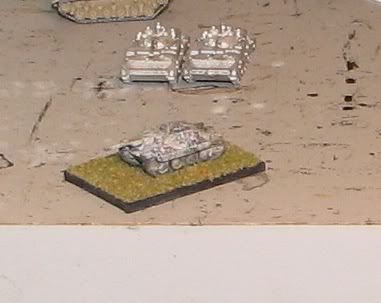
I think it's a bit better.
Mike
Posted: Sat Jun 16, 2007 6:50 pm
by AceRimmer
Products such as Mig Pigment powders give excellent mud / dust effects, application is both fast and easy.
Even with 6mm scale the powder is so fine its perfect..
Posted: Sun Jun 17, 2007 3:21 am
by rct75001
AceRimmer wrote:Products such as Mig Pigment powders give excellent mud / dust effects, application is both fast and easy.
Even with 6mm scale the powder is so fine its perfect..
But Ace, do you varnish over the top of the pigments? I seem to lose most of the effect when varnishing.
Posted: Sun Jun 17, 2007 6:50 pm
by AceRimmer
Hi..
Yes I use very light coats of Testors dullcote spray....
Like yourself I find I lose some of the lighter pigments as it seems to darken everything slightly, so I just compensate by using a lighter shade than I really want..
Another way to use it is mix it with a very watered down white paint, the paint helps to make it stick..
All trial and error at the moment as im just doing my 1st batch of 6mm vehicles, im having lots of errors but I will get there in the end.
