Rust effect
Moderators: dnichols, GHQ, Mk 1
-
vicvolta
- Posts: 39
- Joined: Fri Sep 01, 2006 5:19 am
- Location: Lund, Sweden
- Contact:
Rust effect
Anyone have tips and ideas on how to produce convincing rust effect on minis? Tried with a little Chestnut Ink, but did'nt like the result.
*************************************************
<I>"When in doubt - empty magazine!"</I>
*************************************************
<I>"When in doubt - empty magazine!"</I>
*************************************************
-
Thomaso827
- E5
- Posts: 187
- Joined: Tue Jul 18, 2006 8:26 pm
- Location: Dayton, OH
I found an inexpensive craft paint, "Iron Oxide", that works very nicely without being too much, but it may not be available in Europe. I'll see if I can check the name brand and get back. The text is in French, English and Spanish, but no idea of those are for Europe or for Canada and the US. Model railroad shops should have some rust colors if you have a nice hobby shop around. I think it was Floquil that had a line of railroad paints including rust, dust, grime, mud, etc.
Tom Oxley
Tom Oxley
Tom Oxley, OD Green Old Fart
-
Mk 1
- E5
- Posts: 2383
- Joined: Fri Dec 24, 2004 3:21 am
- Location: Silicon Valley, CA
Most of my paints are from the Polly-S line of acrylics. Most of the time, when I want to paint something as rusted, I use a color called ... (wait for it) ... RUST.

Here I have washed the tracks and running gear of my M3 Lee medium tanks with Polly-S rust.
I am deliberately sloppy with my rust wash on the running gear, as I want it to slop around a bit over the lower portions of the hull and fenders.

Here on one of the M3s you can see how the rust has washed over the transmission housing. It winds up different on every tank ... which is how I want it.
The Polly-S Rust is a very orange color. Lighter than I often see on metal which is in a state of continuous oxidation. So for some cases I just choose from one of the browns in my paint collection.

French H-39s have exposed mufflers on the left hull side. These mufflers should be in a state of continuous oxidation. So I have chosen to paint them brown.
I usually choose an "Earth Brown" or "Red Brown" for this kind of application. But in this case I was using my Polly-S French Earth Brown for the cammo pattern, and so chose Polly-S NATO Tri-Brown for the mufflers. This is a very dark rich chocolate-brown. The picture does not really show to advantage the difference, but the mufflers are a browner-brown than the camo pattern brown.
I usually paint mufflers AFTER I apply a light dry-brush to the entire tank. Then I would typically add a drop of grimy-black wet wash to the muffler, to give it a bit of depth. In this particular case, though, I did not. The mufflers were painted before dry-brushing. I'm not as pleased with the result, and so usually take the other sequence as my approach.
Hope that helps.
Here I have washed the tracks and running gear of my M3 Lee medium tanks with Polly-S rust.
I am deliberately sloppy with my rust wash on the running gear, as I want it to slop around a bit over the lower portions of the hull and fenders.
Here on one of the M3s you can see how the rust has washed over the transmission housing. It winds up different on every tank ... which is how I want it.
The Polly-S Rust is a very orange color. Lighter than I often see on metal which is in a state of continuous oxidation. So for some cases I just choose from one of the browns in my paint collection.
French H-39s have exposed mufflers on the left hull side. These mufflers should be in a state of continuous oxidation. So I have chosen to paint them brown.
I usually choose an "Earth Brown" or "Red Brown" for this kind of application. But in this case I was using my Polly-S French Earth Brown for the cammo pattern, and so chose Polly-S NATO Tri-Brown for the mufflers. This is a very dark rich chocolate-brown. The picture does not really show to advantage the difference, but the mufflers are a browner-brown than the camo pattern brown.
I usually paint mufflers AFTER I apply a light dry-brush to the entire tank. Then I would typically add a drop of grimy-black wet wash to the muffler, to give it a bit of depth. In this particular case, though, I did not. The mufflers were painted before dry-brushing. I'm not as pleased with the result, and so usually take the other sequence as my approach.
Hope that helps.
-Mark 1
Difficile est, saturam non scribere.
"It is hard NOT to write satire." - Decimus Iunius Juvenalis, 1st Century AD
Difficile est, saturam non scribere.
"It is hard NOT to write satire." - Decimus Iunius Juvenalis, 1st Century AD
-
Donald M. Scheef
- E5
- Posts: 1629
- Joined: Sun Jun 25, 2006 2:24 am
- Location: Waukegan, Illinois USA
I just took a quick look at the Testors Floquil site and they have the following:
In "Railroad Enamels" - concrete, aged concrete, dust, earth, grime, grimy black, mud, and rust. Like GHQ, they scale their colors, but to a larger scale, so slightly greater intensity.
I don't mean to short change GHQ's paints, but I have been using enamels on my models since I started in the late 1950s - just never transitioned to acrylics.
Don S.
-
miffster
- Posts: 55
- Joined: Sun Jul 17, 2005 7:00 pm
- Location: Chesterfield, UK
I find it depends a lot on the darkness, or otherwise, of the base colour. Obviously the LCM below is a fairly light grey, which allows for a different combination of colours ot be used
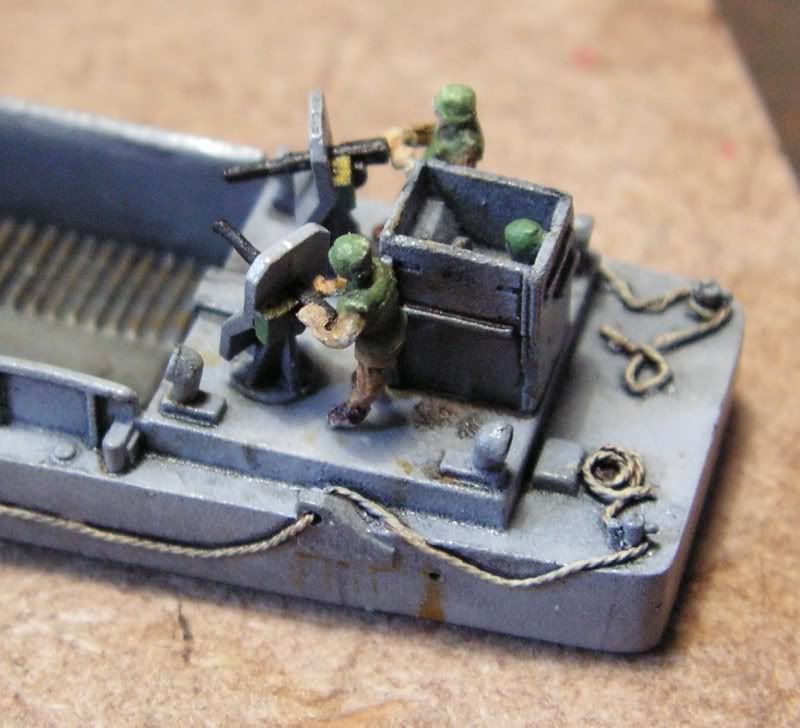
The rust is a very thin strip of Winsor and Newton Raw Sienna, with a thinner stripe of orange - can't remember the make but go for something bright. If the orange looks to bright you can use a brown ink or very thin paint wash to tone it down. For older rust streaks leave out the bright orange stage. I used oils for this and gave them a light downward stroke with a soft brush dampened, not wet, with thinners to blend everything together
I don't have any photos available, but for a darker base coat I use the bright orange, maybe cut down a little with a tiny amount of raw sienna or burnt umber. Again if the orange seems to bright tone it down with a wash of ink.
I think the key to working on a darker base colour is the strength of the pigments in the paint used, and remember the scale effect of luminousity - lighten the colour the smaller the area.
Matt