Page 1 of 2

Basing?

Posted: Wed Nov 03, 2010 5:26 am
by 64mas
What do you guys do for basing infantry? Size, material, how you get them on there, etc... I'm new, and am trying to put together a ww2 russian force, if it matters. Thanks in advance,
--tom

Posted: Wed Nov 03, 2010 6:59 am
by Theodore
I slowly evolved to thicker bases because of players, myslef included needing to grab the figures to move the unit. This lead to high attrition on micro scale infantry.

I started with thin metal and then moved to wood (which works but can warp. I eventually settled on linoleum floor tiles. You can pick them up at hardware home improvement store. They are typically 12X12 inch squares for under a buck each. So 144 one inch squares for under a dollar is quite the deal.
I score them with a straight edge and razor blade and then snap them over the ruler. It leaves a rough edge which I like, but you could cut all the way through to get a smoother look.

I usually just glue the figs on and then use texture/sand/rocks and paint to finish them. I am considering using a dremel to scour a divot so that the figure base can sink into the tile but I have not tried it yet to see if it is worth it. You could even do fox holes with a drill and then glue the figure base at the bottom.

Posted: Wed Nov 03, 2010 7:04 am
by fredjg
For 1/285, I use metal bases (usually 1.25 x 1.5), with thinned carpenter's glue to attach fine sand.and figures. Paint and then dry brush, colors depending on locale and then glue some larger scenic material.

As the size goes up, I move to plywood - maximum of 1/8" with flex mag receptive material contact cemented to the bottom (.030 thickness). Sand,flock, then static grass, clump bushes...

For scenics (houses, barns, fences) I use 1/16" inch plywood with magnetic receptive sheeting attached, again, with contact cement.

I feel carpenter's glue has better "stick" then white glue and you can still remove them at a future date.

I also apply a base paint coat, with the color locale dependent, to the bases before adding any sand or miniztures.

Posted: Wed Nov 03, 2010 10:32 am
by dougeagle
First off...welcome :D

When it comes to basing, its pretty much what you feel like doing. I know for the longest time I couldn't decide what or how I wanted my mini's to be based. At first it was 1"x1" for GHQ rules, but then didn't like that and so it went on and on for awhile. Now I have decided and like how I have mine based.
Infantry- 4 figures per base...1 prone LMG, 3 rifles (smg, rifle, grenade thrower)
Command stands- 2 figures per base
MMG stands- 3 figures...MG stand, 1 prone soldier with binoculars
The infantry are based on 22mm round plastic sheet styrene 0.20" thick, these can be found at your local hobby shop, while the command, MMG and mortar stands are on 17mm. Anti tank guns and other guns are on the same size as infantry...22mm.
Small vehicles such as jeeps, bikes are on 20mm x 20mm square bases and larger vehicles and tanks are on 3/4"x1".

Posted: Wed Nov 03, 2010 12:24 pm
by Mk 1
Second off, welcome from me, too! :wink:

I've been gaming in this scale since ... well, maybe longer than I'd care to say. First started buying, painting and basing infantry in the early/mid 1970's. But the quality of my modelling have progressed dramatically since I started participating on this forum.

I started using sheet styrene, cut into small squares. I've tried cardstock, and balsa. I have finally settled on pennies.

My standard basing approach these days is to mount 4 or 5 infantry figures on a penny as a standard squad. 3 figures is a "special" squad (engineers, larger command squad, etc.). 2 figures is a sub-squad support stand (LMGs, MMGs, infantry mortars, commo teams, observer teams, etc.).

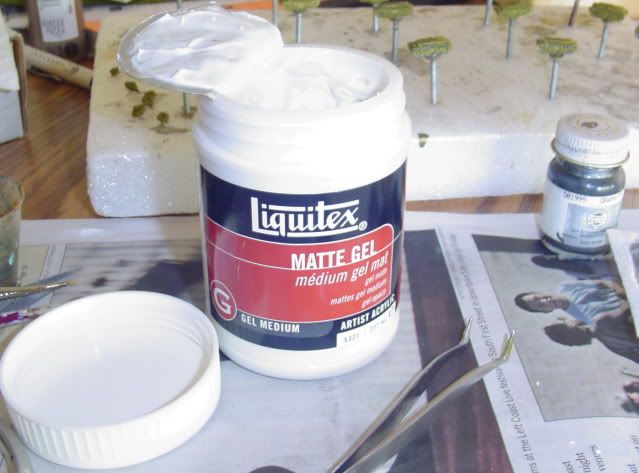
I used to use white glue. I have since, on this forum, learned to use acrylic medium matte gel, which I buy at my local crafts store ("Michael's"). I find it much easier to use. It has the consistancy of pudding, it can be colored by mixing in any acrylic paint, it provides color, texture, and adhesion all in one. I mix it in with cheap crafts paint to give me a dirt color, I slather it all over the penny, push the painted infantry figures' molded-on stands into the glop, touch the tops of those molded-on stands with a touch of the medium, then dump some scattered sand, railroad shrubs, and flocking all over it, and set it aside to dry.

Now, on to some pictures, moving forward from my first pennies, to my more recent stuff:

Image
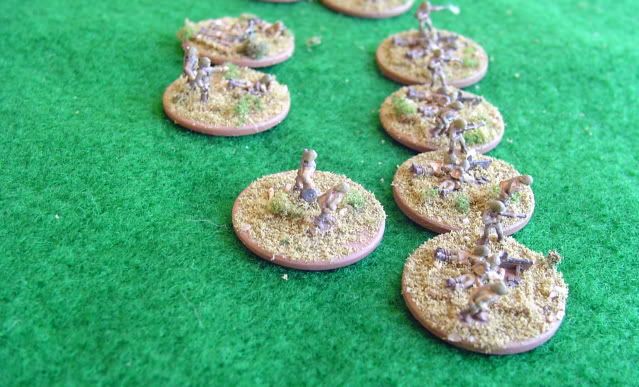
The Soviets in the background of this recent game pic were the first units I mounted on pennies, more than 15 years ago. I used white glue. I refurbished them about 3 or 4 years ago, adding the flocking and some added detailing. But still they are fairly primitive by my current standards.

In the foreground is a squad of my Italians (in Continental uniforms, for service on the Eastern Front). This was my first force to be painted and based since joining this forum. The basing again used white glue, but in this case the glue was mixed with paint as it was used, and the flocking (and detailing) were done from the get-go.

Image
Here you see the Italians again -- in this case an AT gun and an HMG trying to stop Soviet tanks from crossing a bridge in the background.

Image
Here are some of my Romanians, the most recent force that I've put together. These use all of the techniques I described above. I'm very pleased with the results.

Image
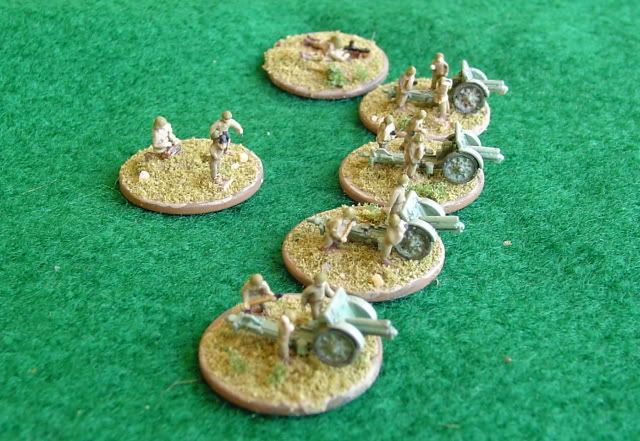
For my artillery I have set up crews on bases, but left the guns loose.

Image
In this way I can use the same based figures to provide light or medium gun batteries as my gaming needs vary.

Image
I've done the same with my AT guns.

Image
In thise way I can provide a battery of AT guns for 1941, or 1943, or 1944 forces with only one set of crews.

Image
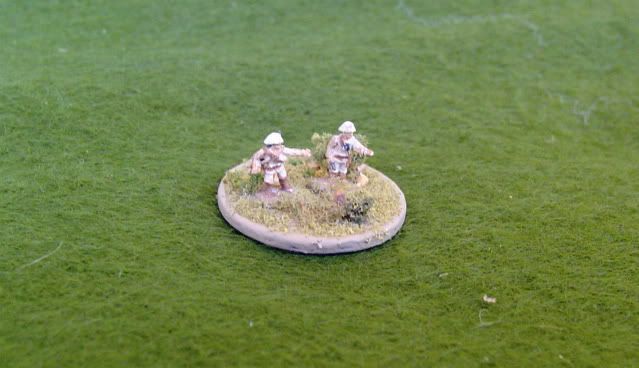
Closing thoughts with a close-up of my current work-in-process, French Armee d'Afrique troops.

What I have found is that pennies are pretty robust. They are also pretty economical (I get 100 per dollar). And they are easy to find, even around the house as needed. Few things I find as frustrating as being just 2 or 3 bases from finishing, and having to wait for another order to come in in the mail. As it is, I can just go look between the cushions of the couch.

That's my approach. Your mileage may vary. Good luck. Have fun. Post a pic or two so we can have fun looking at what you are doing. :wink:

Posted: Wed Nov 03, 2010 2:28 pm
by piersyf
I think it depends on a lot of things; usage rate, the rules set, personal preference...
I base my infantry on plastic card stock, but I go for thinner sheets, 0.75mm. This is so I can base my vehicles on 1mm thick sheet and the difference takes up some of the metal base thickness the figs are cast with. The result is that the infantry don't tower over the vehicles if they are alongside. I also base in full squad stands, so I have about 9 to 11 figures on a base that is 25mm x 15mm. They are quite easy to move. As Mk1 says, do what works for you and your preferred rules.

Posted: Wed Nov 03, 2010 5:55 pm
by voltigeur
Welcome to our little corner of the internet and to this quirky hobby. 8)

The 2 materials I use are 1: The heavy card stocck that you can get at any art supply store or Hobby Lobby. It is about $5.00 for a poster board sheet.

I am moving over the the sheet magnets since it solves a storage problem as well as the basing problem. I'm experimenting with the new thing sheet magnets and thin sheet metal since I do 1: 1 and want to have more infantry tactics in my games. (Will spare you the long winded game design discussion.)

Size depends on game scale and frontage of the unit being represented.

But however you do it you must have fun! :)

Posted: Wed Nov 03, 2010 9:20 pm
by dougeagle
Mk1...very cool stuff :D 8) 8)
I forgot to mention in my posting that I have some flex steel from Litko on their way. This will just stick to the bottom of my stands which will then stick to my storage trays which are lined with magnetic stripping. :D

So 64mas, you can see that we all have different ideas about what to use and how to base your mini's...have fun and look forward to seeing some of your stuff :D

Posted: Thu Nov 04, 2010 2:03 am
by opsctr
Welcome to the community...
The following link may shed some light on the basing subject.
http://commandoperationscenter.com/products111.htm

Everything from individual figure basing...
Image

To fire team or squad basing...
Image


Good luck. Their are many options many of which depend on the rules you are using. Will

Posted: Thu Nov 04, 2010 2:37 am
by 64mas
Thanks for the warm welcome, and all the suggestions are great. I'll try to get at least one base done by christmas, but I'm kinda short on cash and flock. (16, in the most remote corner of minesota imaginable, =/= fun. ) Thanks again though.
--tom
On an off-topic note, is there any use for woodland scenics coarse flock? It's ground foam.

Posted: Thu Nov 04, 2010 3:02 am
by Donald M. Scheef
How does the "most remote corner of Minnesota imaginable" compare to Shorewood?

Don S.

Posted: Thu Nov 04, 2010 3:16 am
by 64mas
Porter, MN maybe 500 people, down in the south-western corner. It's an hour drive to the closest hobby/ game store, and that's in brookings, sd. I've never been to shorewood, so I can't compare. Hope that's a decent explanation on my end though. :)
Being in MN helps the shipping time a little though.

Posted: Fri Nov 05, 2010 5:45 am
by 6mmwargaming
Hi

A newish material on the market is Tamiya "Diorama Texture Paint". The Light sand is good but I think the earth colours are a little bit too dark. But you can add paint to them to change the colours.

Another material I use is silcone caulk as used in bathrooms and as a filler. You can get different coloured tubes so you dont need to paint the bases afterwards and it is good for filling gaps on the bases between the figures and the base.

I wouldn't use cardboard for bases as most paint, glue or texture you put on top will warp it. Plasticard, metal, coins or wood is stronger and will last longer.

I use plasticard and PVA glue for mine. They I texture with caulk and fine sand/ballast. If I stuff up they I can remove them easily again.

BTW woodland scenics coarse flock is good for bushes but you need some finer stuff for bases

Cheers
Kieran

Posted: Fri Nov 05, 2010 6:28 am
by Mk 1
64mas wrote:On an off-topic note, is there any use for woodland scenics coarse flock? It's ground foam.
If you look at the pics I provided of my Romanians and my French Colonials, you can see some small "bushes" on the stands.

These are made with Woodland Scenics coarse flock (ground foam). Sometimes I place it directly, more often I just put some mixed-in with the Woodland Scenics grass flocking and just sprinkle it over the stand. Even a little bit of shrubbery and one or two large sand granules bring more life to the stand (compare to the Italian gun crews in the 2nd photo).
64mas wrote:It's an hour drive to the closest hobby/ game store ....
Being in MN helps the shipping time a little though.
I live in the SF Bay Area. For me, the closest hobby shop that has anything of interest for me is about an hour drive. It's just that in this area, an hour is needed to drive even 20 miles! :roll:

More seriously ... I think you have the right notion thinking about buying through mail-order. There are several good hobby providers in the upper mid-west, not to mention everyone's favorite miniatures manufacturer! With a little time and effort you should be able to find everything you need through webstores, and set yourself off on a path of epic microarmor modelling and wargaming.

I would encourage you to look at local craft and hardware stores for paints. Maybe not for your actual camo and warpaint colors, but for your terrain, buildings, and stands. I find Krylon brand spray paints (hardware or auto-parts stores) are good for their primer and various earth-tone paints. I also now have their clear-coat matte for my over-spray, but I have not yet tried it much, so can't say if I recommend it or not.

I will once again mention and recommend Acrylic Medium Matte Gel for basing.

Image
Acrylic Medium is the stuff that tinting is added to, in order to make acrylic paints -- it is basically un-colored acrylic paint.

The "gel" is medium that has the texture of pudding. Very useful as a glue (it has to have high adhesion, or the paint wouldn't stick to whatever you are painting), and also very useful as a filler or texturing agent. But I have found it MUCH easier to work with than white glue, textured paint, or modelling putty. Goes on smooth, wipes off of the brush easily, doesn't run off of the surface you put it on, doesn't shrink when trying.

I would not even consider trying caulk for hobby work. Others may have skills I don't, but I have used it for home repairs, and got it all over everything just trying to smooth it out a little. :(

Another advantage of acrylic medium is the price. The jar shown above cost me about $2. I doubt I'll ever have to buy another jar, given the small quantities I use. You can probably find acrylic medium in any store that caters to arts and crafts. Any one who paints as a hobby would know where to find it.