I need some tips on how to file the bases of my men. Right now I am holding them with my thumb and forefinger and then using a small file to flatten and reduce the bases before I adhere them to my squad base. I know I can just stick them on and then build up the stand, but as I also base my vehicles it is a lot of extra work Any ideas would be helpfull
Infantry bases
Moderators: dnichols, GHQ, Mk 1
-
Sepp
- Posts: 82
- Joined: Sat Aug 16, 2008 12:12 am
- Location: Stanardsville VA USA
Infantry bases
Hey everyone.
I need some tips on how to file the bases of my men. Right now I am holding them with my thumb and forefinger and then using a small file to flatten and reduce the bases before I adhere them to my squad base. I know I can just stick them on and then build up the stand, but as I also base my vehicles it is a lot of extra work Any ideas would be helpfull

I need some tips on how to file the bases of my men. Right now I am holding them with my thumb and forefinger and then using a small file to flatten and reduce the bases before I adhere them to my squad base. I know I can just stick them on and then build up the stand, but as I also base my vehicles it is a lot of extra work Any ideas would be helpfull
-
Gort
- E5
- Posts: 167
- Joined: Wed Jan 11, 2006 5:51 pm
- Location: SW Ontario
I have solved this issue by making two-part bases. The top is cut from 1mm styrene (I use Evergreen) and the bottom is magnetic sheeting (business card size, less than 1mm thick,self adhesive on one side). I make square bases so cutting isn't a problem. Before I stick the two halves together I mark the styrene piece with the locations of the figures. I then take a suitably sized hole punch and punch out the material. Then put the pieces together, add the figures (self adhesive surface), paint, glue, flock as normal. Total base height is 1.8mm, with the figure base recessed into it. No filing or unsightly bulges.
cheers
cheers
Proudly addicted to micro-armour since 1975.
-
Mk 1
- E5
- Posts: 2383
- Joined: Fri Dec 24, 2004 3:21 am
- Location: Silicon Valley, CA
I find rectangular platforms under my infantry figures to be rather unsightly. So I too have sought ways to eliminate or minimize the molded-on bases of my infantry.
I have never had success in thinning them. Shaving them down would some form of grip to hold the figure. I have never managed that successfully without crushing the figure or slipping the grip (and slicing something other than the molded-on base! ). Filing has never worked for me as it is simply too hard on the ankles of the figure. You must go back-and-forth to effectively file or sand the base down. This motion significantly weakens the molded metal, until it is too easily disformed or broken.
I used to clip them off, using cuticle cutters to slide below the molded feet to cut them off of the molded-on-stand. I still do that for figures that I mount in my open-topped vehicles. But for infantry on bases that made it difficult to mount them (they like to fall over before the glue dries), and made for weak adhesion if I didn't use a thick blob of glue (which was unsightly enough to pretty-much defeat the purpose of clipping the molded-on base).
So now I am resolved to building up the base to obscure the molded-on-base of the figures.
I am intrigued by the method Sepp describes. But I feel my method is simpler. I use pennies for my stands, but my approach would work equally well for thinner base materials, and given the plasticity of the materials might be a very good solution for materials that have some amount of flex, like thin plastic card.
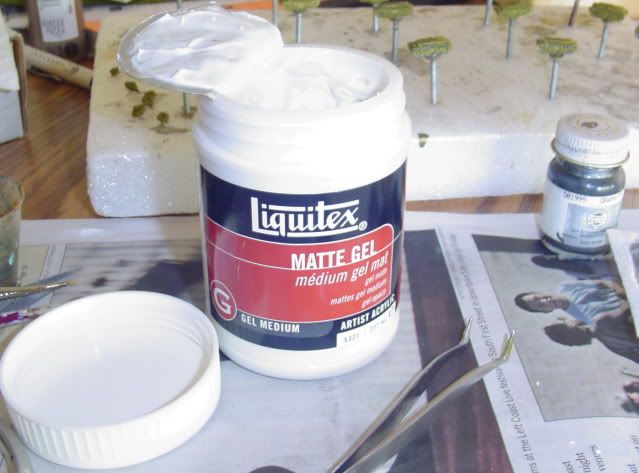
I use Acrylic Medium Matte Gel for my basing. This material takes color well (it is the base material for acrylic paints), and had high adhesion (it is the base material for acrylic household glues), but in gel form it also has a thick consistency (rather like pudding or yoghurt).
The medium is white when wet, and dries to an uncolored cloudy opaque. I add some acrylic paint to give it a color (my favorite at the moment is a cheap acrylic craft paint called mushroom ... gives a nice dirt hue). I put a thick glob on my base (a penny), and push my infantry stands down into the glob. I touch a brush with some of the acrylic medium on top of the molded-on base, sprinkle some large-grain sand (as stones) and some RR shrub clumps, and then cover the whole thing with a small mound of flocking while still wet. After about an hour I take the 30 or so stands I have done this with, turn them over and tap them a few times to remove the excess flocking, and voila!
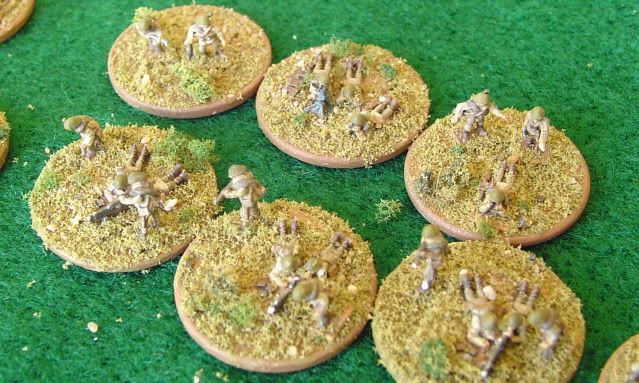
A platoon of my GHQ Romanians.
The acrylic medium provides a raised texture that reaches the tops of the molded-on-bases. It also provides the earth color, and the adhesion for the figures and the terrain materials. The touch of medium on top of the molded-on-bases ensures continuity with the terrain materials (they flow over and onto the rectangles).
I learned this approach from ACWBill here on this board. It seems to work pretty well, and is pretty quick and simple.
It addresses the unsightly rectangles thing quite well. But you still get the figures raised up a bit. Oh well, nobody's perfect.
I have never had success in thinning them. Shaving them down would some form of grip to hold the figure. I have never managed that successfully without crushing the figure or slipping the grip (and slicing something other than the molded-on base!
I used to clip them off, using cuticle cutters to slide below the molded feet to cut them off of the molded-on-stand. I still do that for figures that I mount in my open-topped vehicles. But for infantry on bases that made it difficult to mount them (they like to fall over before the glue dries), and made for weak adhesion if I didn't use a thick blob of glue (which was unsightly enough to pretty-much defeat the purpose of clipping the molded-on base).
So now I am resolved to building up the base to obscure the molded-on-base of the figures.
I am intrigued by the method Sepp describes. But I feel my method is simpler. I use pennies for my stands, but my approach would work equally well for thinner base materials, and given the plasticity of the materials might be a very good solution for materials that have some amount of flex, like thin plastic card.
I use Acrylic Medium Matte Gel for my basing. This material takes color well (it is the base material for acrylic paints), and had high adhesion (it is the base material for acrylic household glues), but in gel form it also has a thick consistency (rather like pudding or yoghurt).
The medium is white when wet, and dries to an uncolored cloudy opaque. I add some acrylic paint to give it a color (my favorite at the moment is a cheap acrylic craft paint called mushroom ... gives a nice dirt hue). I put a thick glob on my base (a penny), and push my infantry stands down into the glob. I touch a brush with some of the acrylic medium on top of the molded-on base, sprinkle some large-grain sand (as stones) and some RR shrub clumps, and then cover the whole thing with a small mound of flocking while still wet. After about an hour I take the 30 or so stands I have done this with, turn them over and tap them a few times to remove the excess flocking, and voila!
A platoon of my GHQ Romanians.
The acrylic medium provides a raised texture that reaches the tops of the molded-on-bases. It also provides the earth color, and the adhesion for the figures and the terrain materials. The touch of medium on top of the molded-on-bases ensures continuity with the terrain materials (they flow over and onto the rectangles).
I learned this approach from ACWBill here on this board. It seems to work pretty well, and is pretty quick and simple.
It addresses the unsightly rectangles thing quite well. But you still get the figures raised up a bit. Oh well, nobody's perfect.
-Mark 1
Difficile est, saturam non scribere.
"It is hard NOT to write satire." - Decimus Iunius Juvenalis, 1st Century AD
Difficile est, saturam non scribere.
"It is hard NOT to write satire." - Decimus Iunius Juvenalis, 1st Century AD
-
John Secker
- E5
- Posts: 204
- Joined: Mon Jul 02, 2012 5:19 am
- Location: Warrington, UK
I take the same approach - if you can't lower the man, raise the earth  I use a paint called Basetex, essentially acrylic paint with sand mixed in I think. That builds the base up around the figure and also provides a more realistic texture to the ground - you can have it nearly flat for desert bases, or add some more interesting contours. But it is a fiddly job and you have to take care not to get it on the figures. After I have done that I add bits of flock and other scenery.
The one area this doesn't really work is when I am basing figures with vehicles on the same base - as with Panzergrenadiers for example. Leaving them on their bases makes them tower over the vehicles in an unrealistic manner. So there I have the same problem of trying to clip or file or cut the bases off, and also the problem of the figure falling over before the glue has set, and being very vulnerable in use with such a small surface being glued. I try to slice off a small "pancake" of the base under his feet, so the model is on sort of snowshoes which can then be glued down without adding much to the height, but this is a horribly imprecise task.
For figures actually inside open topped vehicle I just snip them off the base, the vehicle body usually offers some support when gluing them in. I will often cut some of their legs off, too, perhaps at the knee, so I can glue them in and they will be lower down, to allow them to look as if they are properly "inside" the vehicle.
-
Waddell
- E5
- Posts: 196
- Joined: Sat Dec 07, 2013 10:16 pm
- Location: San Mateo, CA
Question for you all on the pumice jell or the liquitex approach. I've been using balsa wood for basing so I'm wondering if you know if either of these products cause warping in the wood as they dry? I haven't quite talked myself into using pennies. Similarly, would it cause warping if I shifted to sheet plastic instead?
-
Mk 1
- E5
- Posts: 2383
- Joined: Fri Dec 24, 2004 3:21 am
- Location: Silicon Valley, CA
I don't believe the Acrylic Medium would cause any warping. But if you have any acrylic paint you can try it yourself.Waddell wrote: I've been using balsa wood for basing so I'm wondering if you know if either of these products cause warping in the wood as they dry? ... Similarly, would it cause warping if I shifted to sheet plastic instead?
The medium is nothing more than un-tinted paint. In gel form, it is about the same consistency as the glob at the bottom of the paint bottle or jar -- that goo that causes you stir the paint before you use it. So take one of your balsa or thin plastic stands, open your favorite bottle of acrylic model paint, and when you stir it, use the stand to wipe off the stirring stick (instead of the lip of the jar/bottle). Let it dry and see if it warps.
I expect it won't. I don't think acrylic paints cause warpage. If they did, you'd read about it in the hobby forums (like this one).
I used to use white glue. That shrinks when it dries. I observed this in mounting my figures ... not that the pennies would warp (wow, now THAT would be some strong glue!) but the figures would shift as the glue dried, and sometimes a figure that had more glue on one side than the other would be pulled / toppled over, or gaps would appear around the edges of the molded-on-base when the glue pulled away as it shrank. I do not observe anything like that with the acrylic medium.
One of the advantages of using the gel medium, rather than one of the pumice/sand mixes or "textured paint" (which I have also tried), is that you don't need to do much fiddly work.But it is a fiddly job and you have to take care not to get it on the figures.
You spread your gel across the top of the stand. You push the figures down into it. You touch a bit of acrylic onto the top of the molded-on-bases (this is the only fiddly part, but it's not really very hard), and you start adding your terrain stuff (shrubs, stones, static grass, flock, whatever you might like). No glue, no extra painting. Done,.
Hope that helps.
-Mark 1
Difficile est, saturam non scribere.
"It is hard NOT to write satire." - Decimus Iunius Juvenalis, 1st Century AD
Difficile est, saturam non scribere.
"It is hard NOT to write satire." - Decimus Iunius Juvenalis, 1st Century AD
-
Sepp
- Posts: 82
- Joined: Sat Aug 16, 2008 12:12 am
- Location: Stanardsville VA USA
Hey everyone
Many thanks for all the replies. I base both vehicles and men on plastic rectangles, 1/2 x1" for infantry and vehicles then 1x1" for artillery. So as John Secker said I would have to rebase all my vehicles to make the height acceptable . As I have boxes and boxes of these since god knows when and I am now redoing everything, we are talking a lot of work. The idea of gluing them then filling up to the figures base seems my most plausible answer. although this will still make the figures a little tall

Many thanks for all the replies. I base both vehicles and men on plastic rectangles, 1/2 x1" for infantry and vehicles then 1x1" for artillery. So as John Secker said I would have to rebase all my vehicles to make the height acceptable . As I have boxes and boxes of these since god knows when and I am now redoing everything, we are talking a lot of work. The idea of gluing them then filling up to the figures base seems my most plausible answer. although this will still make the figures a little tall
-
ferret701
- E5
- Posts: 390
- Joined: Tue Jan 04, 2005 8:14 pm
- Location: Northern Virginia
- Contact:
You know, I've based something like 1500 (or more...) infantry stands over the years, and I never had any idea that Liquitex would actually work to adhere the models to the bases. I've certainly used it, and own about a gallon, but have always been gluing the dudes down with super glue, then painting on the Liquitex... [Head-Splap]
This method seems so much better and quicker. I'll use it for my modern Chinese (whenever I actually get to them...)
Thanks, guys, that's why I visit the forums.
This method seems so much better and quicker. I'll use it for my modern Chinese (whenever I actually get to them...)
Thanks, guys, that's why I visit the forums.
-
TAMMY
- E5
- Posts: 865
- Joined: Wed Jan 27, 2010 12:09 am
- Location: MILANO, ITALY
I have always used 0,8-1mm birch plywood for may bases and haveno probem of waping with white glue nor liquitex.
I do not base my vehicles so I don't have the problem of hieght of figure/vehicles on the same base as John Seeker sayss. In he case, my solution would be to fix the vehicles after having raised the base, so they will be at the same level of the figure feet.
I do not base my vehicles so I don't have the problem of hieght of figure/vehicles on the same base as John Seeker sayss. In he case, my solution would be to fix the vehicles after having raised the base, so they will be at the same level of the figure feet.
Ubicumque et semper
-
Mk 1
- E5
- Posts: 2383
- Joined: Fri Dec 24, 2004 3:21 am
- Location: Silicon Valley, CA
I don't base my vehicles, but seeing so many comments about whether such an approach would or wouldn't work with vehicles I thought I might offer this view.
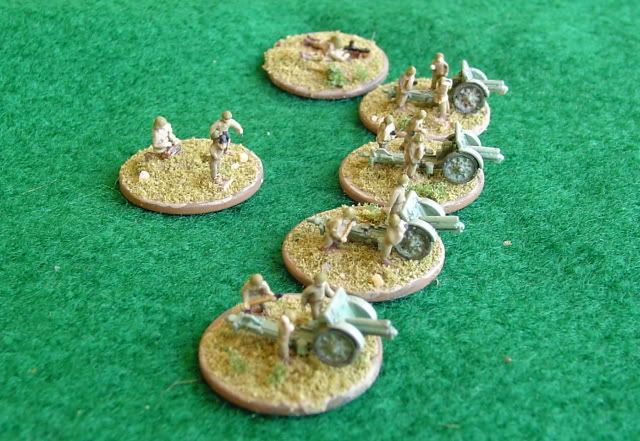
Here are some of my Romanian artillery. In this case I've used GHQ's Italian 100mm Howitzer -- a Skoda gun that was also used by the Romanians (OK, I'm not entirely sure this is the right Skoda 100mm howitzer for the Romanians, but I have just closed my eyes and gone with it!).

And here are more Romanian artillery -- in this case French 75mm guns (also used by the Romanians).
I completed the crew stands, and when they had dried I put the guns on the stands. Seems to look quite alright to me. Whether trucks, half-tracks, tanks, guns ... whatever, it appears to me that non-infantry models can be placed quite reasonably onto a stand that has the infantry built-in, so to speak.
Now in my case I didn't glue the guns down. That way I can create fewer crew stands than I have guns -- enough crews usually for one or two batteries of artillery and one battery of AT guns, even though I may have several batteries of guns to cover the various calibers and years of service. I can then just place the AT or artillery guns on the crew stands to meet my scenario needs. It also makes it easy to work with rulesets that adjudicate crew casualties and gun damage seperately.
I've done my more recent infantry forces this way -- my Italians, Romanians, and French North Africans all have crew stands and guns that are seperate. Works well enough so far, although some day I'm sure I'll want all my different guns in action for some force in some scenario, at which point I'll lament not having enough crew stands.
But the guns, or any other models (vehicles, etc.) could just as easily be glued to the stands.
I realize this is no comfort for those who have already based large armies of tanks, etc. But hey, if you're doing a new infantry formation, maybe it's for an army that doesn't already have all it's vehicles based up some other way.
Or maybe not.
Can't solve all the world's problems with a single suggestion.

Here are some of my Romanian artillery. In this case I've used GHQ's Italian 100mm Howitzer -- a Skoda gun that was also used by the Romanians (OK, I'm not entirely sure this is the right Skoda 100mm howitzer for the Romanians, but I have just closed my eyes and gone with it!).
And here are more Romanian artillery -- in this case French 75mm guns (also used by the Romanians).
I completed the crew stands, and when they had dried I put the guns on the stands. Seems to look quite alright to me. Whether trucks, half-tracks, tanks, guns ... whatever, it appears to me that non-infantry models can be placed quite reasonably onto a stand that has the infantry built-in, so to speak.
Now in my case I didn't glue the guns down. That way I can create fewer crew stands than I have guns -- enough crews usually for one or two batteries of artillery and one battery of AT guns, even though I may have several batteries of guns to cover the various calibers and years of service. I can then just place the AT or artillery guns on the crew stands to meet my scenario needs. It also makes it easy to work with rulesets that adjudicate crew casualties and gun damage seperately.
I've done my more recent infantry forces this way -- my Italians, Romanians, and French North Africans all have crew stands and guns that are seperate. Works well enough so far, although some day I'm sure I'll want all my different guns in action for some force in some scenario, at which point I'll lament not having enough crew stands.
But the guns, or any other models (vehicles, etc.) could just as easily be glued to the stands.
I realize this is no comfort for those who have already based large armies of tanks, etc. But hey, if you're doing a new infantry formation, maybe it's for an army that doesn't already have all it's vehicles based up some other way.
Or maybe not.
Can't solve all the world's problems with a single suggestion.
Last edited by Mk 1 on Wed Oct 15, 2014 6:57 am, edited 1 time in total.
-Mark 1
Difficile est, saturam non scribere.
"It is hard NOT to write satire." - Decimus Iunius Juvenalis, 1st Century AD
Difficile est, saturam non scribere.
"It is hard NOT to write satire." - Decimus Iunius Juvenalis, 1st Century AD
-
kiasutha
- E5
- Posts: 439
- Joined: Thu May 25, 2006 9:10 pm
Sorry,thread drift ahead...
Mk1:
The short answer on the Skoda is unfortunately "officially, no"; the Romanians didn't use that particular model during the war, though I'm reluctant to say they might not of gotten hold of any...
They had over a hundred of them post WW1, but in the 30's Astra converted those to the M14/34; "to the standard of the latest Czech model" ( info from "third axis, fourth ally").
They had another Czech modernization of the vz 14/ GHQ model, the vz 14/19 that has a longer L24 (instead of L19) barrel, so about another 20" length- probably all you'd notice in this scale.
I know the Germans delivered about 65 of them post Stalingrad, but can't recall them having any others.
Meanwhile, having no other options, I'm also using the stock Italian gun; though what I need is the 14/34, vz 30, and vz 34 types. I doubt we'll ever see those...
Btw, I'm still interested in how you did the flamethrower conversion...
-
Mk 1
- E5
- Posts: 2383
- Joined: Fri Dec 24, 2004 3:21 am
- Location: Silicon Valley, CA
kiasutha wrote: Sorry,thread drift ahead...

I have recently found a document: ARTILERIA ROMÂNÃ ÎN DATE SI IMAGINI [The Data and Images of Romanian Artillery] by Col. conf. univ. dr. Adrian STROEA & Lt. col. Gheorghe BÃJENARU (Editura Centrului Tehnic-Editorial al Armatei Bucurecti – 2010). This seems to be an exhaustive survey of artillery pieces used by the Romanian Army.The short answer on the Skoda is unfortunately "officially, no"; the Romanians didn't use that particular model during the war, though I'm reluctant to say they might not of gotten hold of any...
They had over a hundred of them post WW1, but in the 30's Astra converted those to the M14/34; "to the standard of the latest Czech model" ( info from "third axis, fourth ally").
In it, on page 79, it lists and shows an illustration of the Oburzeirul "Skoda" Calibrul 100mm Model 1914. That's our gun. My Romanian language skills being somewhat thin, I rely on Google Translates for the text. Here is what my google-fu produces:
In the Roman army remained
the catch in the first war
220 howitzers world model
1914 of which were in service
in 1933 a number of 140
parts. They were supplied in periods
give the divizioanele the interwar
howitzer regiments of Articles
Yesterday the army corps in June and July.
After 1936, once the acqui-
Model 1934 has ziþionarea
used in addition to these
parts and in the War
world. The new state of Czechoslovakia
reintroduced into production this
howitzer in 1919 and it has mo-
dernizat by stretching the pipe, the
19-24 gauges and zoom beating
at 9970 m. Variant 14/19 have a
greater weight to fight,
155 kg (1505 kg).
This howitzer was
model for subsequent versions
quent and the equipment were
our army as well as model
1930 and 1934 model.
Hmmmm. Until I can get a better translation, I could read this either way ... it certainly describes the upgraded guns, but seems that it might also suggest both guns were kept in service.
In the end this is the conclusion I too reached.Meanwhile, having no other options, I'm also using the stock Italian gun; though what I need is the 14/34, vz 30, and vz 34 types.
Wouldn't be the first time I've had to go with an imperfect match of weapons to troops to get something close to what I wanted.

Probably won't be the last time, either.
Last edited by Mk 1 on Wed Oct 15, 2014 7:24 am, edited 3 times in total.
-Mark 1
Difficile est, saturam non scribere.
"It is hard NOT to write satire." - Decimus Iunius Juvenalis, 1st Century AD
Difficile est, saturam non scribere.
"It is hard NOT to write satire." - Decimus Iunius Juvenalis, 1st Century AD
-
piersyf
- E5
- Posts: 625
- Joined: Sat Oct 04, 2008 1:59 pm
- Location: Melbourne Australia
On basing; I sand the base of the infantry figures level to get good grip on the base, not to thin the base of the figure. I use wet and dry paper on a flat metal surface, hold the base with tweezers and if necessary apply downward pressure using an exacto knife (backwards so it doesn't cut) between the figure's feet. A few side to side swipes to level and brighten the bottom of the figure, and it's good to glue.
I mount infantry on 0.75mm styrene, and mount my vehicles on 1mm styrene. The different base thickness removes some of the thickness of the cast base on the figures.
I mount everything because I want to be able to identify everything.
I agree that irregular bases look better for infantry, but frankly that takes too long, and when you put the ID tag on the base you introduce a regular shape anyway. My bases are rectangular.
There is no right or wrong, only decisions and consequences.
-
kiasutha
- E5
- Posts: 439
- Joined: Thu May 25, 2006 9:10 pm
Mk1:
Man, that translation makes me appreciate the katzenjammer kids !
I've also seen that publication.
There was a discussion of it and it's accuracy on the ww2.ro forum some time ago.
(At this point, time isn't easy to keep track of...)
For now, I'll stick with Axeworthy and company, but as the vz 14 is all we've got it's a moot point really. I'd thought of lengthening the barrel, but the 14/19 still doesn't help in my period.
I really wish they'd make a real Schneider 47mm atg though...
Man, that translation makes me appreciate the katzenjammer kids !
I've also seen that publication.
There was a discussion of it and it's accuracy on the ww2.ro forum some time ago.
(At this point, time isn't easy to keep track of...
For now, I'll stick with Axeworthy and company, but as the vz 14 is all we've got it's a moot point really. I'd thought of lengthening the barrel, but the 14/19 still doesn't help in my period.
I really wish they'd make a real Schneider 47mm atg though...