Galerie de la Begemot - 2nd Edition
Moderators: dnichols, GHQ, Mk 1
-
pmskaar
- E5
- Posts: 1921
- Joined: Sun Apr 17, 2005 5:45 am
Re: Galerie de la Begemot - 2nd Edition
Great pictures and AAR, Begemot! A small but interesting action.
-
Begemot
- E5
- Posts: 222
- Joined: Fri Aug 19, 2011 12:11 am
Re: Galerie de la Begemot - 2nd Edition
Redleg, Imagination, and Pete - Thanks for your interest and comments. Much appreciated.
Imagination - The scale for Mein Panzer at 6mm or 1/285 is: 1 inch equals 50 yards; 1 vehicle equals 1 vehicle; and for infantry a squad is a stand of 4 figures on a 1/2" x 1/2" stand. Time scale is about 5 minutes per turn.
I deviate from the infantry recommendation by using 2 figures each on a separate 1/2" x 1/2" stand to represent a squad. This avoids the appearance of little Napoleonic columns on the battle field and both spreads out the infantry and contributes better to the 'empty battlefield' visual effect. Just a quirk of mine.
Begemot
The summer grasses.
For many brave warriors
The aftermath of dreams.
--- Basho
Please visit my website "Lair of the Begemot": (https://lairbegemot.blogspot.com)
For many brave warriors
The aftermath of dreams.
--- Basho
Please visit my website "Lair of the Begemot": (https://lairbegemot.blogspot.com)
-
Begemot
- E5
- Posts: 222
- Joined: Fri Aug 19, 2011 12:11 am
Re: Galerie de la Begemot - 2nd Edition
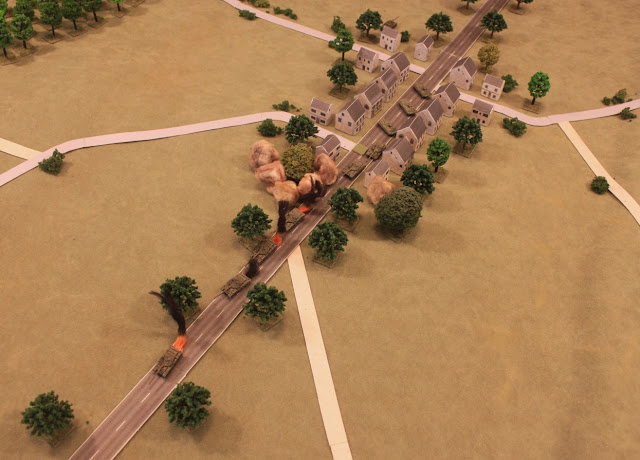
Mein Panzer Cold War - Collision
Introduction
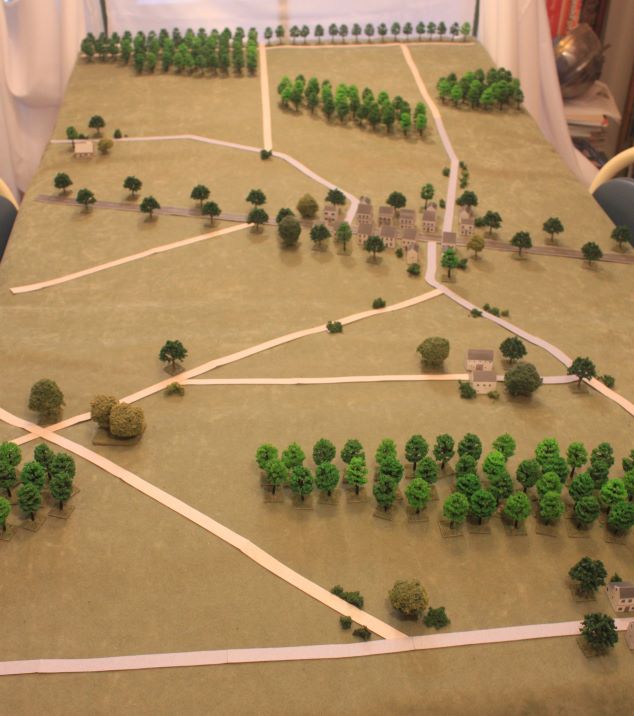
Continuing from the previous Jossa ("Hide and Seek") scenario the Soviet command decides that, based on their reconnaissance reports, an opportunity to attempt to cut off American forces retreating west exists. A tank regiment is ordered to move southwest in the Jossa direction to carry out this maneuver. The Americans recognize their vulnerability and order forces to move to block the Soviet threat. A meeting engagement is in the offing.
As I have neither the table space nor models enough to execute a very large engagement, this scenario will be small in scale, representing the initial contact of the forces.
U.S. Forces
Mission: Engage advancing Soviet forces to delay or halt their advance south through the Jossa valley.
Forces Available: 1 x M60A1 platoon (5 tanks)
Soviet Forces
Mission: Operating as part of the advance guard move south through Jossa to engage US forces and carry out the regiment's mission to cut off and destroy US forces withdrawing west.
Forces Available: 1 x T62 company (9 tanks)
Deployment
Both forces start off table, entering on the first turn, the Soviets from the right (the north) and the Americans from the left (the south).
The Game
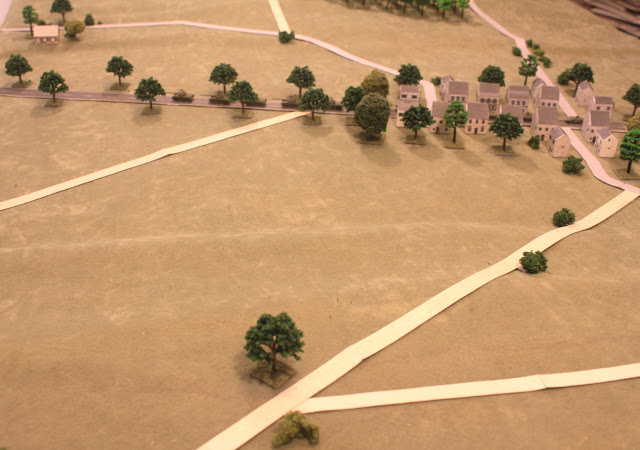
The US gets the initiative and enters first followed by the Soviets. The US engages a spotted Soviet tank but misses.

Second turn the Soviets get the initiative. Moving forward they exchange fire with two US tanks on the US left and get a hit which immobilizes and suppresses one tank.

The US activation sees the suppressed tank recover and the other two tanks on the US left fire. One T62 is killed.

On the third turn the Soviets win the initiative. The Soviet right platoon checks its morale due to its loss and becomes Shaken. They cannot advance this turn, but they can fire and doing so they immobilize another US tank. A center Soviet platoon tank fires at the just immobilized US tank and kills it. Further Soviet fires miss and the remainder of the Soviet company moves forward.
The US platoon activates and checks morale due to its loss. Morale remains good. The remaining left flank US tanks fire with one miss and one suppression result. The two US tanks on the right, unable to see the Soviets on their left remain in Overwatch, waiting for the enemy to appear to their front.
Turn 4 the US gets the initiative so the two US tanks on the left fire. One miss and one kill.

The Soviets on the right continue firing at the US tanks on the US left and kill both US tanks. The US left has been destroyed.

The Soviet center platoon passes its morale check and advances. The Soviet left platoon also moves forward but comes under fire from the overwatching right flank US tanks. One Soviet tank is suppressed and another is destroyed.

Turn five sees the Soviets with the initiative. The Soviet left platoon passes its morale but the suppressed tank remains so. The remaining left flank platoon tank advances through Jossa to the edge of town. The Soviet right flank platoon now advances and engages the left of the remaining US tanks, getting an immobilized and suppressed result. The center Soviet platoon now moves forward but its fires miss.

The US activation sees the US fail its morale check with a rout result. The only US tank that can move exits the table. Its immobilized comrade is abandoned.

The Soviets begin the pursuit.

Results
U.S.: 3 tanks killed; 1 tank immobilized and abandoned; 1 tank escaped.
Soviets: 3 tanks killed.
Assessed: Soviet victory.
Comments
Tactics: This is a meeting engagement and the tactics used by both sides were very basic: get into line and blaze away until somebody wins. For the Soviets this tactic naturally follows from their tank company battle drill, rapidly deploy from column into line and attack to maintain offensive momentum. So why would the US side chose such a tactic, considering they are out numbered? If your foe is on you before you expect him you do your best and pray that will be good enough. This is just the sort of situation you have here with both sides coming into view at the same time and within range.
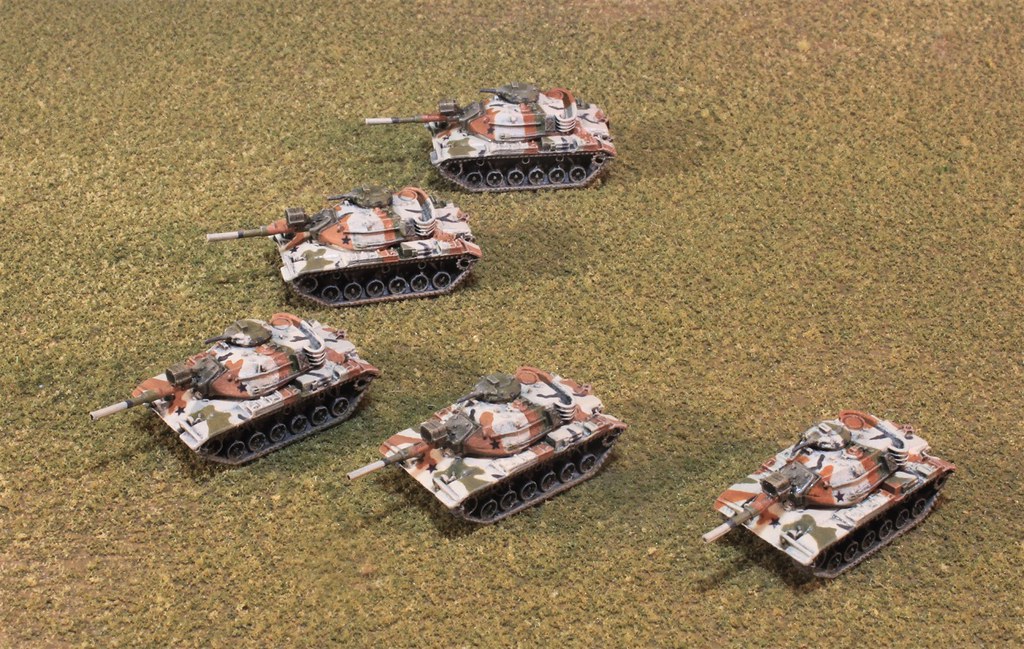
US Tank Camouflage: If you are curious about the camouflage scheme carried by the US tanks it is the MASSTER scheme. This was a scheme that many US units in Germany carried before the introduction of the MERDC scheme. Here is a closer view of the models:
Click here for more: https://lairbegemot.blogspot.com/2022/1 ... .html#more
Mein Panzer M60A1 Values: When I closely examined the 'teaser' Cold War data for the M60A1 tank that OGDW has published I noticed that the frontal defensive value was given as '14'! The T62 has '8' listed as its frontal defensive value. These two tanks were understood to be relatively evenly matched. The M60 value seemed too much so a check of other data sources led me to adjust the front defensive value to a '9' with additional adjustments to the side (from '7' to '4') and the rear (from '3' to '2'). The battle was fought with these adjusted values.
Introduction
Continuing from the previous Jossa ("Hide and Seek") scenario the Soviet command decides that, based on their reconnaissance reports, an opportunity to attempt to cut off American forces retreating west exists. A tank regiment is ordered to move southwest in the Jossa direction to carry out this maneuver. The Americans recognize their vulnerability and order forces to move to block the Soviet threat. A meeting engagement is in the offing.
As I have neither the table space nor models enough to execute a very large engagement, this scenario will be small in scale, representing the initial contact of the forces.
U.S. Forces
Mission: Engage advancing Soviet forces to delay or halt their advance south through the Jossa valley.
Forces Available: 1 x M60A1 platoon (5 tanks)
Soviet Forces
Mission: Operating as part of the advance guard move south through Jossa to engage US forces and carry out the regiment's mission to cut off and destroy US forces withdrawing west.
Forces Available: 1 x T62 company (9 tanks)
Deployment
Both forces start off table, entering on the first turn, the Soviets from the right (the north) and the Americans from the left (the south).
The Game
The US gets the initiative and enters first followed by the Soviets. The US engages a spotted Soviet tank but misses.
Second turn the Soviets get the initiative. Moving forward they exchange fire with two US tanks on the US left and get a hit which immobilizes and suppresses one tank.
The US activation sees the suppressed tank recover and the other two tanks on the US left fire. One T62 is killed.
On the third turn the Soviets win the initiative. The Soviet right platoon checks its morale due to its loss and becomes Shaken. They cannot advance this turn, but they can fire and doing so they immobilize another US tank. A center Soviet platoon tank fires at the just immobilized US tank and kills it. Further Soviet fires miss and the remainder of the Soviet company moves forward.
The US platoon activates and checks morale due to its loss. Morale remains good. The remaining left flank US tanks fire with one miss and one suppression result. The two US tanks on the right, unable to see the Soviets on their left remain in Overwatch, waiting for the enemy to appear to their front.
Turn 4 the US gets the initiative so the two US tanks on the left fire. One miss and one kill.
The Soviets on the right continue firing at the US tanks on the US left and kill both US tanks. The US left has been destroyed.
The Soviet center platoon passes its morale check and advances. The Soviet left platoon also moves forward but comes under fire from the overwatching right flank US tanks. One Soviet tank is suppressed and another is destroyed.
Turn five sees the Soviets with the initiative. The Soviet left platoon passes its morale but the suppressed tank remains so. The remaining left flank platoon tank advances through Jossa to the edge of town. The Soviet right flank platoon now advances and engages the left of the remaining US tanks, getting an immobilized and suppressed result. The center Soviet platoon now moves forward but its fires miss.
The US activation sees the US fail its morale check with a rout result. The only US tank that can move exits the table. Its immobilized comrade is abandoned.
The Soviets begin the pursuit.
Results
U.S.: 3 tanks killed; 1 tank immobilized and abandoned; 1 tank escaped.
Soviets: 3 tanks killed.
Assessed: Soviet victory.
Comments
Tactics: This is a meeting engagement and the tactics used by both sides were very basic: get into line and blaze away until somebody wins. For the Soviets this tactic naturally follows from their tank company battle drill, rapidly deploy from column into line and attack to maintain offensive momentum. So why would the US side chose such a tactic, considering they are out numbered? If your foe is on you before you expect him you do your best and pray that will be good enough. This is just the sort of situation you have here with both sides coming into view at the same time and within range.
US Tank Camouflage: If you are curious about the camouflage scheme carried by the US tanks it is the MASSTER scheme. This was a scheme that many US units in Germany carried before the introduction of the MERDC scheme. Here is a closer view of the models:
Click here for more: https://lairbegemot.blogspot.com/2022/1 ... .html#more
Mein Panzer M60A1 Values: When I closely examined the 'teaser' Cold War data for the M60A1 tank that OGDW has published I noticed that the frontal defensive value was given as '14'! The T62 has '8' listed as its frontal defensive value. These two tanks were understood to be relatively evenly matched. The M60 value seemed too much so a check of other data sources led me to adjust the front defensive value to a '9' with additional adjustments to the side (from '7' to '4') and the rear (from '3' to '2'). The battle was fought with these adjusted values.
The summer grasses.
For many brave warriors
The aftermath of dreams.
--- Basho
Please visit my website "Lair of the Begemot": (https://lairbegemot.blogspot.com)
For many brave warriors
The aftermath of dreams.
--- Basho
Please visit my website "Lair of the Begemot": (https://lairbegemot.blogspot.com)
-
chrisswim
- E5
- Posts: 6614
- Joined: Wed Dec 15, 2004 11:22 pm
- Location: Jacksonville, FL
Re: Galerie de la Begemot - 2nd Edition
Nice, Very nice looking table and battle.
Is each tree a single tree or a group of trees?
Great to see, look at and enjoy. I need to you to run a game for us....
Is each tree a single tree or a group of trees?
Great to see, look at and enjoy. I need to you to run a game for us....
Chris
-
pmskaar
- E5
- Posts: 1921
- Joined: Sun Apr 17, 2005 5:45 am
Re: Galerie de la Begemot - 2nd Edition
Great battle report, Begemot! I also love your MASSTER camo on your American tanks. Great stuff!
-
Begemot
- E5
- Posts: 222
- Joined: Fri Aug 19, 2011 12:11 am
Re: Galerie de la Begemot - 2nd Edition
Chris and Pete - Thanks for looking and I'm glad you found the scenario interesting.
Chris - The tree model is a single tree if standing alone in the open, but represents multiple trees if in a group, especially a large stand.
Begemot
Chris - The tree model is a single tree if standing alone in the open, but represents multiple trees if in a group, especially a large stand.
Begemot
The summer grasses.
For many brave warriors
The aftermath of dreams.
--- Basho
Please visit my website "Lair of the Begemot": (https://lairbegemot.blogspot.com)
For many brave warriors
The aftermath of dreams.
--- Basho
Please visit my website "Lair of the Begemot": (https://lairbegemot.blogspot.com)
-
redleg
- E5
- Posts: 3438
- Joined: Fri Dec 17, 2004 11:02 am
- Location: Riverside, CA
Re: Galerie de la Begemot - 2nd Edition
Great looking game, Begemot! I love the camo on your tanks!
Redleg's Website: micropope.webstarts.com
-
Begemot
- E5
- Posts: 222
- Joined: Fri Aug 19, 2011 12:11 am
Re: Galerie de la Begemot - 2nd Edition
Redleg - Thanks. More still to come.
Begemot
Begemot
The summer grasses.
For many brave warriors
The aftermath of dreams.
--- Basho
Please visit my website "Lair of the Begemot": (https://lairbegemot.blogspot.com)
For many brave warriors
The aftermath of dreams.
--- Basho
Please visit my website "Lair of the Begemot": (https://lairbegemot.blogspot.com)
-
foxbat
- E5
- Posts: 134
- Joined: Tue Dec 29, 2009 2:01 am
- Location: France
Re: Galerie de la Begemot - 2nd Edition
Nice minis and terrain.
Given the balance of forces and the set up, I think the US side did pretty well in that game.
Given the balance of forces and the set up, I think the US side did pretty well in that game.
-
Begemot
- E5
- Posts: 222
- Joined: Fri Aug 19, 2011 12:11 am
Re: Galerie de la Begemot - 2nd Edition
Mein Panzer Cold War - Skinning the Cat
Prologue
Secretary of Defense Donald Rumsfeld shook his head and growled with irritation. He had just finished the report of the action detailed in the
"Collision" (see above) report and was most annoyed at what he had read. "My God!" thought Rumsfeld, "This was a disaster! What if Cronkite gets hold of this and puts it out on CBS News? Could this turn into another 'Vietnam is Lost' moment? This war is just getting started and we can't let something like this 'Collision' debacle run this war off the rails."
After a few moments of contemplation Rumsfeld nodded his head and set his jaw. "We need a Do-Over on this." With the decision made, Rumsfeld pulled the bottom drawer of his desk open and pulled out The Very Red Phone. He picked up the receiver and heard the click as the phone was picked up on the receiving end.

The familiar voice spoke. "Morden speaking. What do you want?"
"This is Rumsfeld and ..."
"I know who this is. What do you want?"
"We need a Do-Over. We had an incident in the current project that could be very damaging if it gets out. It could raise questions of competence in the public mind. We need to erase this event and do it again with a better plan of action." There was a long silence.
"It's not easy" said Morden. "Bending space and time like that. You're asking for a lot. This requires personal handling by the Boss."
"I appreciate the difficulty", said Rumsfeld, "but think of all those souls the Corporation loses if this project ends early? Can you afford that?" Another long silence.
"Let me check with His Darkness. Please hold." Lawrence Welk muzak began to play while Rumsfeld drummed his desk. Five minutes passed and Morden resumed the call.
"Okay, you've got the Do-Over. But make your new effort worth our time. It will cost you. We'll have your soul for this."
"Yes, of course", said Rumsfeld with relief. "This time things will be different. You won't regret this. How will I know when the Do-Over has been completed? How will I know when it's been done?"
"When you throw up in your waste basket. The vertigo of the space-time warping is severe." The connection broke as Morden hung up.
"They already have my soul", thought Rumsfeld. "What morons. Things will be different when I get down there. There will be a new boss." As Rumsfeld closed the lower desk drawer with the Very Red Phone he felt an overpowering sense of dizziness and a wave of nausea hit him.
A moment later he reached for his intercom. "Get General Blanchard on the line immediately! I've got new orders!" barked Rumsfeld.
Introduction
As the old saying goes about there being more than one way to skin a cat, so tactics allow for a variety of choices in how to accomplish a given mission. These choices may be more or less appropriate, more or less expensive, more or less successful. This scenario is a replay of the basic situation presented in "The Collision" with the US side being given an opportunity to use a more sophisticated approach in meeting advancing Soviet forces and to have a chance of acquitting themselves better.
U.S. Forces
Mission: Engage advancing Soviet forces to delay or halt their advance south through the Jossa valley.
Forces Available:
Soviet Forces
Mission: Operating as part of the advance guard move south through Jossa to engage US forces and carry out the regiment's mission to cut off and destroy US forces withdrawing west.
Forces Available:
Combat Reconnaissance Patrol:
Scenario Conditions
The US side is allowed to place their force anywhere on the western half of the table before the arrival of any Soviet forces.
The Soviets will be organized into two groups: a Combat Reconnaissance Patrol (CRP) which will enter the table on Turn 1; and a Forward Security Element (FSE) which will enter the table on Turn 5. Both forces will be required to remain road bound on the paved highway and proceed at best speed until they make contact with the US force, at which time they are released from all restrictions. Should the US player engage the CRP before the FSE has entered the table, the Soviet FSE may enter anywhere on the Soviet side of the table. Once the FSE has been engaged then the game continues for another 7 turns. The turn limit is based on the presumed entry of the Soviet Advanced Guard (a battalion plus sized force) after the seventh turn.
If the Soviets are not engaged the Soviets win.
Arrival Schedule for Soviets:
Turn 1 - Combat Recon Patrol
Turn 5 - Forward Security Element
Game ends when Soviet Forward Security Element exits western edge of table OR 7 turns after FSE has been engaged.
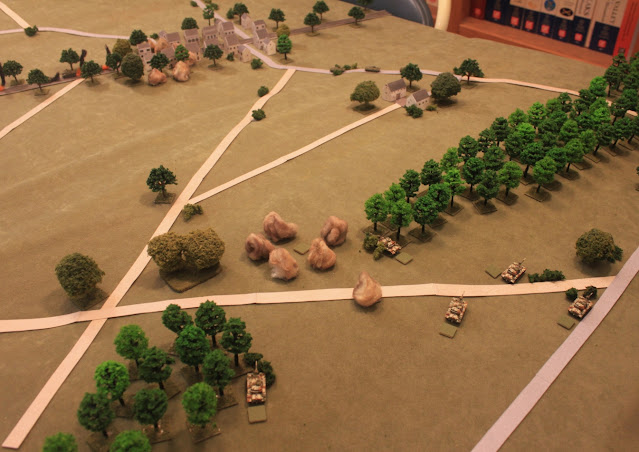
Deployment
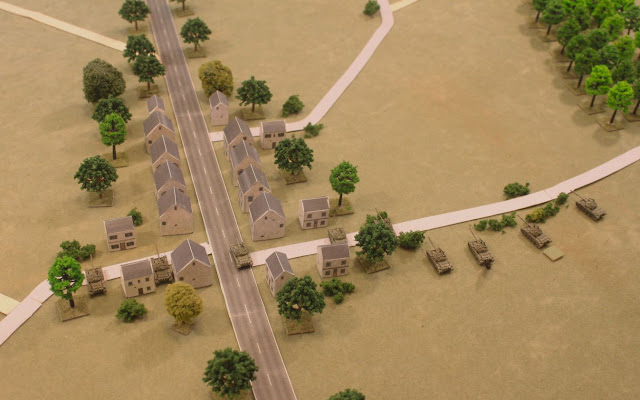
The areas of trees are not passable to the tanks of either side so the US tank platoon cannot take position in the woods. The US player decides to take up an ambush position on the north ridge as indicated by the blue marking open circle on the image below. The blue cross is the pre-registered artillery fire point. The red arrow indicates the entry direction for the Soviets, along the highway through the village.

The ridge will allow the US tanks to remain concealed either by hugging the edge of the tree line and camouflaging with brush and tree limbs or hiding below the ridgeline on the reverse slope, then moving up to hull defilade positions to engage the Soviets in the valley below.
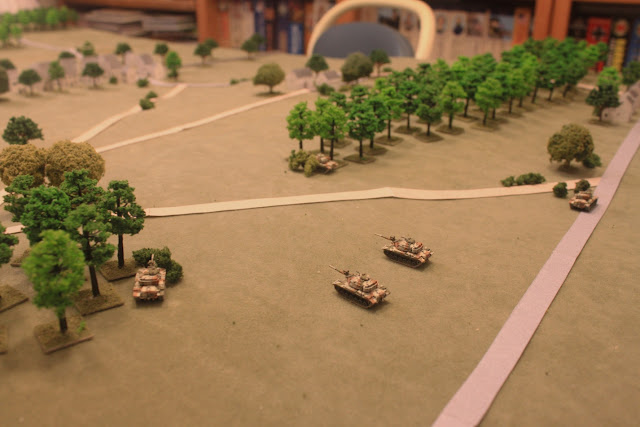
The two tanks alongside the trees have views into the valley. The rightmost tank is tasked with covering this approach should Soviet forces come down along the north ridge.
The US plan is to ignore the Combat Reconnaissance Patrol and let it exit the table. The tank in the upper center (the platoon leader) will initiate the ambush when the Soviet Forward Security Element emerges from the village. The two tanks in defilade in the center will move up to hull down positions and engage. The artillery will fire on the target reference point to split the Soviet column and isolate the leading vehicles from the rest of the Soviet force. Kill as many Soviets as possible and leave before the Soviet Advanced Guard arrives.
The Game
Turn 1 and the Soviet Combat Reconnaissance Patrol enters.

The US player watches the CRP cross and exit the table. Someone further down the road will deal with them.

Game turn 5 and the US target, the Forward Security Element, arrives.

The US watches the FSE emerge from Jossa.
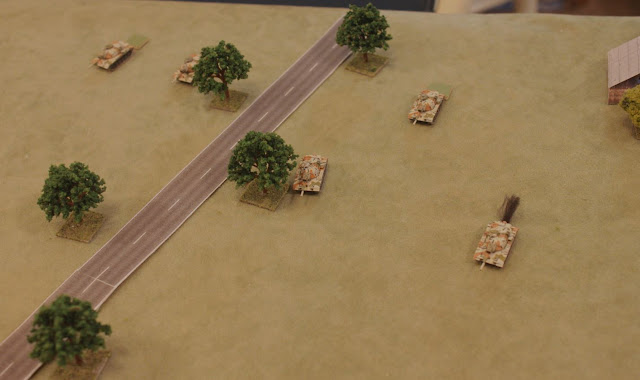
The US platoon leader decides the Soviets have moved down the road far enough and engages the lead Soviet T62, thereby initiating the ambush.

The lead tank, hit in the left side bursts into flames. The ambush sprung, the US M60s move up the to their hull defilade positions and engage.

Three more T62s are quickly destroyed before the Soviets can react.
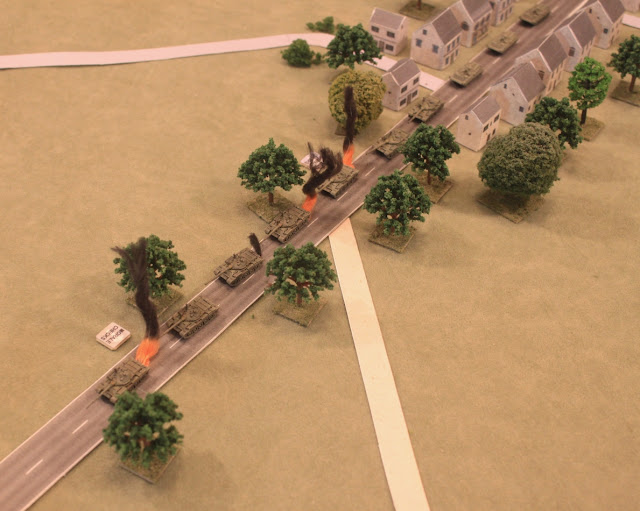
Then the US artillery falls adding to the Soviet's plight. The sole undamaged Soviet tank in the lead group routs (visible at lower left of village). The remaining Soviets pull back to get buildings between themselves and the US fires.

To further complicate the Soviet situation, both Soviet tank platoon leaders have been killed as well as the FSE commander. Only the BMP platoon leader is left to attempt to lead the FSE.
The US adjusts its artillery fires closer to the village. The US tanks watch for targets to present themselves. The US platoon leader knows that the Soviet Advanced Guard is barreling down the road towards him and so will not risk getting caught in the open without a covered escape route.
The BMP platoon leader successfully gains command of the FSE. The Soviet artillery Forward Observer maneuvers to a position to view the area from which the ambush was sprung.
The US artillery is adjusted into Jossa itself. The Soviet artillery arrives, barraging the area in front of the US position. It is intended to suppress the ambushing Americans and to mask the surviving Soviets.
The Soviet BMP platoon leader, filled with the spirit of aktivnost*, decides to use the masking effect of the Soviet artillery and orders the BMP platoon to maneuver to the tree line on the north ridge.

As the Soviet barrage continues, the BMPs begin to move along the tree line. If they can get close enough the infantry may be able to close with the US tanks and drive them off. The surviving T62s take up over watch positions covering the location of the ambushing enemy.

The US platoon leader, having been watching the clock and sensing through his fingerspitzengefühl** that the Soviets are closing up to him, decides that now is the time to leave. The platoon begins a controlled withdrawl. The US artillery is lifted. There are other urgent requests for their services.

The Soviet artillery lifts and the BMPs dismount their infantry but their quarry has gone.

The infantry secure the area just as the Advanced Guard begins to enter the board. The US has gotten safely away to their next position.
Results
U.S.: No losses.
Soviets: 4 tanks killed. 1 tank routed off the table. Forward Security Element delayed.
Assessed: US victory.
Epilogue
The Pentagon - later that evening. Secretary Rumsfeld reviews the report on the day's action at Jossa.
"Better. Much better." thinks Rumsfeld. "Cronkite won't have anything to use against us; the Commies got a bloody nose; and, I look good. I think the platoon leader at Jossa has earned himself a medal. Life is good." Rumsfeld smiles.
Comments
As noted in the introduction, this was a redo to show a different tactical approach to dealing with the initial stages of a meeting engagement scenario.
The M60 is a tall tank which makes it a bit easier to see, but a compensating benefit is it can depress its main gun to a greater degree than a Soviet T62 ( −10° for the M60 versus −6° for the T62). This fact points to high ground defilade positions giving the Americans a tactical advantage. Hence the ridge line ambush position selected by the US in this scenario.
Was this a fun or balanced scenario? Fun for the ambushers, of course. Balanced? No. But then in real war you look for every advantage to make the situation as unbalanced in your favor as you can. An ambush is designed to be as unfair a situation as you manage.
Glossary
* Aktivnost: the Soviet military principle of energetic, forceful and active pursuit of military goals.
** Fingerspitzengefühl: a German word which literally means "finger tip feeling" and means possessing an intuitive flair or instinct for the dynamics and nuances of a situation.
Begemot
Prologue
Secretary of Defense Donald Rumsfeld shook his head and growled with irritation. He had just finished the report of the action detailed in the
"Collision" (see above) report and was most annoyed at what he had read. "My God!" thought Rumsfeld, "This was a disaster! What if Cronkite gets hold of this and puts it out on CBS News? Could this turn into another 'Vietnam is Lost' moment? This war is just getting started and we can't let something like this 'Collision' debacle run this war off the rails."
After a few moments of contemplation Rumsfeld nodded his head and set his jaw. "We need a Do-Over on this." With the decision made, Rumsfeld pulled the bottom drawer of his desk open and pulled out The Very Red Phone. He picked up the receiver and heard the click as the phone was picked up on the receiving end.
The familiar voice spoke. "Morden speaking. What do you want?"
"This is Rumsfeld and ..."
"I know who this is. What do you want?"
"We need a Do-Over. We had an incident in the current project that could be very damaging if it gets out. It could raise questions of competence in the public mind. We need to erase this event and do it again with a better plan of action." There was a long silence.
"It's not easy" said Morden. "Bending space and time like that. You're asking for a lot. This requires personal handling by the Boss."
"I appreciate the difficulty", said Rumsfeld, "but think of all those souls the Corporation loses if this project ends early? Can you afford that?" Another long silence.
"Let me check with His Darkness. Please hold." Lawrence Welk muzak began to play while Rumsfeld drummed his desk. Five minutes passed and Morden resumed the call.
"Okay, you've got the Do-Over. But make your new effort worth our time. It will cost you. We'll have your soul for this."
"Yes, of course", said Rumsfeld with relief. "This time things will be different. You won't regret this. How will I know when the Do-Over has been completed? How will I know when it's been done?"
"When you throw up in your waste basket. The vertigo of the space-time warping is severe." The connection broke as Morden hung up.
"They already have my soul", thought Rumsfeld. "What morons. Things will be different when I get down there. There will be a new boss." As Rumsfeld closed the lower desk drawer with the Very Red Phone he felt an overpowering sense of dizziness and a wave of nausea hit him.
A moment later he reached for his intercom. "Get General Blanchard on the line immediately! I've got new orders!" barked Rumsfeld.
Introduction
As the old saying goes about there being more than one way to skin a cat, so tactics allow for a variety of choices in how to accomplish a given mission. These choices may be more or less appropriate, more or less expensive, more or less successful. This scenario is a replay of the basic situation presented in "The Collision" with the US side being given an opportunity to use a more sophisticated approach in meeting advancing Soviet forces and to have a chance of acquitting themselves better.
U.S. Forces
Mission: Engage advancing Soviet forces to delay or halt their advance south through the Jossa valley.
Forces Available:
- 1 x M60A1 platoon (5 tanks)
- 1 x 155 mm artillery battery on call
Soviet Forces
Mission: Operating as part of the advance guard move south through Jossa to engage US forces and carry out the regiment's mission to cut off and destroy US forces withdrawing west.
Forces Available:
Combat Reconnaissance Patrol:
- 3 x T62 tanks (1 platoon)
- 2 x BRDM 2 (representing engineer and chemical warfare recon teams)
- 7 x T62 tanks (2 platoons and company commander tank)
- 3 x BMP 1 (1 Motor Rifle platoon)
- 1 x BRDM 2 (artillery forward observer)
- 1 x 122mm artillery battery on call
Scenario Conditions
The US side is allowed to place their force anywhere on the western half of the table before the arrival of any Soviet forces.
The Soviets will be organized into two groups: a Combat Reconnaissance Patrol (CRP) which will enter the table on Turn 1; and a Forward Security Element (FSE) which will enter the table on Turn 5. Both forces will be required to remain road bound on the paved highway and proceed at best speed until they make contact with the US force, at which time they are released from all restrictions. Should the US player engage the CRP before the FSE has entered the table, the Soviet FSE may enter anywhere on the Soviet side of the table. Once the FSE has been engaged then the game continues for another 7 turns. The turn limit is based on the presumed entry of the Soviet Advanced Guard (a battalion plus sized force) after the seventh turn.
If the Soviets are not engaged the Soviets win.
Arrival Schedule for Soviets:
Turn 1 - Combat Recon Patrol
Turn 5 - Forward Security Element
Game ends when Soviet Forward Security Element exits western edge of table OR 7 turns after FSE has been engaged.
Deployment
The areas of trees are not passable to the tanks of either side so the US tank platoon cannot take position in the woods. The US player decides to take up an ambush position on the north ridge as indicated by the blue marking open circle on the image below. The blue cross is the pre-registered artillery fire point. The red arrow indicates the entry direction for the Soviets, along the highway through the village.
The ridge will allow the US tanks to remain concealed either by hugging the edge of the tree line and camouflaging with brush and tree limbs or hiding below the ridgeline on the reverse slope, then moving up to hull defilade positions to engage the Soviets in the valley below.
The two tanks alongside the trees have views into the valley. The rightmost tank is tasked with covering this approach should Soviet forces come down along the north ridge.
The US plan is to ignore the Combat Reconnaissance Patrol and let it exit the table. The tank in the upper center (the platoon leader) will initiate the ambush when the Soviet Forward Security Element emerges from the village. The two tanks in defilade in the center will move up to hull down positions and engage. The artillery will fire on the target reference point to split the Soviet column and isolate the leading vehicles from the rest of the Soviet force. Kill as many Soviets as possible and leave before the Soviet Advanced Guard arrives.
The Game
Turn 1 and the Soviet Combat Reconnaissance Patrol enters.
The US player watches the CRP cross and exit the table. Someone further down the road will deal with them.
Game turn 5 and the US target, the Forward Security Element, arrives.
The US watches the FSE emerge from Jossa.
The US platoon leader decides the Soviets have moved down the road far enough and engages the lead Soviet T62, thereby initiating the ambush.
The lead tank, hit in the left side bursts into flames. The ambush sprung, the US M60s move up the to their hull defilade positions and engage.
Three more T62s are quickly destroyed before the Soviets can react.
Then the US artillery falls adding to the Soviet's plight. The sole undamaged Soviet tank in the lead group routs (visible at lower left of village). The remaining Soviets pull back to get buildings between themselves and the US fires.
To further complicate the Soviet situation, both Soviet tank platoon leaders have been killed as well as the FSE commander. Only the BMP platoon leader is left to attempt to lead the FSE.
The US adjusts its artillery fires closer to the village. The US tanks watch for targets to present themselves. The US platoon leader knows that the Soviet Advanced Guard is barreling down the road towards him and so will not risk getting caught in the open without a covered escape route.
The BMP platoon leader successfully gains command of the FSE. The Soviet artillery Forward Observer maneuvers to a position to view the area from which the ambush was sprung.
The US artillery is adjusted into Jossa itself. The Soviet artillery arrives, barraging the area in front of the US position. It is intended to suppress the ambushing Americans and to mask the surviving Soviets.
The Soviet BMP platoon leader, filled with the spirit of aktivnost*, decides to use the masking effect of the Soviet artillery and orders the BMP platoon to maneuver to the tree line on the north ridge.
As the Soviet barrage continues, the BMPs begin to move along the tree line. If they can get close enough the infantry may be able to close with the US tanks and drive them off. The surviving T62s take up over watch positions covering the location of the ambushing enemy.
The US platoon leader, having been watching the clock and sensing through his fingerspitzengefühl** that the Soviets are closing up to him, decides that now is the time to leave. The platoon begins a controlled withdrawl. The US artillery is lifted. There are other urgent requests for their services.
The Soviet artillery lifts and the BMPs dismount their infantry but their quarry has gone.
The infantry secure the area just as the Advanced Guard begins to enter the board. The US has gotten safely away to their next position.
Results
U.S.: No losses.
Soviets: 4 tanks killed. 1 tank routed off the table. Forward Security Element delayed.
Assessed: US victory.
Epilogue
The Pentagon - later that evening. Secretary Rumsfeld reviews the report on the day's action at Jossa.
"Better. Much better." thinks Rumsfeld. "Cronkite won't have anything to use against us; the Commies got a bloody nose; and, I look good. I think the platoon leader at Jossa has earned himself a medal. Life is good." Rumsfeld smiles.
Comments
As noted in the introduction, this was a redo to show a different tactical approach to dealing with the initial stages of a meeting engagement scenario.
The M60 is a tall tank which makes it a bit easier to see, but a compensating benefit is it can depress its main gun to a greater degree than a Soviet T62 ( −10° for the M60 versus −6° for the T62). This fact points to high ground defilade positions giving the Americans a tactical advantage. Hence the ridge line ambush position selected by the US in this scenario.
Was this a fun or balanced scenario? Fun for the ambushers, of course. Balanced? No. But then in real war you look for every advantage to make the situation as unbalanced in your favor as you can. An ambush is designed to be as unfair a situation as you manage.
Glossary
* Aktivnost: the Soviet military principle of energetic, forceful and active pursuit of military goals.
** Fingerspitzengefühl: a German word which literally means "finger tip feeling" and means possessing an intuitive flair or instinct for the dynamics and nuances of a situation.
Begemot
The summer grasses.
For many brave warriors
The aftermath of dreams.
--- Basho
Please visit my website "Lair of the Begemot": (https://lairbegemot.blogspot.com)
For many brave warriors
The aftermath of dreams.
--- Basho
Please visit my website "Lair of the Begemot": (https://lairbegemot.blogspot.com)
-
panzergator
- E5
- Posts: 3344
- Joined: Thu Oct 08, 2015 3:44 am
Re: Galerie de la Begemot - 2nd Edition
Love that USAREUR MASSTER camo
All blessings flow from a good mission statement.
Pogo was right. So was Ike.
"A Gentleman is a man who is only rude intentionally." (Churchill)
Give credit. Take responsibility.
Pogo was right. So was Ike.
"A Gentleman is a man who is only rude intentionally." (Churchill)
Give credit. Take responsibility.
-
Begemot
- E5
- Posts: 222
- Joined: Fri Aug 19, 2011 12:11 am
Re: Galerie de la Begemot - 2nd Edition
Panzergator - MASSTER camo is weird and sticks out like a sore thumb but is strangely compelling.
Begemot
Begemot
The summer grasses.
For many brave warriors
The aftermath of dreams.
--- Basho
Please visit my website "Lair of the Begemot": (https://lairbegemot.blogspot.com)
For many brave warriors
The aftermath of dreams.
--- Basho
Please visit my website "Lair of the Begemot": (https://lairbegemot.blogspot.com)
-
pmskaar
- E5
- Posts: 1921
- Joined: Sun Apr 17, 2005 5:45 am
Re: Galerie de la Begemot - 2nd Edition
Great AAR, Begemot. A sort of Duffer's Drift type of story. The terrain and minis look great by the way!
-
redleg
- E5
- Posts: 3438
- Joined: Fri Dec 17, 2004 11:02 am
- Location: Riverside, CA
Re: Galerie de la Begemot - 2nd Edition
That's an awesome AAR Begemot! Great looking terrain and vehicles and the play by play action is fantastic!
And the Very Red Phone...I love it!
And the Very Red Phone...I love it!
Redleg's Website: micropope.webstarts.com
-
panzergator
- E5
- Posts: 3344
- Joined: Thu Oct 08, 2015 3:44 am
Re: Galerie de la Begemot - 2nd Edition
USAREUR MASSTER, as I was given to understand it, was not designed for our eyes, but rather reconnaissance cameras. It was what was being used when I arrived in Germany in 1975. My first impression was "Now who in he'll is THAT gonna fool?". And then everything got covered in a light coat of mud spray or dust, which was a sandy color, and it all stood out in a wood line. The BEST thing was to break up the silhouette with stick and branches of pine and let sunlight, shadow, and darkness do the rest. Which really pissed off the forstmeister, of course, and resulted in fines and pulled road clearance. That would, of course, be cleared away by the Russians...
All blessings flow from a good mission statement.
Pogo was right. So was Ike.
"A Gentleman is a man who is only rude intentionally." (Churchill)
Give credit. Take responsibility.
Pogo was right. So was Ike.
"A Gentleman is a man who is only rude intentionally." (Churchill)
Give credit. Take responsibility.