Page 1 of 5
Building paper houses
Posted: Fri Apr 07, 2006 5:43 am
by WHM
Looking at the pictures at IanH's website and those posted by sfcgreg29er has left me w/the urge to try my most decidedly weak skills building paper buildings. Directions were posted, but questions remain.
Just how are the walls covered so the plastic is covered? The directions posted are just not that clear to me. How are you folks out there doing it?
I've found other sites w/paper buildings, I copy them to word and format the size by the Mk1 eyeball. Not sceintific but don't know any other way. Tried copying the French country House as bitmap and then expanding the image in paint, but the detail gets blurred.
Re: Building paper houses
Posted: Fri Apr 07, 2006 6:45 am
by Mk 1
WHM wrote:I copy them to word and format the size by the Mk1 eyeball.

Posted: Fri Apr 07, 2006 7:19 am
by Gort
WHM
re the french country house
Try opening the file in microsoft photo editor. You can use the image tab to change the size (I used 125%), and then use the effects tab to sharpen the image (I used +2). Seems to work OK for me and the resulting building is a better fit for my GHQ infantry.
regards
Posted: Fri Apr 07, 2006 8:29 am
by sfcgreg29er
WHM Wrote:
Looking at the pictures at IanH's website and those posted by sfcgreg29er has left me w/the urge to try my most decidedly weak skills building paper buildings. Directions were posted, but questions remain.
Just how are the walls covered so the plastic is covered? The directions posted are just not that clear to me. How are you folks out there doing it?
I've found other sites w/paper buildings, I copy them to word and format the size by the Mk1 eyeball. Not sceintific but don't know any other way. Tried copying the French country House as bitmap and then expanding the image in paint, but the detail gets blurred.
I'm not a computer expert. If there is a better way to post these building wallpapers let me know and I will give it a try. WHM is right. I copied the picture I posted and when I printed it out it didn't come out as clear as the original I have saved as a bitmap on my hard drive. I'll have to ask my daughter, who is attending a graphic arts and print technology course at our local Career Tech HS, how to do this. She's smarter than her dad. I have Adobe photoshop but I'm not up to speed with it.
As far as adhering the paper to the styrene, cut the paper pieces out then lay on the styrene sheet. Then use a brush and apply liquid cement to the paper. It will soak through the paper and melt the plastic slightly, thereby adhering to the back of the paper. I usually cut out the gable ends, cement to the styrene, cut these out, then cut the front and back walls of styrene. These I then cement to the inside of the gable ends. Smooth up the seams, then cement the front and back papers to the styrene. This hides the seam where the gable ends meet the front and back. Trim any overlapping paper with an xacto knife and smooth with a fine modeling file. I then cement on the roof, apply the ridge, and then cement on the roof paper. Trim and file the edges smooth and paint.
Hope this helps. I'll see if I can take some pics of a building in progress and post.
Posted: Fri Apr 07, 2006 2:24 pm
by tstockton
Mike,
A question, based on my "luck" with printing with an inkjet printer... When you brush on the liquid cement, do the inks on the printed paper run any? I've had "trouble" in the past with "fresh ink" smudging / smearing; I've found that if I let a printed page air-dry for a while, the "problem" seems to be lessened .
Do you use any "special' paper, or do you use just "plain ol'" paper?
BTW, I use a similar process for hatchways on my 1:1200 ships -- I use "plain ol'" paper, cut to appropriate size. Then a place a small spot of super glue where I want the hatch to be... apply the paper... wait a few seconds... then place a drop of super glue on top of the paper "hatch". The super glue soaks in to the paper and adheres it to the ship. Later, when thoroughly dry, I take a very fine sandpaper stick and can smooth down the edges where my Xacto knife has left a slightly-raised edge. Then I paint the hatch the appropriate color, and voila! One can hardly tell the difference between the cast-on details any my added-on hatch!
Thanks in advance for your reply!
Regards,
Tom Stockton
Posted: Fri Apr 07, 2006 5:13 pm
by Scott Washburn
Sounds like a lot of work to me
 www.paperterrain.com
 offers a range of 6mm paper buildings ready to cut out and addemble.
Paper structure construction methods
Posted: Fri Apr 07, 2006 5:47 pm
by hobby-bob
I've been designing & building paper structures for a year or so now, and I believe you can get along fine without backing the paper walls with plastic. You just need to do four things:
1. Print the model on heavy enough cardstock to stand up (I use 60# white cardstock from Target; it comes in about 50-sheet packages). Most of the time, your models aren't going to be more than a couple of inches high or a couple of inches wide, and this should provide adiquate support.
2. Design your models so that at least one wall is attached to an adjacent wall, which makes the model much stronger, and makes it easier to make 90 degree angles.
3. Always add glue tabs to the edges of the model; for a nice, stable joint, it helps a lot have a good foundation to glue onto.
4. Add a floor and sub-roof to the structure (that is, design a box or a prism-shape rather than an open rectangle). You’d be surprised how strong it can be. If the model is too big to have the floor physically adjacent to one of the walls, design a large enough base sheet for the model.
If you’re interested in designing your own buildings, I recommend buying some second-hand drawing software on eBay. My favorite tool is Visio (now made by Microsoft), which has lots of nifty drag-and-drop features (for example, you can design a window once, save it, and use it again as many times as you need). I’ve designed an entire factory complex of six buildings in under a week.
My copy of Visio, which is a couple of versions old, cost about $20.00 last year.
When I become more adept at digital photography, I’ll post some photos. I’ll include some vehicles in the pictures for scale, but I have to say, though, the examples of other poster’s painting skills will certainly put mine to shame!
Posted: Fri Apr 07, 2006 8:38 pm
by AllenTC2
Scott - the structures they are talking about are made using actual photos of real buildings. I think if you look on page 37 or 38 (or somewhere near there) of the "Show yer Stuff" thread, you'll see some of the structures they are talking about. Yes, they are a good deal more complicated to construct, but they look a bit more realistic. Your products trade the photorealism for convenience of construction. Not saying yours don't look good (my Russian village is looking pretty danged good!! Terrain hexes are on the way, so I'll have some pics once it's all done) but it's not quite a sharp as the photo-based buildings.
Posted: Fri Apr 07, 2006 8:42 pm
by WHM
Scott Washburn wrote:
[/quote]Sounds like a lot of work to me
www.paperterrain.com offers a range of 6mm paper buildings ready to cut out and addemble.
True, but some of the pictures are truely inspiring. I've printed out on a forest of paper trying to get the right size. At Cold Wars I bought yours as well. I was impressed by the way you had them displayed.
sfcgreg29er wrote:
. I usually cut out the gable ends, cement to the styrene, cut these out, then cut the front and back walls of styrene. These I then cement to the inside of the gable ends. Smooth up the seams, then cement the front and back papers to the styrene. This hides the seam where the gable ends meet the front and back.
So I guess the steps are:
1. Cut out paper pieces, glue to styrene
2. Cut out gable ends (the left and the right sides of the building.
3. Cut out the front and back the plastic frame of the building and glue to the inside of the gabled sides.
4. smooth up the seams and glue on the papers of the F. and B. of the plastic frame.
Step 4 is what I do not understand. It would seem the 1mm. side of tthe gable remains uncovered. Obviously it isn't, but something is lost in the translation.
If you can post pictures that give a better understanding that would be GREAT!!
Maybe post mote printouts of your buildings to?
Gort:
Tried your plan, thanks.
Hobby-bob;
Would you also be willing to post some buildings for print out?
Posted: Fri Apr 07, 2006 10:58 pm
by sfcgreg29er
tstockton wrote:
A question, based on my "luck" with printing with an inkjet printer... When you brush on the liquid cement, do the inks on the printed paper run any? I've had "trouble" in the past with "fresh ink" smudging / smearing; I've found that if I let a printed page air-dry for a while, the "problem" seems to be lessened .
Do you use any "special' paper, or do you use just "plain ol'" paper?
I use a HP Inkjet printer and I've had no problems with running ink. You may just have to let the ink dry longer. Say a few days. I use Testors brand liquid cement. I use plain ol' paper.
To answer some other questions:
WHM wrote:
Step 4 is what I do not understand. It would seem the 1mm. side of tthe gable remains uncovered. Obviously it isn't, but something is lost in the translation.
You have to first measure the width of the front and back wallpaper. Then cut the front and back styrene pieces 2mm less to take into account the 1mm thickness of the gable ends. This will allow the front and back wallpapers to overlap the seam. Hope this helps.
I've tryed printing out on cardstock, but over a period of time the sides warped a little and I don't like the bent corners. Also, I like the heavier weight of the styrene. The card stock, IMOP, is just too light. I kept knocking the buildings over. I've looked at the paper buildings offered by paperterrain.com at Coldwars, but they didn't look realistic enough. I wanted something not as labor intensive as painting a resin or metal house, but looked good. Besides, I can make a house for about $1.00 US. The thing I like most is the pictures I use are of actual houses located in France, Belgium or Germany. I've also taken some photos of some buildings in my neighborhood and recreated them in 6mm which look pretty cool.
Posted: Fri Apr 07, 2006 11:14 pm
by Scott Washburn
This is quite interesting. So you use photos of whole buildings? I do use photos for my buildings to some extent. For example, the stone is from photos of real stone, the stucco is real stucco, etc. I tried bricks, but the results were unsatisfactory. But most of the other stuff like doors and windows I draw using my graphics program. But how do you get a picture of a real house that's 'flat' enough to use? I mean, if you take the picture from close up there is going to be a good bit of distortion due to perspective and if you take the picture from far enough away to eliminate that, you would lose some detail, wouldn't you? I mean I can't argue with your results, but I'm curious about how it was achieved--especially since I'm a lousy photographer
Posted: Fri Apr 07, 2006 11:21 pm
by AllenTC2
Scott - Check the post on Page 38 by sfcgreg29er.....it's towards the top. He said he lifted pics from a French real estate website! LOL I'm curious about the distortion thing myself. Still, the farm complex pictured is pretty impressive.
All that said....I am still loving the paperterrain stuff. It is proving to be very good for modifying and so on. Hopefully within a month or so, I should have all the houses based on terrain hexes and I'll take some pics....assuming my work on the hexes is half decent! LOL
Posted: Sat Apr 08, 2006 3:22 am
by saxophone
But how do you get a picture of a real house that's 'flat' enough to use?
I can't speak for him, but you can correct the perspective (somehwat) with Photoshop.
[/quote]
Posted: Sun Apr 09, 2006 9:40 am
by sfcgreg29er
Scott Washburn Wrote:
This is quite interesting. So you use photos of whole buildings? I do use photos for my buildings to some extent. For example, the stone is from photos of real stone, the stucco is real stucco, etc. I tried bricks, but the results were unsatisfactory. But most of the other stuff like doors and windows I draw using my graphics program. But how do you get a picture of a real house that's 'flat' enough to use? I mean, if you take the picture from close up there is going to be a good bit of distortion due to perspective and if you take the picture from far enough away to eliminate that, you would lose some detail, wouldn't you? I mean I can't argue with your results, but I'm curious about how it was achieved--especially since I'm a lousy photographer
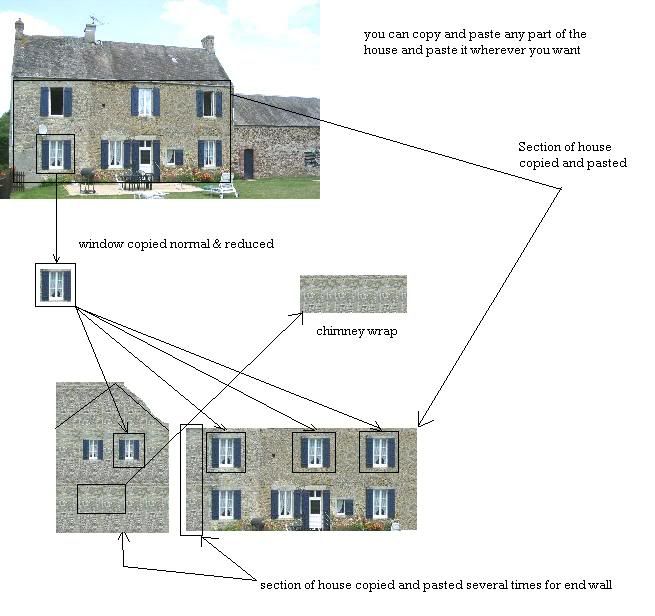
Here is an example of how I "build" a house using a pic off a website. As you can see the house is skewed slightly but it doesn't matter because I copy and paste only parts of the image. Using the "select" feature on Microsoft paint, and then copying and pasting, it creates a "squared-up" image. I can then copy and paste any portion to create any part of a house. Sometimes when I don't like a particular window or door, I'll use one from another pic and paste it onto the house I'm building. Sometimes you will have to touch up the image by copying small pieces and pasting over the offending areas. If you notice there is some black patio furniture blocking the front door. I copied and pasted small portions of the door over the furniture thereby making a whole door. I did the same for a small portion of the front wall right above the two windows on the right. There was also a small satellite dish on the front of the house I had to cover. The main thing is to find or take a picture that is as square on as possible. I made a church using three different pics which I have posted on the "scratchbuilt" thread.
Posted: Fri Apr 14, 2006 3:38 am
by 1ComOpsCtr
Gentlemen,
Take a look at the following web site...
www.commandoperationscenter.com
Within the site you will find many buildings that are paper, but if you take a look at
the "terrain model" pages you will see paper buildings from the Shugart Gordon
MOUT facility terrain model.
All are made from card stock with a balsa frame. I will post pictures of how to
construct the frame if any of you wish. Its the best way to make paper buildings
as it is quite frankly easier than using plastic stock as a backing... and it is a whole
lost less expensive.
Will
ComOpsCtr