Help with snow board
Moderators: dnichols, GHQ, Mk 1
-
Luthfats
- Posts: 77
- Joined: Fri Sep 03, 2010 6:18 pm
Help with snow board
Hello, i'm about to begin a snow board for my WW2 soviet army and my soon to be bought german army for the eastern front and i am wondering about how i should go about it, should i get micro skirmish boards because they already come with hexes, what should i use as snow and ground cover, i have seen yellow brush on snow boards in the books and i'am curious as to where this material came from. I know about the tree packs so i will buy some of them and buildings i will buy russian cottages and whatever from terrain maker but anything else guys please help and possibly a couple of pictures of some good snow terrain would help alot, cheers! 
"It is foolish and wrong to mourn the men who died. Rather we should thank God that such men lived."
- General George S. Patton, Jr
- General George S. Patton, Jr
-
groundlber
- E5
- Posts: 162
- Joined: Mon Feb 06, 2006 8:13 am
Snow boards
Luthfats- Check out 'snow hex' page on the modelling guides. The techniques are illustrated using hexes, but would work for any stryofoam based terrain. Be sure to have a plan for the terrain (at least in your head) before you get too far along. I suggest a small village with a road running through it and either a small pond or a well. (The villagers won't hang around if there's nothing to drink). Good luck.
Groundlber
Groundlber
-
Luthfats
- Posts: 77
- Joined: Fri Sep 03, 2010 6:18 pm
Reply
Yeah ive got a few guides from my orders thanks man, ill do that. But where do they get the yellowish ground foam is that GHQ i have seen there ground foam but that colour doesnt seem to be there 
"It is foolish and wrong to mourn the men who died. Rather we should thank God that such men lived."
- General George S. Patton, Jr
- General George S. Patton, Jr
-
groundlber
- E5
- Posts: 162
- Joined: Mon Feb 06, 2006 8:13 am
snow covered ground
Check out your local hardware store or home improvement center for wood puttty. The brand I get drys to a yellowish tan color. A thin coat helps hide the styrofoam 'bumps' on the surface of the hexes. I'll let you know the brand I use tomorrow. Long day at work and I'm tired.
Groundlber
Groundlber
-
opsctr
- E5
- Posts: 147
- Joined: Sun Mar 09, 2008 11:20 am
- Location: St. Louis, MO
- Contact:
Did you look at the two "winter" ground cover variations?

GHQ Winter Wheat

GHQ Darker variety.
Woodland Scenic also makes a couple yellow ground cover types but I suspect the winter wheat is what you're looking for.


Hope this helps... Will
GHQ Winter Wheat
GHQ Darker variety.
Woodland Scenic also makes a couple yellow ground cover types but I suspect the winter wheat is what you're looking for.
Hope this helps... Will
"The three most important words when trying to make a decision are: communications, communications, communications, ...in that order" MGen BG Hollingsworth USMC (retired)
-
Luthfats
- Posts: 77
- Joined: Fri Sep 03, 2010 6:18 pm
-
opsctr
- E5
- Posts: 147
- Joined: Sun Mar 09, 2008 11:20 am
- Location: St. Louis, MO
- Contact:
You might enjoy following this link. Great winter terrain.
http://www.flickr.com/photos/6mmgaming/ ... 807865725/
It was posted last year by Mark Luther, another member of the forum. You have to search a bit to find the good stuff on this site but it's there... Will
http://www.flickr.com/photos/6mmgaming/ ... 807865725/
It was posted last year by Mark Luther, another member of the forum. You have to search a bit to find the good stuff on this site but it's there... Will
"The three most important words when trying to make a decision are: communications, communications, communications, ...in that order" MGen BG Hollingsworth USMC (retired)
-
Luthfats
- Posts: 77
- Joined: Fri Sep 03, 2010 6:18 pm
-
Mk 1
- E5
- Posts: 2383
- Joined: Fri Dec 24, 2004 3:21 am
- Location: Silicon Valley, CA
I am a BIG fan of the "MLuther" method of micro-armor terrain. Mark has posted so many compelling battle stories, and I have been quite inspired by his AARs.opsctr wrote:It was posted last year by Mark Luther, another member of the forum.
I have never done a winter / snow board, not with MLuther's techniques nor with any others. But I have studied his approach, and tried to learn and implement the basics of his techniques. In my experience they apply equally for desert or temperate terrain, and I expect them to apply equally for winter terrain. It takes a bit of experience to get it all working, but here are the basics as I have understood them:
1 ) The starting point is a cloth. MLuther uses plain, cheap bed sheets. I have tried some other, heavier cloths. I think I will move towards bedsheets, as he still seems to get better results than I do.
2 ) Elevations go UNDER the cloth. Use whatever you want for elevations. Cut styrofoam seems to be the easiest, although I mostly re-use the cut corrugated cardboard that I have been collecting for several years (originally for use ON TOP of my game cloths, but now applied UNDER per the MLuther method).
3 ) Use spray-paints to break-up the uniformity of the color of the cloth. Two or three variances on the base color. If a green cloth, use a lighter or darker green, and maybe a tan or earth tone or a yellowed tone. For a snow-scape maybe some light gray and some mud-brown. Lightly spray in uneven blotches. Better to use coloring/shading around your elevations (rises get greener or browner, whatever). It is semi-permanent, but don't worry, 'cause you actually want to have a mottled color over time.
4 ) Use pastels for specific terrain features of each game. Roads, rivers, marshes, rocky/crumbled dirt sloaps, etc. Consider putting pastel colors around elevations and/or depressions to highlight these terrain features. After stroking on the pastels, rub them a bit with your fingers to smudge them up and make them less distinct. A pack of 20 pastels from the crafts store serves very well for many games. Use three or four shades for each terrain feature, not just one.
5 ) Put lots of stuff on top of the cloth. Fields of grain and crops are mostly remanents of interesting cloths from the fabric store. Tree lines are made on coffee-house stirring sticks with painted/flocked bases. Add buildings, etc. Don't be shy to put some pastels around your added foliage and structures.
That's what I've learned so far. Still building my collection of game cloths and crop cloths.
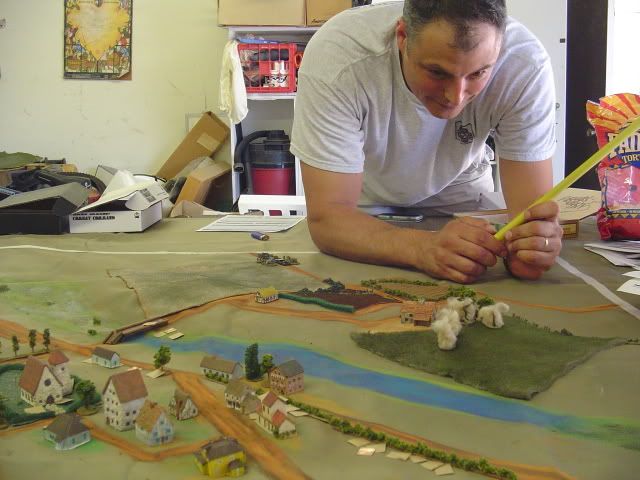
Here is an example from my most recent game (now more than a year ago ... not been a good year for hobbying for me.) This was a meeting engagement between a Soviet force and an Italian force at Loboikivka during the mid-stages of operation Barbarossa in 1941. In the picture you see my opponant James (aka: PAGrognard or Palo Alto on various fora) over the game board, which I assembled on the ping-pong table in my garage.
Using MLuther's techniques I was able to put together a game board that closely matched the actual terrain (which I was able to find on Google Earth). It was a great game. Loads of fun. Having interesting terrain made it much more interesting.
-Mark 1
Difficile est, saturam non scribere.
"It is hard NOT to write satire." - Decimus Iunius Juvenalis, 1st Century AD
Difficile est, saturam non scribere.
"It is hard NOT to write satire." - Decimus Iunius Juvenalis, 1st Century AD
-
mluther
- E5
- Posts: 212
- Joined: Wed Nov 15, 2006 10:09 pm
- Location: Atlanta, GA
Thanks for the kind words, Mk1. Your description is spot on.
The nice thing about using pastels is that it is pretty forgiving. You can add more colors if you need to and it does wash out (mostly). And what dosn't just adds to the variation.
I find that the white/snow requires more retouching with the cheapo can of spray more than the brown or green sheets.
It is nice to see pics of your table, which looks great.
Mark
-
jb
- E5
- Posts: 2160
- Joined: Fri Mar 11, 2005 7:13 am
- Location: Antananarivo
mluther,mluther wrote:Thanks for the kind words, Mk1. Your description is spot on.
The nice thing about using pastels is that it is pretty forgiving. You can add more colors if you need to and it does wash out (mostly). And what dosn't just adds to the variation.
I find that the white/snow requires more retouching with the cheapo can of spray more than the brown or green sheets.
It is nice to see pics of your table, which looks great.
Mark
A couple of questions;
What kind of sheets?
What kind of paint? (and/or pastels)
I also think your terrain has the best effects regardless of scale . . .
John
-
mluther
- E5
- Posts: 212
- Joined: Wed Nov 15, 2006 10:09 pm
- Location: Atlanta, GA
Hi John,
The ground sheets are just cheap bed sheets-large enough to cover a 4X6 table. Mine are old bed sheets that have seen better days dyed to green or brown using a few packs of Rite dye. They will still be too pale so I then sprayed on some brown or green earthy colors using the cheapest spray paint from a hardware store. Because the sheets get washed after a game to get most of the pastels out, you occassionaly have to touch up some areas with more spray paint. This retouching just adds to the overall effect over time. Like I say, its hard to screw this method up.
The pastels are from art supply stores (genarlly a place like Michaels or Hobby Lobby only has pre assorted packs, so I go to actual artist supply shops). Once again buy the cheap ones. The softer the better, but you really don't need to get the expensive brands.
Of course a winter sheet doesn't even need to be dyed if its white already.
Mark
-
piersyf
- E5
- Posts: 625
- Joined: Sat Oct 04, 2008 1:59 pm
- Location: Melbourne Australia
This is pretty much the dominant method I've been using for 40 years... I guess not that surprising since I started gaming at 10 years of age, I used my bed as a 6' x 3' board by stuffing clothes under the covers to make hills and tossing a brown wool blanket over the top for the ground cover! What little money I had went on miniatures, not on a board.
The main drawback I have found to this method (and the only reason I'd consider board tiles) is the lack of support under a vehicle or stand; if you put them on a piece of bed sheet with nothing under it, the earth literally drops under them! This changes sight lines and even slope angles (they won't stay put, they slide). Something we just put up with...
The best material we ever used was carpet felt underlay; It's relatively cheap (a few dollars a square metre), about 10mm thick, has weight so it will settle into good lines and folds as well as resist the weight of a mini, and if you are buying it just for gaming it can be sprayed with adhesive and have ground flock attached.
I used to use a thick jute felt; I don't recommend that! Very dusty. You can get pure wool felt that is much better, and still just a few dollars a metre.
The textured and slightly fluffy surface won't work for snow; still put a sheet over that, but the felt will provide better and more uniform support, and the sheet will cling to it better because of the fabric nap.
I don't have any at the moment (still restoring my collection of minis... only just started ordering houses and the like) so don't have anything to show, unfortunately...
P