Pete, great technique and style for those ships.
I have not seen a couple of them until now.
Excellent work on the ships.
Pete's Place
Moderators: dnichols, GHQ, Mk 1
-
chrisswim
- E5
- Posts: 6658
- Joined: Wed Dec 15, 2004 11:22 pm
- Location: Jacksonville, FL
Re: Pete's Place
Chris
-
pmskaar
- E5
- Posts: 1953
- Joined: Sun Apr 17, 2005 5:45 am
Re: Pete's Place
Thanks very much Foxbat, Redleg, and Chris! Here are a couple more WWI ships that I did for GHQ.
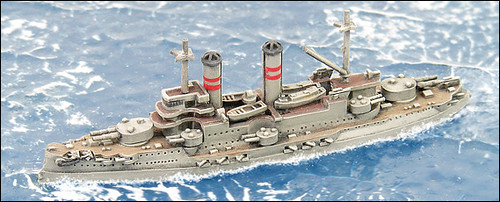
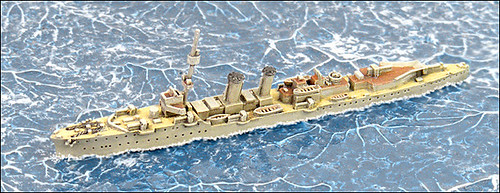
Russian BB Slava. This is the only only WWI Russian ship I have painted.

German Light Cruiser Leipzig. This is one of my first WWI ships painted way back in 1994-95. This one is still in my collection although loaned to GHQ for the picture.
Russian BB Slava. This is the only only WWI Russian ship I have painted.
German Light Cruiser Leipzig. This is one of my first WWI ships painted way back in 1994-95. This one is still in my collection although loaned to GHQ for the picture.
-
redleg
- E5
- Posts: 3468
- Joined: Fri Dec 17, 2004 11:02 am
- Location: Riverside, CA
Re: Pete's Place
Beautiful ships Pete! Do you play WW1 naval at all? I'm wondering what rule sets are out there for naval.
Redleg's Website: micropope.webstarts.com
-
pmskaar
- E5
- Posts: 1953
- Joined: Sun Apr 17, 2005 5:45 am
Re: Pete's Place
Thanks very much, Redleg!
To answer your question, no I have not..... yet. I would like to play one of these days when I decide to quit painting my 1/285th scale vehicles and infantry.
I have a few WWI ships completed but need more. I would like to do Coronel and maybe Falklands one of these days. Not really sure about Jutland as it is a massive action and requires a lot of ships. Definitely some smaller engagements though.
Currently I don't have any rules sets for WWI or WWII for that matter. When I do get around to it I may go with Fleet Action Imminent by ODGW and maybe also get General Quarters III by them as well. I have heard good things about them. I know there are others out there.
A long time ago, Clash of Arms published Fear Go and Dread Naught for WWI. This was the WWI version of Command at Sea which seemed to be a pretty complex set of rules. I have not played these so really can't say much about them.
-
Hoth_902
- E5
- Posts: 1402
- Joined: Wed Jun 18, 2014 11:08 am
- Location: Pacific Northwest
- Contact:
Re: Pete's Place
Pete,
I just ordered the white I needed to dull out the Camo Red-brown and olive Green for my German camo. Its all Humbrol. I was wondering, how much white you add to your colors to get the desired paint effect. Also, you have said you thin out the paint. Any tip on how much thinner you add to the mixture? Should be doing camo real soon..
I just ordered the white I needed to dull out the Camo Red-brown and olive Green for my German camo. Its all Humbrol. I was wondering, how much white you add to your colors to get the desired paint effect. Also, you have said you thin out the paint. Any tip on how much thinner you add to the mixture? Should be doing camo real soon..
-
pmskaar
- E5
- Posts: 1953
- Joined: Sun Apr 17, 2005 5:45 am
Re: Pete's Place
Hi Hoth
Formulas. I don't have any specific formula for mixing the white with my colors. My Humbrol #83 Dunkelgelb is also lightened with a bit of #34 Matt White as well. I do not have any specific formula of paint ratios for the process. I just add white till it looks right to my eyes. There may be some slight tonal variations but keep in mind that weathering and fading don't always happen uniformly.
As far as thinning the paint, I don't have a specific ratio for that either. It comes down to making the paint almost like a stain. When applying the first coat of camouflage to the base coat, I tend to keep the colors a bit lighter and thinner. When using the thinned paint, be careful not to have too much of the thinned paint on the brush or else it will flow too much and maybe hit areas that you don't want to hit. It may take some experimentation to get things the way you want them. I might recommend trying it out on a single piece first to see how it goes. If you have an older piece that you are not too particular about that might also be a way to go.
It takes a few layers to build up the camo. I have between 2 to 4 layers depending.
Camouflage patterns. Many variations of course especially in the German Army. Various stripes and blotches of various sizes. There was virtually no standardization until late in the war on some vehicles painted at the factory.
Here are a few more pictures from my own collection.
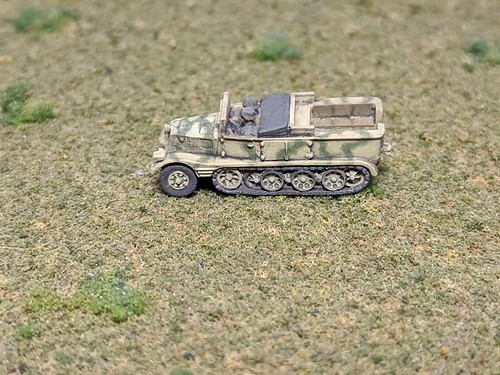
Sdkfz 11 with simple wavy stripes in green only. This one is pretty simple to do. You probably don't have to thin the paint out quite as much as with doing small blotches.

Marder II with green blotches. This is based on pictures of an actual Marder II in 1943. This one was not hard to do as it is 2 color and not 3 color. I just spaced out the blotches in a fairly random pattern.
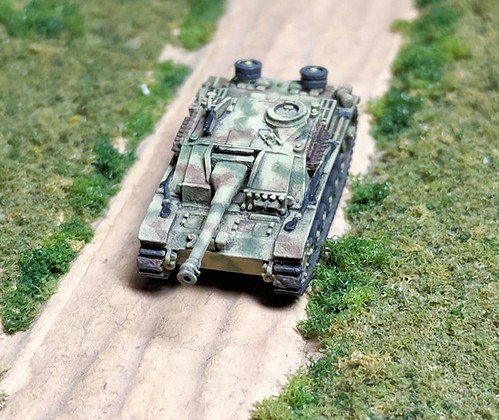
A late war StuG IIIG. The camo is very random green and brown elongated blotches over the Dunkelgelb. This is a bit more involved as the brown needs to be added over the green. I think I used about 3 to 4 layers of the thinned camo paint to achieve this look. It is a bit time consuming but I was happy with the way it turned out.

Here are my Elephants. Three are done in the green and brown wavy blotches. The 4th one in what I call the "Kursk Pattern" of green webbed stripes over the Dunkelgelb. This one was not real easy to do but turned out okay in my book.
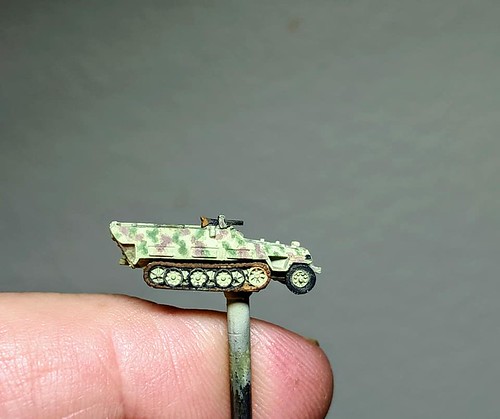
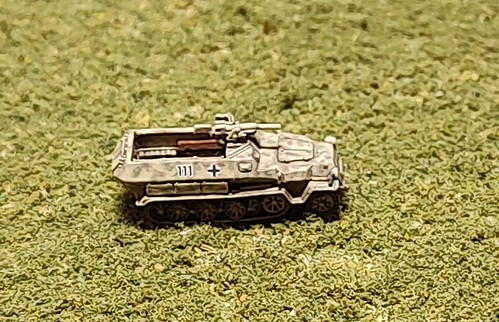
Here is a Sdkfz 251D before the wash. It has a random pattern of green and brown.
Once you get the camo pattern on, it is a good idea to bake your models in the oven at 200 degrees for 20 minutes to set the paint. For my wash I used a turpentine based dark brown wash for my German vehicles in Dunkelgelb. Humbrol paint is pretty tough and usually won't pull off but baking makes it much less likely. I use a toaster oven dedicated for this purpose as the Mrs. is concerned that baking in our oven may cause issues. I can't confirm or deny that but it makes her happy so I do it.
Formulas. I don't have any specific formula for mixing the white with my colors. My Humbrol #83 Dunkelgelb is also lightened with a bit of #34 Matt White as well. I do not have any specific formula of paint ratios for the process. I just add white till it looks right to my eyes. There may be some slight tonal variations but keep in mind that weathering and fading don't always happen uniformly.
As far as thinning the paint, I don't have a specific ratio for that either. It comes down to making the paint almost like a stain. When applying the first coat of camouflage to the base coat, I tend to keep the colors a bit lighter and thinner. When using the thinned paint, be careful not to have too much of the thinned paint on the brush or else it will flow too much and maybe hit areas that you don't want to hit. It may take some experimentation to get things the way you want them. I might recommend trying it out on a single piece first to see how it goes. If you have an older piece that you are not too particular about that might also be a way to go.
It takes a few layers to build up the camo. I have between 2 to 4 layers depending.
Camouflage patterns. Many variations of course especially in the German Army. Various stripes and blotches of various sizes. There was virtually no standardization until late in the war on some vehicles painted at the factory.
Here are a few more pictures from my own collection.
Sdkfz 11 with simple wavy stripes in green only. This one is pretty simple to do. You probably don't have to thin the paint out quite as much as with doing small blotches.
Marder II with green blotches. This is based on pictures of an actual Marder II in 1943. This one was not hard to do as it is 2 color and not 3 color. I just spaced out the blotches in a fairly random pattern.
A late war StuG IIIG. The camo is very random green and brown elongated blotches over the Dunkelgelb. This is a bit more involved as the brown needs to be added over the green. I think I used about 3 to 4 layers of the thinned camo paint to achieve this look. It is a bit time consuming but I was happy with the way it turned out.
Here are my Elephants. Three are done in the green and brown wavy blotches. The 4th one in what I call the "Kursk Pattern" of green webbed stripes over the Dunkelgelb. This one was not real easy to do but turned out okay in my book.
Here is a Sdkfz 251D before the wash. It has a random pattern of green and brown.
Once you get the camo pattern on, it is a good idea to bake your models in the oven at 200 degrees for 20 minutes to set the paint. For my wash I used a turpentine based dark brown wash for my German vehicles in Dunkelgelb. Humbrol paint is pretty tough and usually won't pull off but baking makes it much less likely. I use a toaster oven dedicated for this purpose as the Mrs. is concerned that baking in our oven may cause issues. I can't confirm or deny that but it makes her happy so I do it.
-
Hoth_902
- E5
- Posts: 1402
- Joined: Wed Jun 18, 2014 11:08 am
- Location: Pacific Northwest
- Contact:
Re: Pete's Place
Pete,
I've said it before and I will say it again, awesome work. My favorites out of this bunch are the halftrack and the stug. Great advice on how to approach this. I have a few extra pieces for halftrack and recon vehicles that I can practice. Plus I have gotten pretty good at stripping vehicles so no worries about messing up a piece. Understand about ratios being based on feeling at the time. Also understand that having variations in how the color looks, from one tank to the next, is a good thing.
I have heard people talk about backing, from time to time. So that is the way to go? This does pretty good at making the paint Durable? Does your backing method apply to Lacquers or is it limited to enamels and acrylics? Does the backing help Acrylics? Do you seal your vehicles with a Clear coat as well or does the backing do the trick.
Thanks for the information.
-
redleg
- E5
- Posts: 3468
- Joined: Fri Dec 17, 2004 11:02 am
- Location: Riverside, CA
Re: Pete's Place
Those pieces are spectacular Pete I am super impressed, as always!
I'm also curious about your baking process. I feel like my vehicles get too shiny when I put the clear coat and I can't get all the shiny off after I apply a wash. But if baking will do the trick without having to put the clear coat on I will give it a try too. Maybe slip some tanks in with a batch of cookies or something!
I'm also curious about your baking process. I feel like my vehicles get too shiny when I put the clear coat and I can't get all the shiny off after I apply a wash. But if baking will do the trick without having to put the clear coat on I will give it a try too. Maybe slip some tanks in with a batch of cookies or something!
Redleg's Website: micropope.webstarts.com
-
pmskaar
- E5
- Posts: 1953
- Joined: Sun Apr 17, 2005 5:45 am
Re: Pete's Place
Thanks very much, Hoth and Redleg! I appreciate it.
Hoth, glad you liked the Sdkz 251 and the StuGs.
Baking. I have been baking my GHQ miniatures at various stages for over 30 years. This was recommended by GHQ in their old how to paint article as well as the turpentine black wash that I still use.
Redleg - I do think it makes the paint a bit more durable at least as far as applying the turpentine wash over it. I can't really say if you absolutely need to do this as I'm sure many folks don't bake and are perfectly happy. Of course I would not bake resin or plastic pieces.
For baking, I have a toaster over that I use and a block of wood to put the models on to keep them from touching the oven surface. When I apply my final coat of Dull Coat, I don't bake that as sometimes the baking seems to create issues.
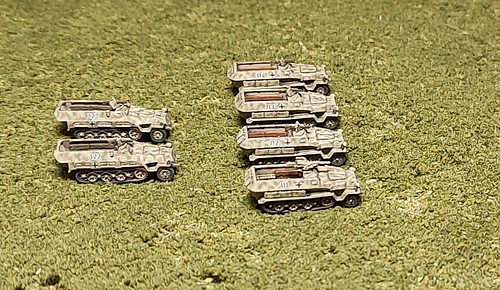
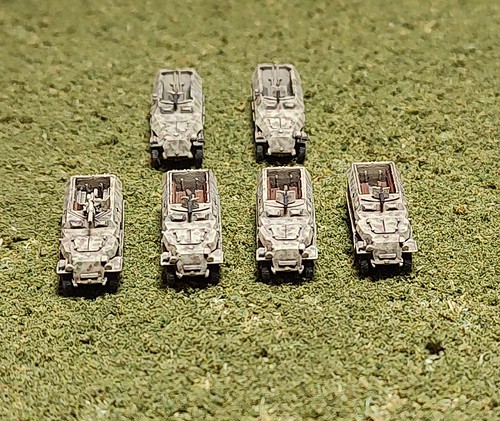
Here are a couple more pictures of my German half-tracks for you, Hoth. I used a different pattern for the 1st Company in Sdkz 251Cs than I did for the 3rd Company with the Sdkz 251Ds.

Hoth, glad you liked the Sdkz 251 and the StuGs.
Baking. I have been baking my GHQ miniatures at various stages for over 30 years. This was recommended by GHQ in their old how to paint article as well as the turpentine black wash that I still use.
Redleg - I do think it makes the paint a bit more durable at least as far as applying the turpentine wash over it. I can't really say if you absolutely need to do this as I'm sure many folks don't bake and are perfectly happy. Of course I would not bake resin or plastic pieces.
For baking, I have a toaster over that I use and a block of wood to put the models on to keep them from touching the oven surface. When I apply my final coat of Dull Coat, I don't bake that as sometimes the baking seems to create issues.
Here are a couple more pictures of my German half-tracks for you, Hoth. I used a different pattern for the 1st Company in Sdkz 251Cs than I did for the 3rd Company with the Sdkz 251Ds.
-
foxbat
- E5
- Posts: 144
- Joined: Tue Dec 29, 2009 2:01 am
- Location: France
Re: Pete's Place
Looking at your StuG and Marder minis... they're incredible. Detail work is top notch, no one would say first hand they're 1/285. 
-
chrisswim
- E5
- Posts: 6658
- Joined: Wed Dec 15, 2004 11:22 pm
- Location: Jacksonville, FL
Re: Pete's Place
Pete,
Great job painting! Also changing style or technique is great.
Not sure I can do that, as you do.
Great job painting! Also changing style or technique is great.
Not sure I can do that, as you do.
Chris
-
redleg
- E5
- Posts: 3468
- Joined: Fri Dec 17, 2004 11:02 am
- Location: Riverside, CA
Re: Pete's Place
Beautiful halftracks Pete! And thank you for the info on baking the paint jobs! I think I'll give it a shot!
Redleg's Website: micropope.webstarts.com
-
pmskaar
- E5
- Posts: 1953
- Joined: Sun Apr 17, 2005 5:45 am
Re: Pete's Place
Thanks very much, Chris and Redleg!
Here are a couple more of my WWI ships for the GHQ catalog. Here are the armored cruisers HMS Minotaur, HMS Duke of Edinburgh, and the light cruiser, HMS Calliope.


Here are a couple more of my WWI ships for the GHQ catalog. Here are the armored cruisers HMS Minotaur, HMS Duke of Edinburgh, and the light cruiser, HMS Calliope.
-
Hoth_902
- E5
- Posts: 1402
- Joined: Wed Jun 18, 2014 11:08 am
- Location: Pacific Northwest
- Contact:
Re: Pete's Place
Pete,
Is the Stug IIIG a GHQ model? I don't see it in the online catalog. Is this like the buildings, where you need the SKU to find it?
Is the Stug IIIG a GHQ model? I don't see it in the online catalog. Is this like the buildings, where you need the SKU to find it?
-
pmskaar
- E5
- Posts: 1953
- Joined: Sun Apr 17, 2005 5:45 am
Re: Pete's Place
Hi Hoth
The StuG IIIG without sideskirts with StuH 42 are located under Howitzers, believe it or not. The StuG IIIG with Sideskirts is located under Anti-tank guns Self propelled. I don't know why the ones without sideskirts are under Howitzers except maybe for the StuH 42 being a self propelled howitzer.
The StuG IIIG without sideskirts with StuH 42 are located under Howitzers, believe it or not. The StuG IIIG with Sideskirts is located under Anti-tank guns Self propelled. I don't know why the ones without sideskirts are under Howitzers except maybe for the StuH 42 being a self propelled howitzer.