Dougeagle,
Thanks for the feedback.
It was a really nice battlefield. Glad you like the AAR as well. I enjoy creative writing and had fun putting it together. I defineltly would like to do and AAR for some of the games I play in the future.
The airborne aspect of the game was fun. It adds another dimension to the game and gets troops fighting quicker than if both forces just clashed at the bridge after moving from one end of the board.
The rules were a creation of the game master. They are simple and fun. Makes playing one of this games, cold, really easy. By the end of the game, you have a good feel for the way things need to go.
AARs: Show Us Yer Games!
Moderators: dnichols, GHQ, Mk 1
-
Hoth_902
- E5
- Posts: 1556
- Joined: Wed Jun 18, 2014 11:08 am
- Location: Pacific Northwest
- Contact:
-
Cav Dog
- E5
- Posts: 898
- Joined: Wed Dec 29, 2004 1:12 am
Here we go, its been a while...
Scenario: Spring 1945, a German Kampfgruppe tries to break through American lines. Germans enter from the top and the goal is simple, exit as many forces off the road at the bottom end of the table.

German forces:
2 Panther platoons

A Tiger II Platoon
A JgdPz IV platoon

A PzGren Platoon

A PzPion Platoon

And Finally KG HQ


Defending US forces
2 Rifle Platoons
1 Weapons Platoon
1 57mm ATG squad
1 M10 TD Platoon
1 M4/75 Platoon
1 M4/76 Platoon
1 Tank HQ with 2 M4/75 and 1 M4/105
1 Roadblock
The Americans deployed 1 rifle platoon at the roadblock supported by the weapons platoon and the ATG in he village at the top of the screen.

The roadblock is just to the right of the stone walls on the road. The ATG ot off a couple of shots at the German SPW prior to being put out of action by return fire.

Third roadblock squad on overwatch for any flanking action

Platoon HQ with bazooka team

The Germans led with the PzGrn Platoon which quickly got into a firefight with the American defenders. They took some losses and had to be reinforced by the PzPion platoon who quickly mopped up the Americans and blew the roadblock. - sorry it was an intense infantry battle in close quarters so no pics. It took 10 turns to clear the roadblock putting the Germans behind schedule.
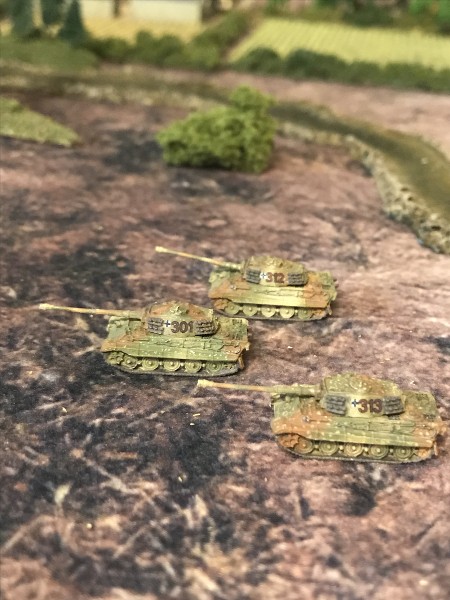
The Panthers roll up the road followed by the Tigers.


The M10s on the ridge kill the lead Panther and their mates swing around to outflank the advancing German column.


While US reinforcements enter the board

The battle will continue...
Scenario: Spring 1945, a German Kampfgruppe tries to break through American lines. Germans enter from the top and the goal is simple, exit as many forces off the road at the bottom end of the table.
German forces:
2 Panther platoons
A Tiger II Platoon
A JgdPz IV platoon
A PzGren Platoon
A PzPion Platoon
And Finally KG HQ
Defending US forces
2 Rifle Platoons
1 Weapons Platoon
1 57mm ATG squad
1 M10 TD Platoon
1 M4/75 Platoon
1 M4/76 Platoon
1 Tank HQ with 2 M4/75 and 1 M4/105
1 Roadblock
The Americans deployed 1 rifle platoon at the roadblock supported by the weapons platoon and the ATG in he village at the top of the screen.
The roadblock is just to the right of the stone walls on the road. The ATG ot off a couple of shots at the German SPW prior to being put out of action by return fire.
Third roadblock squad on overwatch for any flanking action
Platoon HQ with bazooka team
The Germans led with the PzGrn Platoon which quickly got into a firefight with the American defenders. They took some losses and had to be reinforced by the PzPion platoon who quickly mopped up the Americans and blew the roadblock. - sorry it was an intense infantry battle in close quarters so no pics. It took 10 turns to clear the roadblock putting the Germans behind schedule.
The Panthers roll up the road followed by the Tigers.
The M10s on the ridge kill the lead Panther and their mates swing around to outflank the advancing German column.
While US reinforcements enter the board
The battle will continue...
Tactics are the opinion of the senior officer present.
-
PolishGI
- E5
- Posts: 833
- Joined: Wed Jun 19, 2013 2:57 am
- Location: SW USA
Oh very cool. Very late in the war.
We always play with ammo levels and limited HVAP. So for the M10 crews, you have to choose wisely.... And for the Germans, well, you are just out of luck being that late in the war. no HVAP. But it is tough deciding when to use it as the Panther units and King TIgers are both formidable.
Please let us know how it goes. Curious as to how this plays out. 10 rounds for the infantry to clear the roadblock though... Did that take a while? Perhaps too long? Allows the American reinforcements to arrive and help shut things down.
 Charlie don't surf!
-
Cav Dog
- E5
- Posts: 898
- Joined: Wed Dec 29, 2004 1:12 am
So we pick up the battle:
German PzGren remnants rallying in the town

And the surviving Gis from the roadblock try to regroup at the riverbank - which was cold and unfordable which really limited the battlespace for both sides.

The German commander decides to use his Tigers to outflank the town and have his Panthers take care of the M10s on the right flank.


The JgdPzs sweep to the right once the M10s are out of action.

But are taken under fire from the flank by the previously unspotted Shermans in the woodline.


The Tigers and PzPion are in position to attack the town. unable to kill the Tigers from the front, the M4/76 platoon attempts a suicidal charge to get around the flank, with predictable results.

But one survives and gets revenge for his buddies, earning a posthumous medal for valor.


On the right flank, the remaining Shermans have a close quarters knife fight with the remaining Panthers and JgdPzs.


With both sides nearly out of armor, and the Germans out of time, call it a victory for the Americans.
German PzGren remnants rallying in the town
And the surviving Gis from the roadblock try to regroup at the riverbank - which was cold and unfordable which really limited the battlespace for both sides.
The German commander decides to use his Tigers to outflank the town and have his Panthers take care of the M10s on the right flank.
The JgdPzs sweep to the right once the M10s are out of action.
But are taken under fire from the flank by the previously unspotted Shermans in the woodline.
The Tigers and PzPion are in position to attack the town. unable to kill the Tigers from the front, the M4/76 platoon attempts a suicidal charge to get around the flank, with predictable results.
But one survives and gets revenge for his buddies, earning a posthumous medal for valor.
On the right flank, the remaining Shermans have a close quarters knife fight with the remaining Panthers and JgdPzs.
With both sides nearly out of armor, and the Germans out of time, call it a victory for the Americans.
Tactics are the opinion of the senior officer present.
-
BurtWolf
- E5
- Posts: 1083
- Joined: Sun Feb 03, 2013 11:48 pm
- Location: Rochester, NY
-
Quartette
- E5
- Posts: 109
- Joined: Sat Nov 15, 2008 10:01 pm
- Contact:
Played a quick scenario yesterday using the Intervention wargame rules. Didn't tart the battlefield up much with scenery - just enough for cover and to give a feel.
Scenario
A CH53 (North West corner) had crashed (circled blue). The surviving marines required rescue and had to RV with another CH53 which was en route. There were 4 potential LZ (shaded green). The south east was the best as it was the most open and a helicopter could land there safely. However it was the closest to Russian forces. The western LZ (orange) was too hazardous due to electricity pylons crossing it.

Forces
US marines: (approx 230 pts)
3 units each with SAW and AT. One of the units contained the lieutenant.
1 Mortar squad.

The marine units were randomly assigned morale conditions to begin the game. The mortar team began the game suppressed and the northern most marine squad began pinned. The other two marine units were fine.
Russian forces: (approx 180 pts)
Undeclared Russian forces were manning a check-point at the other end of the town. The were tasked with investigating the crash site.
2 x Conscript units
2 x BTR80a2

In Intervention, the turn is split into two phases - resolution phase and activity phase. In the activity phase units activate one at a time.
Turn 1:
Both marine units failed their morale resolution rolls - the mortar team so badly that their condition worsened.
The Russian units begin to push north. One conscript unit advanced up the western flank but for some reason ended its movement in the open (player error). It was quickly engaged and pinned by the marines, which were now fanning out from the crash site. The lieutenant used his command action and successfully motivated the other marine unit, giving them an additional action.
This unit used its first action to move into a building and then its other 2 actions to engage one of the BTRs in the rear before it had chance to move. Both AT rounds hit, damaging and then destroying the BTR. Unfortunately the marines then failed their depletion roll and ran out of AT.
The remaining Russian BTR and conscript unit rushed for cover; behind vegetation and in the mosque respectively. (Stay classy Russia)
Turn 2
Marines at the beginning of turn 2:

The mortar unit again failed its morale resolution really badly and fell back off the table, but the northern marine squad recovered to suppressed.
The Marines in the building traded fire with the conscripts but neither side had much effect. The remaining BTR also engaged the marines in the building but failed to achieve much.
The marines in the hedgerow again engaged the pinned conscripts and this time knocked them out.
Turn 3:
Now without AT, the marines in the building turned their attention to the conscripts in the mosque and knocked them out. They then moved east to secure an LZ.
The marines in the hedgerow used both their actions to head south and moved 8 inches to occupy a building which would give them a clear shot at the BTR for next turn.
The northern marines (which began the game pinned) moved east and engaged the BTR at range. They missed and also failed their depletion roll. Only one unit of marines now had any AT capability left.
The sole remaining Russian unit (the BTR) engaged the nearby marines but achieved little.
Turn 4
The southern marines engaged the BTR but only suppressed it. They then also failed their depletion roll and exhausted their supply of AT. The BTR returned fire and pinned them in their building.
The Marines now had no AT left.
Turn 5
The rescue helicopter arrived this turn. Faced with the prospect of attempting to defeat a BTR with no AT, the US player elected to land the helicopter as far away from the BTR as possible. This meant landing in a tight LZ. Thankfully the pilot passed the difficult terrain test and successfully landed in the north.

The southern marines recovered from pinned to suppressed, while the other marine units pulled back west to towards the new LZ
Realising they were running out of time, the BTR crashed through the foliage and moved north as fast as it could along the road. Arriving close to the LZ, it opened up on the helicopter, evidently firing wildly it missed entirely.
Turn 6

The situation at the beginning of turn 6 (showing activation order).
While the first marine unit activated and successfully boarded the helicopter, the BTR activated before the second marine unit and engaged the helicopter. The helicopter was now suppressed.
Faced with losing their rescue helicopter, and with dwindling options, the remaining northern marine unit changed its plan and, rather than withdrawing to the helicopter, it bravely assaulted the BTR. Unfortunately, they rolled poorly and failed to inflict any damage. The BTR had already activated this turn so was unable to hit back.
Turn 7
In the resolution phase the helicopter got a 1 on its morale check and was reduced to pinned. This caused the marine squad inside to disembark - also now pinned.
The assault was resolved next. In an assault, both parties attack simultaneously. The BTR failed to inflict any damage on the marines, but the marines used both their actions and managed to knock out the BTR.
Battered, bruised and with an MIA mortar squad, the marines has achieved victory ... just.

Overall it was a fun little game which didn't go how we expected. Early on it looked like the marines would walk it, but their good luck ended and a string of depletion fails brought the Russians back into the game. Landing the helicopter in the restricted LZ was probably a risk worth taking (due to the lack of AT at that stage) but it could have ended in disaster.
Scenario
A CH53 (North West corner) had crashed (circled blue). The surviving marines required rescue and had to RV with another CH53 which was en route. There were 4 potential LZ (shaded green). The south east was the best as it was the most open and a helicopter could land there safely. However it was the closest to Russian forces. The western LZ (orange) was too hazardous due to electricity pylons crossing it.
Forces
US marines: (approx 230 pts)
3 units each with SAW and AT. One of the units contained the lieutenant.
1 Mortar squad.
The marine units were randomly assigned morale conditions to begin the game. The mortar team began the game suppressed and the northern most marine squad began pinned. The other two marine units were fine.
Russian forces: (approx 180 pts)
Undeclared Russian forces were manning a check-point at the other end of the town. The were tasked with investigating the crash site.
2 x Conscript units
2 x BTR80a2
In Intervention, the turn is split into two phases - resolution phase and activity phase. In the activity phase units activate one at a time.
Turn 1:
Both marine units failed their morale resolution rolls - the mortar team so badly that their condition worsened.
The Russian units begin to push north. One conscript unit advanced up the western flank but for some reason ended its movement in the open (player error). It was quickly engaged and pinned by the marines, which were now fanning out from the crash site. The lieutenant used his command action and successfully motivated the other marine unit, giving them an additional action.
This unit used its first action to move into a building and then its other 2 actions to engage one of the BTRs in the rear before it had chance to move. Both AT rounds hit, damaging and then destroying the BTR. Unfortunately the marines then failed their depletion roll and ran out of AT.
The remaining Russian BTR and conscript unit rushed for cover; behind vegetation and in the mosque respectively. (Stay classy Russia)
Turn 2
Marines at the beginning of turn 2:
The mortar unit again failed its morale resolution really badly and fell back off the table, but the northern marine squad recovered to suppressed.
The Marines in the building traded fire with the conscripts but neither side had much effect. The remaining BTR also engaged the marines in the building but failed to achieve much.
The marines in the hedgerow again engaged the pinned conscripts and this time knocked them out.
Turn 3:
Now without AT, the marines in the building turned their attention to the conscripts in the mosque and knocked them out. They then moved east to secure an LZ.
The marines in the hedgerow used both their actions to head south and moved 8 inches to occupy a building which would give them a clear shot at the BTR for next turn.
The northern marines (which began the game pinned) moved east and engaged the BTR at range. They missed and also failed their depletion roll. Only one unit of marines now had any AT capability left.
The sole remaining Russian unit (the BTR) engaged the nearby marines but achieved little.
Turn 4
The southern marines engaged the BTR but only suppressed it. They then also failed their depletion roll and exhausted their supply of AT. The BTR returned fire and pinned them in their building.
The Marines now had no AT left.
Turn 5
The rescue helicopter arrived this turn. Faced with the prospect of attempting to defeat a BTR with no AT, the US player elected to land the helicopter as far away from the BTR as possible. This meant landing in a tight LZ. Thankfully the pilot passed the difficult terrain test and successfully landed in the north.
The southern marines recovered from pinned to suppressed, while the other marine units pulled back west to towards the new LZ
Realising they were running out of time, the BTR crashed through the foliage and moved north as fast as it could along the road. Arriving close to the LZ, it opened up on the helicopter, evidently firing wildly it missed entirely.
Turn 6
The situation at the beginning of turn 6 (showing activation order).
While the first marine unit activated and successfully boarded the helicopter, the BTR activated before the second marine unit and engaged the helicopter. The helicopter was now suppressed.
Faced with losing their rescue helicopter, and with dwindling options, the remaining northern marine unit changed its plan and, rather than withdrawing to the helicopter, it bravely assaulted the BTR. Unfortunately, they rolled poorly and failed to inflict any damage. The BTR had already activated this turn so was unable to hit back.
Turn 7
In the resolution phase the helicopter got a 1 on its morale check and was reduced to pinned. This caused the marine squad inside to disembark - also now pinned.
The assault was resolved next. In an assault, both parties attack simultaneously. The BTR failed to inflict any damage on the marines, but the marines used both their actions and managed to knock out the BTR.
Battered, bruised and with an MIA mortar squad, the marines has achieved victory ... just.
Overall it was a fun little game which didn't go how we expected. Early on it looked like the marines would walk it, but their good luck ended and a string of depletion fails brought the Russians back into the game. Landing the helicopter in the restricted LZ was probably a risk worth taking (due to the lack of AT at that stage) but it could have ended in disaster.
Cave Ab Homine Unius Libri
-
mluther
- E5
- Posts: 212
- Joined: Wed Nov 15, 2006 10:09 pm
- Location: Atlanta, GA
6-6-44 game.
I just got back from France and Normandy so I was in the mood for a DDay game. I also wanted something basic and that would allow for both sides to do some maneuvering, so a straight out assault on dug in stationery troops was out. I came up with the move in from Asnelles by the B Company 2 Devons and the counterattack by the 916 Grd Rgt later in the day on June 6. The 2 German grenadier companies had 2 3-section Zugs. I rated them as poor troops. This company had 2 attached MMG teams. The German orders were to get off the north edge of the table. A pair of StuGIIIs would show later. For the Brits, B Company of the 2 Devons had all 3 platoons, but I also rated them as poor troops for this game. Between being seasick and inexperienced they were not fully up to their game. A troop from the Sherwood Rangers were assigned as support but were running late. Their orders were to advance south and get off the table.They began on the north board edge.
Toofatlardies I Ain't been Shot Mum rules
Link to full flickr set:
https://www.flickr.com/photos/6mmgaming ... 9344468147
 Looking north towards Asnelles and Gold Beach by Mark Luther, on Flickr
 !st platoon is in trouble by Mark Luther, on Flickr
 Shermans spreading out by Mark Luther, on Flickr
 2 platoon firing by Mark Luther, on Flickr
 End game positions by Mark Luther, on Flickr
Mark
I just got back from France and Normandy so I was in the mood for a DDay game. I also wanted something basic and that would allow for both sides to do some maneuvering, so a straight out assault on dug in stationery troops was out. I came up with the move in from Asnelles by the B Company 2 Devons and the counterattack by the 916 Grd Rgt later in the day on June 6. The 2 German grenadier companies had 2 3-section Zugs. I rated them as poor troops. This company had 2 attached MMG teams. The German orders were to get off the north edge of the table. A pair of StuGIIIs would show later. For the Brits, B Company of the 2 Devons had all 3 platoons, but I also rated them as poor troops for this game. Between being seasick and inexperienced they were not fully up to their game. A troop from the Sherwood Rangers were assigned as support but were running late. Their orders were to advance south and get off the table.They began on the north board edge.
Toofatlardies I Ain't been Shot Mum rules
Link to full flickr set:
https://www.flickr.com/photos/6mmgaming ... 9344468147
Looking north towards Asnelles and Gold Beach by Mark Luther, on Flickr!st platoon is in trouble by Mark Luther, on FlickrShermans spreading out by Mark Luther, on Flickr2 platoon firing by Mark Luther, on FlickrEnd game positions by Mark Luther, on FlickrMark