How to paint microarmor

This is a general forum for all types of posts related to Military models.

Moderators: dnichols, GHQ, Mk 1

Mk 1
E5
Posts: 2383
Joined: Fri Dec 24, 2004 3:21 am
Location: Silicon Valley, CA

Post by Mk 1 »

I have double-posted this to two active threads on painting: "How to paint microarmor" and "Painting advice needed".

Here is a step-by-step of tonight's painting. Hope it is helpful, or at least interesting.

I bought some more WW2 Italians recently, just after posting my Italians on the "Show Us Yer Stuff" thread. I noted in that thread that I felt I should get some more AB41s and M13/40s, and that I was low on trucks. Then AB41s came on special, so I made my purchase.

Tonight I painted up my SPA35 medium trucks. I spray-primed all of my new Italians with Testor's Model Master White primer over the weekend. I wanted to paint up the AB41s and M13s, but I found I was out of Model Master's Afrika Mustard, which was the base-coat I was using on my Italian armor. I even when to my local hobby shop to pick some up, but the shop was closed. Owners taking a vacation or some such. The nerve of some people!

So ... since my trucks are all done in Italian Green Camo rather than Afrika Mustard, and since I HAVE Italian Green Camo (although only in a Polly-S bottle, not in a spray), I decided to paint up my 5 new trucks this evening.
Image
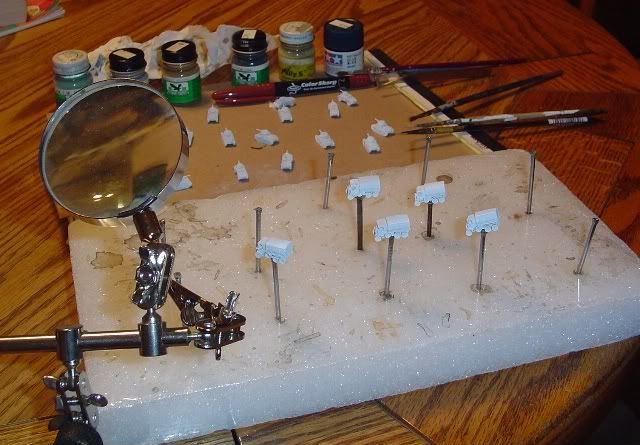
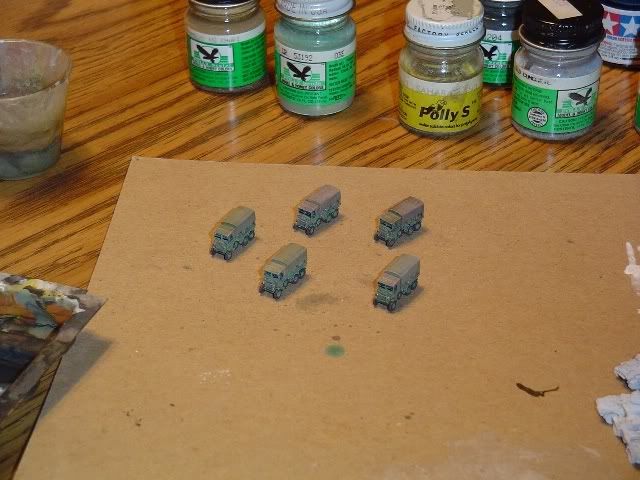
Here I have just set-up for my evening's painting.

I have fixed the SPA35 trucks to nails with super-glue. I have a block of styrofoam out of some box or other that I use as a peg-board holder for my painting nails.

I have a magnifying glass on a weighted stand with an articulated arm and clips to hold the nails. VERY handy for detailing, but a luxury that the new painter should not worry about (took me about 30 years to finally by mine. So don't rush.)

I have set out the paints I will be using: Polly-S Italian Camo Green, Sahara Sand, US Khaki, Old Concrete, Grimy Black, and Tamiya Acrylic Metallic Blue. (I also decided later to add touched of Polly-S German Uniform Grey and Flesh for the drivers, and Metallic Silver for the headlights.)

I have set out my brown Sharpie pen for some detailing work. I also have my favorite tweazers, great for pulling unexpected bits of flash out of little recesses in the models.

I have laid-out some brushes: very fine for the tires and detailing, medium-fine for most of the painting, large/round/bushy for the wash, and flat-headed red sable for beating.

I have the plastic off of a GHQ bubble-pack as my multi-chambered mixing pallette. And a small plastic cup (medicine doser-sized) for my water.

I'm ready to go!
Image
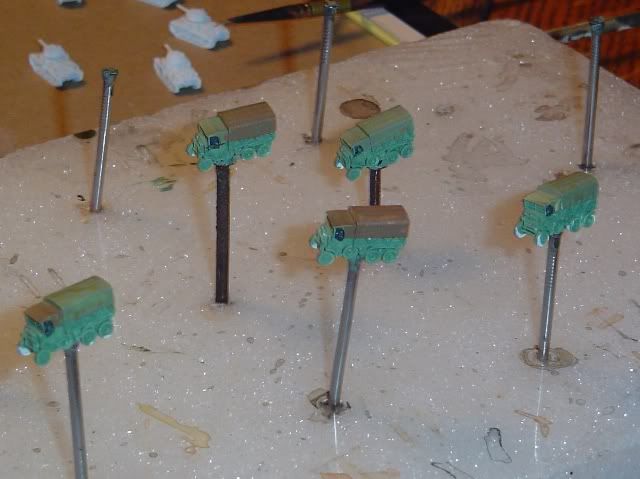
I've done my base-coating. The trucks are done in Italian Camo Green. The tarps are done in Sahara Sand or US Khaki. I like some individual character in my vehicles, so I don't paint all tarps identically. Note that I have even varied the shading in the Sahara Sand, by undercoating with the Camo Green in some cases, and painting directly onto the white primer in others. This is most noticeable on the truck on the far right, where the tarp on the cab is Sahara Sand on the white primer, while the tarp over the truck-bed is Sahara Sand over Camo Green.

At this stage there is a stark difference between the Sahara Sand tarps and the US Khaki tarps. That will diminish as I go on.
Image
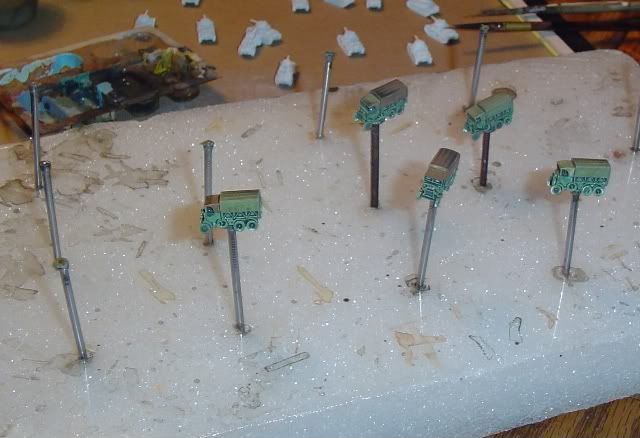
Here the trucks have been washed. Grimy Black, heavily diluted with water, and with just a touch of dishsoap in the mix as a surficant.

I am letting them dry just a bit, until they are not really wet, but just sticky.

Image
Now they've been beaten. I use my flat-headed sable brush to beat them.

The technique is simple. Dry brush. Hold the model. Swish back-and-forth. Rotate the model a little. Swish again. Rotate again. Etc.
Image
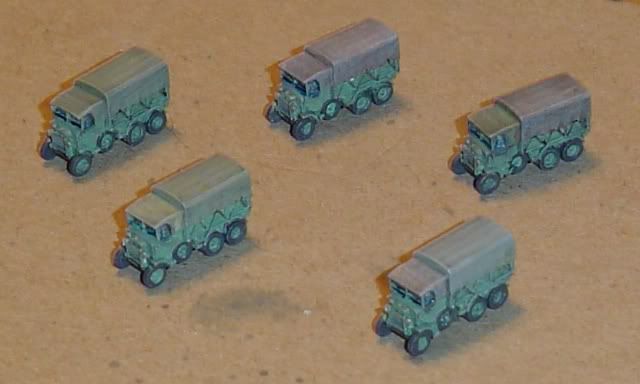
Here they are, dry-brushed with Old Concrete, and detailed. All done. Mostly.
Notice how the variations in shading on the tarps have become noticeably less pronounced. When I've seen canvas left out in the weather, this is the kind of fading and variation I have come to expect.

I used the brown Sharpie pen for the tie-down roaps. Quick and easy detailing.

I painted the entire underside of the trucks with Grimy Black. Not that I expect my trucks to be turned turtle on a wargaming board, but you never know! And, it helps ensure that I don't get a peak of an un-painted under-surface on some odd-angled photo.
Image
Still think the tires are a little too black. Might hit the lower half with a dry-brushing of Polly-S "Dust"...

Needs to be sprayed with Testor's Dullcote. Then I'll hit the windshields with Polly-S clear gloss, and I really will be done.

Then into the ready box they go!
-Mark 1
Difficile est, saturam non scribere.
"It is hard NOT to write satire." - Decimus Iunius Juvenalis, 1st Century AD

Rusty
Posts: 78
Joined: Tue Sep 20, 2005 12:03 pm
Location: New Zealand

Post by Rusty »

MK 1, wow thanks for that great work actually has opened my eyes to how easy this actually is

WHM
E5
Posts: 176
Joined: Tue Mar 29, 2005 12:42 pm
Location: Central N.J.

Post by WHM »

MK1, the trucks look great, but again, after they are washed the figures are beaten but what is on the brush, water, or is it dry?

Thankee much.

Rusty
Posts: 78
Joined: Tue Sep 20, 2005 12:03 pm
Location: New Zealand

Post by Rusty »

WHM i agree again not sure what MK1 means with the beating with a brush i hope you can clear this one up

Thanks in advance

Mk 1
E5
Posts: 2383
Joined: Fri Dec 24, 2004 3:21 am
Location: Silicon Valley, CA

Post by Mk 1 »

WHM pondered:
MK1, the trucks look great, but again, after they are washed the figures are beaten but what is on the brush, water, or is it dry?
>The technique is simple. Dry brush. Hold the model. Swish back-and-forth. Rotate the model a little. Swish again. Rotate again. Etc.

Dry. The brush is dry. No water. Dry.

Squeeze it dry in the rag as needed while beating. (It is likely that a squeeze will be needed after each model.) Brush should be dry.

At least that is how I have come to do it. Ritter is the master (and author) of this technique. I may not have interpreted his approach correctly. But that is what I have come to do, and I like the results.

The mounting on nails is a great aid to me. I spent 25 years holding the models front and back while I painted the sides. Then waiting. Then holding the models by the sides while I painted the front and back. Oy, paint on my fingers, and finger-prints on my models! I like the nails a lot. Count THAT as a Ritter-ism too.

Note that there is a painting guide on this fine website. It is mostly what I would call the "Ritter technique". It is actually explained a little better in the catalog that comes with your order. Take a look. It is pretty helpful.

Mind, again, that this is not some "correct" or "right" way. It is only "a" way. A way that I use. Others use different approaches, which have equal validity. 1ComOps' technique may be as good, or better. I don't know. I use this approach. I like it. Your mileage may vary. Kids, don't try this at home. No, wait, DO try this at home. That's the point, after all.
-Mark 1
Difficile est, saturam non scribere.
"It is hard NOT to write satire." - Decimus Iunius Juvenalis, 1st Century AD

tstockton
E5
Posts: 715
Joined: Sat Apr 16, 2005 10:55 pm
Location: Indiana
Contact:

Post by tstockton »

Mk I,
Mind, again, that this is not some "correct" or "right" way. It is only "a" way.
If ever someone hit the provierbial "nail on the head", I think you just nailed it BIG TIME! Like nearly everything else in life, there is no ONE "right way" to do something. And since there are surely very few "ethical considerations" in the finishing of micro armor, one could argue that the "ends justify the means". Ritter (to name one of many) does absolutely outstanding work on his models. But he uses enamels -- great for him, you cannot argue with his results (!!!) -- but I have chosen to use acrylics for my modeling. So... while I can follow his overall procedures, I do not follow his methods "step-by-step". Yes, I do use the same basics -- prime, base color, dark wash, drybrush, detail paint, decals, weathering -- the media used, and some of the techniques, differ.

So, is one way "right"? And does that make other ways "wrong" -- or just "different"? I think the key is just as much in the "enjoyment obtained from the journey", as well as the reaching of the "final destination".

My advice to anyone dabbling in ANY hobby -- find what works for you, then stick with it. And many, many, many thanks to everyone for sharing their experiences they've encounted along the way -- many of your posts have helped me "refine" my "skill set", and thus, my enjoyment of this fine hobby!

Regards,
Tom Stockton
"Well, I've been to one World's Fair, a picnic, and a rodeo, and that's the stupidest thing I ever heard come over a set of earphones. You sure you got today's codes?"

-- Major T. J. "King" Kong in "Dr. Strangelove"

tanker
Posts: 75
Joined: Fri May 12, 2006 2:22 am
Location: Somewhere near the Chesapeake Bay
Contact:

Post by tanker »

MK1 wrote:
>The technique is simple. Dry brush. Hold the model. Swish back-and-forth. Rotate the model a little. Swish again. Rotate again. Etc.

Dry. The brush is dry. No water. Dry.

Squeeze it dry in the rag as needed while beating. (It is likely that a squeeze will be needed after each model.) Brush should be dry.
Dry brush is an excellent technique, and so is using a light wash. A good friend of mine recently recommended Kel's Magic Sauce as a good wash for minifigs. You can find it at the War Store.

http://thewarstore.com/kelsmagicsauce.html

I haven't used it myself yet. Life has been too intrusive for me to even open up the latest packs of microarmor I've purchased in the past few months from GHQ. But I promise I'll get to them and then post some pics. No, really. I promise.

Tanker
"An armored division is like a tuxedo. You don't need one often, but when you do nothing else will suffice." - quote heard at a meeting of the JCoS

WHM
E5
Posts: 176
Joined: Tue Mar 29, 2005 12:42 pm
Location: Central N.J.

Post by WHM »

Great advise, thanks.

Another question(s) regarding using spray paint as a primer.

I have repainted a bunch of my old vehicles using some of the techniques described by different sources. Back in the day I would take the model and just paint it roadwheel to doghouse, glacis to engine grills in one color. When I repainted them in the newer methods I would strip off the old paint using oven cleaner or letting them soak in paint thinner. Now you guys got me thinking it is not necessary to do this as the models are spray painted using mostly either cheap black or white paint. If using paint as a primer why not use the old paint job?

So the question is first, is it necessary to strip them of their old paint job since they are going to be covered in a spray. Can't the old brushed on paint be the primer? And second, I've seen bottles of primer, how are those differnt advantagesly as oppsed to sprayed/brushed on paint? If there is an advantage.

Thanks again.
:D

Pitfall
E5
Posts: 204
Joined: Tue Mar 14, 2006 5:18 am
Location: South Bend, IN
Contact:

Post by Pitfall »

Paint is not primer and primer is not paint. Primer is chemically different from paint nad it does more than just add color to the model. Primers contain very little pigment and adhere to the surface to be painted while filling small pores and cracks to create a uniformly colored and smooth surface to paint. Paint contains pigments to add color to a surface as well as provide a somewhat protective finish.

I would recommend stripping the models as well becuase any future layers of paint will be adhering to the paint on the tank, not the tank itself. Plus after many years of handling, the tanks may have built up a layer of oil or dirt which will cause any more paint added to flake off.
I wish I had something witty to say...

Mk 1
E5
Posts: 2383
Joined: Fri Dec 24, 2004 3:21 am
Location: Silicon Valley, CA

Post by Mk 1 »

WHM was wondering out loud:
So the question is first, is it necessary to strip them of their old paint job since they are going to be covered in a spray. ...
I firmly believe the end result will be better if you strip off the old paint first.

But I think it is fair to question whether the difference will be enough to make it worth the effort.

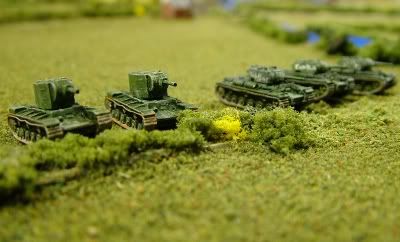
Image
(Apologies to those who have seen me post the same pictures too many times. I don't have a large collection of pictures to choose from to illustrate my point...)

In this picture from a wargame I fought last year, the KV-2s on the left illustrate the issue.

These tanks were in the bottom of my "active forces" box. They hadn't been out on a game table in decades. But we were going to do a Barbarossa scenario, so I went digging around to find them.

They had originally been spray-primed in a green/beige tone, and then spray-painted with a khaki drab which I could best describe as dark green-black, all done back more than 30 years ago.

I dug them out of the box, looked at them, said "ugh", and resolved that I would need to re-paint them for the upcoming game. I did NOT strip them. I just sprayed them with my Testor's Modelmaster Medium Green, did a black wash, dry-brushed with Polly-S Sahara Sand, and detailed the tracks and guns. So they ware wearing a few coats of paint as you see them here.

Bear in mind that these are OLD GHQ castings. The detail was significantly less back in those days. Still, the periscopes, hatches, and even the grab-rails are visible.

Would they look better if I had stripped them first? I think so. Would it have mattered enough to make it worth my while? Naw. I'm satisfied with the way they look, and I have 30 or 40 boxes of new micros waiting for my next minute of availability, so I don't need to invest more time in these.

I have only stripped paint off of micros on one occasion. I had some old M3A1 Stuarts that were just gobbed up too much even for my standards. They had been painted, and re-painted, and re-painted again. These too were old castings from the 1970s that I had first bought as lend-lease and painted-up in my then-current Soviet color scheme (same as the KV-2s), then updated to my more recent Medium Green Soviet color in the 90's. I wanted to re-paint them in American colors to go with the US Army in Tunisia forces I built up in 2004, so it was time to look at re-painting them again. In the last re-painting I evidently did not shake up the spray can well enough (a real risk with Modelmaster sprays), or perhaps I held it too close, or I didn't sweep it over the models smoothly, or whatever. These tanks were just gobbed up.

I stripped them by dropping them into a small cup of Pine Sol (yes, the standard furniture cleaner) for a few hours, and then going at them with an old toothbrush. It worked, but I would advise anyone else's method if they express satisfaction -- I found this method tedious and messy.

But I then re-primed them with white primer, and re-painted them with ModelMasters Olive Green, and washed/weathered/detailed them. I am satisfied enough with the results, and they role on the game board with my new casting M3A1s without too much gnashing of teeth.

Maybe I'll try to get a picture of them, the old and new M3A1s side-by-side, for comparision...
And second, I've seen bottles of primer, how are those differnt advantagesly as oppsed to sprayed/brushed on paint?
I will agree with what others have said on this point.

A good primer is different from paint. I've used white spray paint as primer, and I was not as satisfied with the result. Primer winds up being much thinner, and it really helps the paint to adhere and to give a uniform coverage compared to paint on bare metal.

Also, brushed-on paint often has a brush-induced texture. This may not be a problem if it is the last coat you put on, but if it is the first, every subsiquent coating will amplify that texturing. So spray-priming is best.

At least, that's my view. Your mileage may vary.
-Mark 1
Difficile est, saturam non scribere.
"It is hard NOT to write satire." - Decimus Iunius Juvenalis, 1st Century AD

WHM
E5
Posts: 176
Joined: Tue Mar 29, 2005 12:42 pm
Location: Central N.J.

Post by WHM »

One question leads to another.,,,

OK, you guys who use paint as a primer, what say you? Are there advantages to your school of thought or is it a question of good enough as MK1 used in his post as per his KV1s?

Rusty
Posts: 78
Joined: Tue Sep 20, 2005 12:03 pm
Location: New Zealand

Post by Rusty »

I have always used a spray can for the base, i did try a while back basecoating in paint but it didnt work for me. Unfortuatelly ive been using GW spray. And have also used the Tamiya spray as this is all i really have available to me.

Now i quick question is though and yes another question does lead to another..........


Is an airbrush worth it for this scale or a brush better

WHM
E5
Posts: 176
Joined: Tue Mar 29, 2005 12:42 pm
Location: Central N.J.

Post by WHM »

I've seen it mentioned a couple of times here but don't know what it is....sooooooo, just what is "GW Spray"?

CountRingworm
Posts: 58
Joined: Sat Jul 01, 2006 7:54 am
Location: Des Moines, IA
Contact:

Post by CountRingworm »

GW Spray- i assume- is the Games Workshop brand primer.

they make the warhammer stuff :)

Rusty
Posts: 78
Joined: Tue Sep 20, 2005 12:03 pm
Location: New Zealand

Post by Rusty »

CountRingworm wrote:GW Spray- i assume- is the Games Workshop brand primer.

they make the warhammer stuff :)
You got it in one, sorry for the slang there, it is Games Workshop Spray Primer.

Post Reply