Hello all, I'm a newbie to GHQ. Though I've been snooping around the forum for a few months this is my first post. I have little to no experience when it comes to painting and detailing my miniatures. What's really kicking my butt is the wash process. I've read through numerous posts on the different techniques and sequences for detailing miniatures, but what I usually end up with is a black smeared mess with the wash getting everywhere except in the cracks and crevices. Right now I'm starting with a rattle can light grey primer coat, followed by a rattle can coat of my base color (let's say a yellow desert sand for my HMMWV's). After that I apply my wash, blank ink mixed very conservatively with water, with small brush. After that everything goes to hell. I either wait too long and can't get the excess wash off or not long enough and my brush pulls the wash out of the nooks and crannies. It seems that no amount of dry brushing will cover the black mess all over. If anyone has the time to break this process down for me (idiot style) I'd really appreciate it.
Also, a quick comment. Peter Van Buren's work on Red Ricks site is amazing. I fly on CH-53E's in the Marines and his stuff is right on the mark. (He has obviously been doing this for a long time). My 53E's are pretty much garbage in comparison. If anyone can coach me to paint like that I'll get them a ride on the real thing if they ever find themselves in Jacksonville, NC
Washes for the modeling challenged
Moderators: dnichols, GHQ, Mk 1
-
skypig53
- Posts: 61
- Joined: Sun Oct 01, 2006 11:38 pm
- Location: Soon to be Quantico, VA
-
Peter
- Posts: 32
- Joined: Fri Aug 26, 2005 10:21 am
I'll Take That Check Ride!
Seriously, thanks for your kind words on my painting. Here's what I did; remember, this is what I do and others will have their own ideas and suggestions.
I assemble and clean with alcohol the model. I usually do not prime but if I do, I use a spray can primer from Home Depot. Spray lightly!
I use an airbrush only and very thin acrylics for the base coat. I usually mix a combo of grey and white and a touch of purple for the USMC color. I mix by eye and actually try to vary the shading for effect from model to model. I spray two or three thin coats and let it dry overnight.
I use very thin black paint thinned with the same brand thinner. I don't "wash" the whole model. I use the tiniest brush, a 10/0, and touch the flow into the seams and wherever I want the wash. I find a real wash too dark in this scale and I like to stick with acrylics only and not mix in oils or enamels. Coating with Future like people do in larger scales seems too much for these smaller models.
I will then in some cases airbrush a lighter shade into the larger panels and/or as an overall "dusting" to smooth out the colors.
For some of the panel lines without engraved lines, I will draw them with a mechnical pencil, using a small piece of plastic as a guide.
I then decal and overspray with Dullcoat.
Let me know if you have questions and I'll try to answer them. Sorry, I live in NoVirginia so I will take a rain check on the helo ride.
Peter
-
Devildog
- Posts: 68
- Joined: Thu Jun 02, 2005 11:59 pm
- Location: San Antonio, Texas
Here's another tip - for models with light basecoat colors (tans, yellows etc ie: desert vehicles or late war Germans) - don't use black paint/ink/whatever for the wash - use brown. Also, after the wash dries, drybrush the model with the basecoat color again, this covers up any of the "stains" left by the wash on the flat, raised surfaces.
"Hell no we're not retreating. We are just attacking from a different position." Gen. Oliver Smith USMC
-
skypig53
- Posts: 61
- Joined: Sun Oct 01, 2006 11:38 pm
- Location: Soon to be Quantico, VA
Thanks for the quick reply and advice. I've got about a dozen helos on the way from CinC, and GHQ. 53's, 46's, UH's and AH's. I'm trying to put together a Marine Expeditionary Unit and I want to get the rotor wing of the Aviation Combat Element knocked out first as it will probably be the most challenging and definately the most expensive.
I've never touched an airbrush before so I don't think I'll be able to get the same results with a rattle can and a brush. Maybe I can find one for on sale and experiment with it. Any recommendations on brand or model that is best for such an extreme scale.(and won't break the bank)
As for the washes, the owner of a local hobby shop recommended the black ink over flat paint and thinner. He says a lot of people use it for Warhammer though I'm not into that. I guess I'll experiment with your method as I have the paint and thinner on hand already.
Thanks to all.
-
8ball
- E5
- Posts: 464
- Joined: Thu Nov 04, 2004 6:52 am
- Contact:
I'm strictly a brush user. I actually follow a process similar to Pete's except with a brush. I use acrylics.
I start with a base coat of the basic color. I add some white, and keep the paint pretty thin. Sometmes I'll apply two or three very thin coats.
Then, like Pete, I carefully apply a wash, which can be anything from the base color darkened with black to black, or brown ink. I also use a 10/0 brush and let the wash run into the cracks and details by capillary action.
After I'm happy with the wash, I do a light wet, dry brush over the flat panels and high spots. I don't get the results that some of the guys here, like Pete, binpicker, and some of the others do, but I'm pretty happy. If you check out the Temporary Basing and Revolving Turrets topic, you'll see my stuff in the initial post.
-
Mk 1
- E5
- Posts: 2383
- Joined: Fri Dec 24, 2004 3:21 am
- Location: Silicon Valley, CA
I'm thinking that in some cases, like the excellent example 'copters (Peter's) you've chosen to try to emulated, the small touch of wash with "capillary" action may work very well. If there is a particular line you wish to highlight, spot-work may be best.
My own experience with the "wash and beat the whole model" approach has produced good results with ehancement of detail across a large variety of features and textures, both large and small ("large" within the context of micro armor, which ain't very large at all!). But I must admit that I have seen some features highlighted better in other people's work -- control surface seams on aircraft wings and tails stands out as one example in my thinking. I might try the spot application/capillary approach in future efforts.
As to getting "beaten" by the washing ... well, what the heck, keep trying! Its a hobby after all, not a job -- no one is going to fire you for doing it wrong (as in "not the boss's way").
I've had some failures in washing. Sometimes so bad that the models in question had to bet re- base coated. Others that just took a bit of extra work to "tone down", and still came out looking a bit different than their compadres. So what? I've never seen any two tanks that actually looked the same. Dirt, dust, mud, grime, and sun-fading accumulate at different rates on different vehicles. Rejoice in the "character" of your "not quite what I wanted" models.
Now, a practical tip or two...
I prime and base-coat with shake-a-can enamels. I do most of my detailing with brush and acrylics.
I don't use ink for washes. I use acrylics diluted with water. Depending on what my wash is, it may be heavily diluted at 10-to-1 or more (overall vehicle) or not heavily diluted at 2 or 3-to-1 (rust or mud on running gear).
One trick, learned hear on the forum, is to put just a touch of dish soap in the wash. Really. Just touch the brush to the nozzle on the dishsoap bottle by the sink before you stir it around in the diluted wash, or some such. It breaks up the surface tension of the water/paint, preventing it from beading up and encouraging it to flow into the cracks and crevases.
As to when to brush it off -- I go in with a flat-headed red sable brush and beat the models up when the wash has dried to the point of looking "sticky". In my case, I wash about 5 to 7 models, then go back and start beating the first one. OK, sometimes I'm a little early, and a model looses more of its wash. Sometimes I'm a little late, and a model comes out darker/grimier than its bretheren. S'OK by me.
Here are some pictures of how I do it...
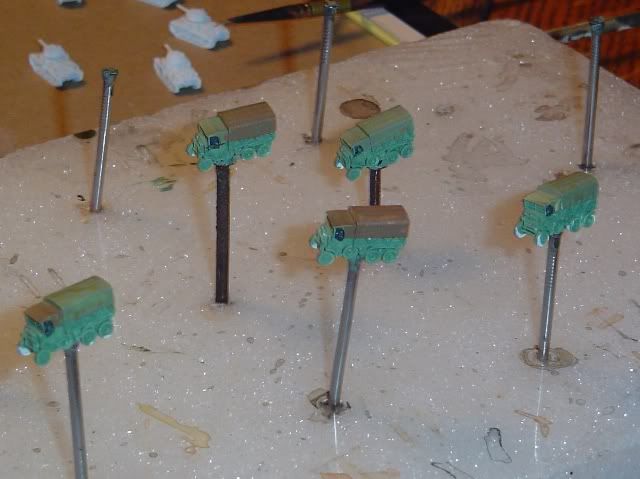
These Italian trucks have been base-coated, including the base-coating of their tarps in several subtle variations of colors (two colors, and two under-coats beneath those colors, and various splits between driver's tarp vs. cargo tarp).
Now they've been washed, and I am waiting. Not long. If I had another 5 trucks, I'd turn back to these as soon as I was done washing them.
Note how diluted the wash is. About 10-to-1. In this case I used Polly-S "Oily Black" (or is it "Grimy Black"?). It spreads out and runs into the cracks and crevases because of the dab of dishsoap. It really doesn't darken the whole model too much, as it is so heavily diluted. Mostly, it makes it look wet and dirty.

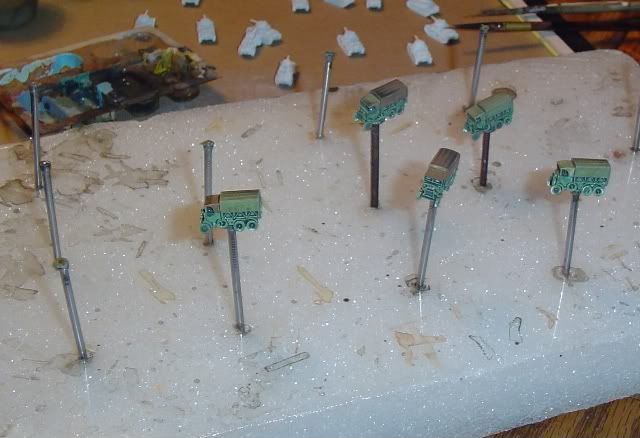
Now they've been beaten with the red sable brush. Swish swish swish from four or five directions, across every surface. Pulls off a lot of the wash. Even starts to wear down the base-coat a bit, almost as if I was dry-brushing a lighter color (since my primer is white).

Here they are, all detailed-up and dry brushed. You can see how subtle the wash results are. Not so heavy-handed that they have darkened the model at all, really.
At least this is what works for me. I've been here on the forum coming up on two years, now (is it really that long?). Whatever minor skills I have developed in weathering have been developed during that time. For thirty years before I started on this forum, I developed some skills in detailing, but none at all in weathering. Its still all pretty new to me, and I find it to be a lot of fun!
So keep at it. Try out some variety of the ideas you've seen described. Show us how you're doing. We'd love to see, and to help if we can.
My own experience with the "wash and beat the whole model" approach has produced good results with ehancement of detail across a large variety of features and textures, both large and small ("large" within the context of micro armor, which ain't very large at all!). But I must admit that I have seen some features highlighted better in other people's work -- control surface seams on aircraft wings and tails stands out as one example in my thinking. I might try the spot application/capillary approach in future efforts.
As to getting "beaten" by the washing ... well, what the heck, keep trying! Its a hobby after all, not a job -- no one is going to fire you for doing it wrong (as in "not the boss's way").
I've had some failures in washing. Sometimes so bad that the models in question had to bet re- base coated. Others that just took a bit of extra work to "tone down", and still came out looking a bit different than their compadres. So what? I've never seen any two tanks that actually looked the same. Dirt, dust, mud, grime, and sun-fading accumulate at different rates on different vehicles. Rejoice in the "character" of your "not quite what I wanted" models.
Now, a practical tip or two...
I prime and base-coat with shake-a-can enamels. I do most of my detailing with brush and acrylics.
I don't use ink for washes. I use acrylics diluted with water. Depending on what my wash is, it may be heavily diluted at 10-to-1 or more (overall vehicle) or not heavily diluted at 2 or 3-to-1 (rust or mud on running gear).
One trick, learned hear on the forum, is to put just a touch of dish soap in the wash. Really. Just touch the brush to the nozzle on the dishsoap bottle by the sink before you stir it around in the diluted wash, or some such. It breaks up the surface tension of the water/paint, preventing it from beading up and encouraging it to flow into the cracks and crevases.
As to when to brush it off -- I go in with a flat-headed red sable brush and beat the models up when the wash has dried to the point of looking "sticky". In my case, I wash about 5 to 7 models, then go back and start beating the first one. OK, sometimes I'm a little early, and a model looses more of its wash. Sometimes I'm a little late, and a model comes out darker/grimier than its bretheren. S'OK by me.
Here are some pictures of how I do it...
These Italian trucks have been base-coated, including the base-coating of their tarps in several subtle variations of colors (two colors, and two under-coats beneath those colors, and various splits between driver's tarp vs. cargo tarp).
Now they've been washed, and I am waiting. Not long. If I had another 5 trucks, I'd turn back to these as soon as I was done washing them.
Note how diluted the wash is. About 10-to-1. In this case I used Polly-S "Oily Black" (or is it "Grimy Black"?). It spreads out and runs into the cracks and crevases because of the dab of dishsoap. It really doesn't darken the whole model too much, as it is so heavily diluted. Mostly, it makes it look wet and dirty.
Now they've been beaten with the red sable brush. Swish swish swish from four or five directions, across every surface. Pulls off a lot of the wash. Even starts to wear down the base-coat a bit, almost as if I was dry-brushing a lighter color (since my primer is white).
Here they are, all detailed-up and dry brushed. You can see how subtle the wash results are. Not so heavy-handed that they have darkened the model at all, really.
At least this is what works for me. I've been here on the forum coming up on two years, now (is it really that long?). Whatever minor skills I have developed in weathering have been developed during that time. For thirty years before I started on this forum, I developed some skills in detailing, but none at all in weathering. Its still all pretty new to me, and I find it to be a lot of fun!
So keep at it. Try out some variety of the ideas you've seen described. Show us how you're doing. We'd love to see, and to help if we can.
-Mark 1
Difficile est, saturam non scribere.
"It is hard NOT to write satire." - Decimus Iunius Juvenalis, 1st Century AD
Difficile est, saturam non scribere.
"It is hard NOT to write satire." - Decimus Iunius Juvenalis, 1st Century AD
-
1ComOpsCtr
- E5
- Posts: 389
- Joined: Fri Apr 14, 2006 3:03 am
- Location: Midwest
- Contact:
Perhaps the first thing to talk about is your use of ink for the wash. Unless you dullcoat after you apply the ink, which won't help you I believe, you will usually return the ink to a partial liquid state by getting it wet again. I believe you will find using paint will produce a better wash than ink because once the paint dries it is more permanent than the ink. You can use water based paint or oil based paint for a wash depending on what you want the finished product to look like. I use an oil based primer and spray base color for most of the vehicles I do for the Marine units we duplicate, using a mixture to two bottles of Testors "rubber tire" and one bottle of flat black for a very nice dark brown primer that works for almost every period we model.
Since a wash will almost always tint the base color you will have to go back over the primary color with highlights after you let the wash dry. If you use water based try a very small drop of dish soap in the water you use to dilute the paint to help break the surface tension of the model
Anyone who tells you not to use a good base coat or primer is only leading you down the path to future lead rot, ...maybe not right away, but in the future. If you don't have a good seal the lead will eventually develop a reaction to the moisture in the air you store your miniatures in and form a powder on the surface which will cause the paint to fall off... eventually.

The picture above is of a CinC Ch-53 before GHQ made their model. Note the way the blades appear.
http://www.commandoperationscenter.com
Perhaps some of the pictures contained in the site above will help you with detail work and illustrate what can be done in this scale.
Good luck...
Will
ComOpsCtr
Since a wash will almost always tint the base color you will have to go back over the primary color with highlights after you let the wash dry. If you use water based try a very small drop of dish soap in the water you use to dilute the paint to help break the surface tension of the model
Anyone who tells you not to use a good base coat or primer is only leading you down the path to future lead rot, ...maybe not right away, but in the future. If you don't have a good seal the lead will eventually develop a reaction to the moisture in the air you store your miniatures in and form a powder on the surface which will cause the paint to fall off... eventually.
The picture above is of a CinC Ch-53 before GHQ made their model. Note the way the blades appear.
http://www.commandoperationscenter.com
Perhaps some of the pictures contained in the site above will help you with detail work and illustrate what can be done in this scale.
Good luck...
Will
ComOpsCtr
"He who fights with monsters should look to it that he himself does not become a monster." - Friedrich Wilhelm Nietzsche, 1844-1900
-
armypainter
- Posts: 58
- Joined: Mon Sep 25, 2006 6:19 am
- Location: Pennsylvania

-
1ComOpsCtr
- E5
- Posts: 389
- Joined: Fri Apr 14, 2006 3:03 am
- Location: Midwest
- Contact:
Thanks for the compliment.
The thing to remember while doing a wash to a vehicle is that you are trying to bring out detail and the amount of work usually depends on how much effort you want to spend to achieve the level of detail you want. If the models are for simple wargames or simulations you can spend less time than if the models are the focus of your efforts. Any painted miniature is able to fight/die on the table, the major difference seems to be the amount of time you are willing to devote to making a miniature look as close to the real thing as you can, ...which doesn't matter quite the same to everyone. The gamers you play with may not notice your work, other than the models look good. I guess the real test is when someone you are gaming with picks up the CH-53E you have just placed on the table and says: "that looks just like my bird". If that's what you want you will need lots of practice, dedication, and time.
But, not everyone needs the same detail as those of us who are fanatics about detail and accuracy. Sometimes just having a vehicle painted OD or Tan with painted tires is enough... The vehicles in the picture below were primed with the dark brown primer mentioned in a previous post. You can also just make out the brown wash to the area below the tarp in the photo...

Something worth remembering when painting miniatures. Black is not a natural color. Using dark brown or dark blue as a basis for shading or as a primer/base coat to let the shadows show through works very well in this small scale. Working from dark to light, with an eye for using slightly lighter shades for the smaller scale makes a vehicle stand out in a drab landscape. Just for grins here is another view of a "future wars" simulation in progress with Marine Ospreys from before GHQ made their fantastic model available. Note all of the browns and redbrowns that are offset by the green of the trees. Note how the dark ground helps the lighter vehicles stand out.

Using a wash takes patience, as does learning to dry-brush, but using both in conjunction will give you a nice finished model that will look realistic.
Will
ComOpsCtr
The thing to remember while doing a wash to a vehicle is that you are trying to bring out detail and the amount of work usually depends on how much effort you want to spend to achieve the level of detail you want. If the models are for simple wargames or simulations you can spend less time than if the models are the focus of your efforts. Any painted miniature is able to fight/die on the table, the major difference seems to be the amount of time you are willing to devote to making a miniature look as close to the real thing as you can, ...which doesn't matter quite the same to everyone. The gamers you play with may not notice your work, other than the models look good. I guess the real test is when someone you are gaming with picks up the CH-53E you have just placed on the table and says: "that looks just like my bird". If that's what you want you will need lots of practice, dedication, and time.
But, not everyone needs the same detail as those of us who are fanatics about detail and accuracy. Sometimes just having a vehicle painted OD or Tan with painted tires is enough... The vehicles in the picture below were primed with the dark brown primer mentioned in a previous post. You can also just make out the brown wash to the area below the tarp in the photo...
Something worth remembering when painting miniatures. Black is not a natural color. Using dark brown or dark blue as a basis for shading or as a primer/base coat to let the shadows show through works very well in this small scale. Working from dark to light, with an eye for using slightly lighter shades for the smaller scale makes a vehicle stand out in a drab landscape. Just for grins here is another view of a "future wars" simulation in progress with Marine Ospreys from before GHQ made their fantastic model available. Note all of the browns and redbrowns that are offset by the green of the trees. Note how the dark ground helps the lighter vehicles stand out.
Using a wash takes patience, as does learning to dry-brush, but using both in conjunction will give you a nice finished model that will look realistic.
Will
ComOpsCtr
"He who fights with monsters should look to it that he himself does not become a monster." - Friedrich Wilhelm Nietzsche, 1844-1900
-
Mk 1
- E5
- Posts: 2383
- Joined: Fri Dec 24, 2004 3:21 am
- Location: Silicon Valley, CA
BillG:
I tried alcohol to thin my washes after reading about it here on this forum.
I was initially impressed. I found it made my task much easier ... it caused the wash to flow well (no beading-up as I sometimes experienced with water-thinned acrylics), and it dried fast, which is convenient when I want to focus on getting a single unit (say 10 vehicles) finished in a couple hours of work.
But ...
I also found that the washes dried a little too fast for me. I try to use variations on Ritter's approach, washing the whole vehicle and then "beating it" with a brush to whick away the wash from the larger flatter surfaces before it dries. Alcohol-thinned washes dried too fast for me on several occasions, and I wound up with vehicles that were too dark overall.
That issue I managed to overcome with some practice.
But the bigger issue is that I seem to be left with a light crusted effect on some of the vehicles I washed with the alcohol. I don't know how it came about, or what it is. If I look straight down on the model from above (perpendicular to the surface) it looks dark-washed. But when seen from some angles, it most definitely appears that a white-wash was applied, rather than a dark wash. And if the lighting comes from the side, it looks like a white-wash even when viewed from above.
Any idea might have caused that? Have you seen this effect?
Overall, I've gone back to washing with water-thinned acrylics, with just a touch of dish-soap in the wash to prevent beading.
-Mark 1
Difficile est, saturam non scribere.
"It is hard NOT to write satire." - Decimus Iunius Juvenalis, 1st Century AD
Difficile est, saturam non scribere.
"It is hard NOT to write satire." - Decimus Iunius Juvenalis, 1st Century AD
-
Ritter
- E5
- Posts: 528
- Joined: Tue Nov 23, 2004 10:59 am
- Location: BC, Canada
- Contact:
Mark-uno,
I too had this problem with Acrylics thinned with isopropynol or rubbing alcohol. There isnt the same coverage with acrylics once thinned. They tend to look whitish and hazy. Maybe try a wash of testors tinned with turp over the acrylic base coat. Shouldnt harm the acrylics if dried properly.
Troy
I too had this problem with Acrylics thinned with isopropynol or rubbing alcohol. There isnt the same coverage with acrylics once thinned. They tend to look whitish and hazy. Maybe try a wash of testors tinned with turp over the acrylic base coat. Shouldnt harm the acrylics if dried properly.
Troy
-
8ball
- E5
- Posts: 464
- Joined: Thu Nov 04, 2004 6:52 am
- Contact:
I'm not sure what kind of ink 1ComOpsCtr has experience with, but I don't have a rehydration problem with them. I use waterproof drawing inks, such as Higgins. Once they dry, they dry. Inks are also far less dense than paint so they do a better job of filling tiny nooks and etched grooves. As he says, some colored inks do have a glossy finish. But this is easily fixed with a a matte clear finish, which you're going to want to use anyway to protect your work.
Remember, "wash" is something of a misnomer. A better word to describe it would be "detailing," IMHO.
Remember, "wash" is something of a misnomer. A better word to describe it would be "detailing," IMHO.