Custom Scenery
Moderators: dnichols, GHQ, Mk 1
-
DeanMartin54
- Posts: 19
- Joined: Mon Jun 25, 2007 4:24 am
- Location: Syracuse, New York
Custom Scenery
Hey Everyone i was just curious as to what custom scenery items for your boards and or layouts! i am just about finished with my first Layout and i am loving it. i tried to think of what i could use as Hedgerows, so i snooped aroud the house and found a whole package of pipe cleaners. so i dipped them in glue and covered with terf! But the best part is that i cut certain sections so that they are removable! It is perfect for putting Pak's or Flak guns to take out those pesky tank columns! I also have been collecting Springs from all the dead pens i could find, i had to explain to all my friends at school what i was doing  , put them all in plastic cup and filled it with water and salt. a few days later, i had rusted barbed wire!!!! Because im still in high school, i cant afford to buy all the things to make it perfect, but i myself like making custom pieces!
"All right, they're on our left, they're on our right, they're in front of
us, they're behind us...they can't get away this time"
- Lewis B. "Chesty" Puller, USMC
us, they're behind us...they can't get away this time"
- Lewis B. "Chesty" Puller, USMC
-
DeanMartin54
- Posts: 19
- Joined: Mon Jun 25, 2007 4:24 am
- Location: Syracuse, New York
Pictures are on the way!!!!
Just had a stroke of genius! I am buying masses of Monopoly buildings for small sheds, houses or buildings. I will paint them obvisously and make them as realistic as possible!!!
Anything can become detailed with the right amount paint, brushes, and Styrene (if i learn to use it)
Just had a stroke of genius! I am buying masses of Monopoly buildings for small sheds, houses or buildings. I will paint them obvisously and make them as realistic as possible!!!
Anything can become detailed with the right amount paint, brushes, and Styrene (if i learn to use it)
Last edited by DeanMartin54 on Wed Jan 02, 2008 11:31 pm, edited 1 time in total.
"All right, they're on our left, they're on our right, they're in front of
us, they're behind us...they can't get away this time"
- Lewis B. "Chesty" Puller, USMC
us, they're behind us...they can't get away this time"
- Lewis B. "Chesty" Puller, USMC
-
jb
- E5
- Posts: 2160
- Joined: Fri Mar 11, 2005 7:13 am
- Location: Antananarivo
Re: Custom Scenery
DM54 , thats how it all started for me, Iwas young and couldn't aford anything. I had to make my tanks out of clay that I dug out of creek beds. Somehow over the years I still get just as excited over making projects from "nothing". Its nice to know that if I ever really fell on bad times I can keep up my morale from nothing...DeanMartin54 wrote:...Because im still in high school, i cant afford to buy all the things to make it perfect, but i myself like making custom pieces!
John
-
DeanMartin54
- Posts: 19
- Joined: Mon Jun 25, 2007 4:24 am
- Location: Syracuse, New York
That is a great idea!! I decided to make mine as realistic as possible, and i am wondering whether i am the first to add this to a layout or not; A SoundTrack! i have over an hour of Tank engines warming up, running, stopping, halftracks, motorcycles, Stukas diving, plane engines, Artillery bombardments, and infantry noises! Even rain! If anyone is interested, i am sure i can email parts of the cd i made for my layout if anyone is interested!!!
Pictures later tonight!!!!
Also, i added a river today for my layout and i used "realistic water" in model trains. i had a M15a1 without the turret, and a Sherman Firefly with the same fate. i rusted them up a bit and put them in the river and partially exposed! I also added some extra pieces such as extra barrels, muck, and a motorcycle so the riverbed looks littered with the remains of an unfortunate Allied Patrol!
"All right, they're on our left, they're on our right, they're in front of
us, they're behind us...they can't get away this time"
- Lewis B. "Chesty" Puller, USMC
us, they're behind us...they can't get away this time"
- Lewis B. "Chesty" Puller, USMC
-
Mk 1
- E5
- Posts: 2383
- Joined: Fri Dec 24, 2004 3:21 am
- Location: Silicon Valley, CA
Yep, I too have a tendancy to gather random items to make terrain.
This stems from my own early gaming days in Jr. High and High School, not that I was so terribly cheap (well, yes, in truth I was), but also there just wasn't very much available way back then (when the earth was waste and void), and I didn't know many other miniatures wargamers to learn from. So I had to make due with what I could find and what I could create from my own imagination.

The Russian peasant hut is balsa. I bought a single long rectangular strip, and a single semi-circular rounded strip, and managed to make about 15 peasant huts. Took some time with a razor to score up the thatched roofs.
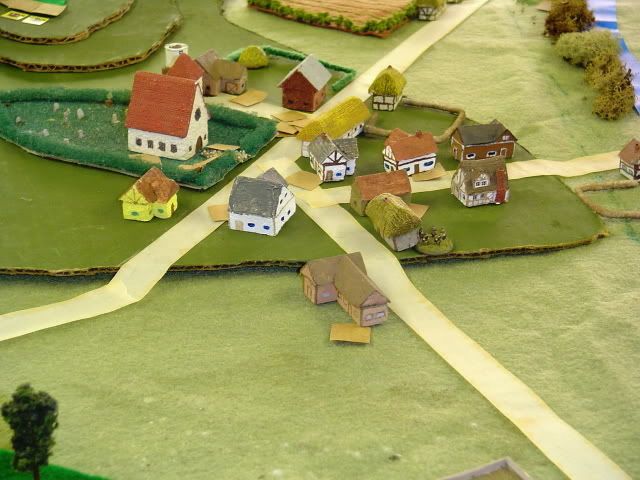
Here you can see many of my "made-on-the-cheap" terrain items.
First, my terrain itself is done with a felt table cover and painted elevations. The elevations I have created by cutting up corregated cardboard. Any box that comes in to my home is likely to get carved and painted. Typically green on one side and sand/tan on the other. I often just place my tanks on the cardboard when I spray paint their base-coats, so that I don't even really pay for painting my elevations.
Note the churchyard. The church itself is a commercial model, but the yard has a hedge made from the kitchen scrubbing pad that was mentioned by AuCav above. The grass of the yard is model railroad paper grass -- not too enthusiastic abut that stuff, haven't used it much since. The gravestones I cut from regular cardboard.
You'll notice I also use pipe-cleaners for hedges. I've also sprayed some pipe cleaners stone gray to use as stone walls. Not the best modelling you'll see here, but functional for a quick set-up game.
I also bought a triangular-cut balsa strip. With rectangular and triangular strips you can make almost any shape. So you see many buildings made from the balsa. Total cost for the materials to make about 30 buildings (between peasant huts and whatever else) was about $2.00. I still have plenty of balsa left over. I also taught myself to make molds and do resin castings, so that I could more quickly duplicate those buildings that seemed to come out well.
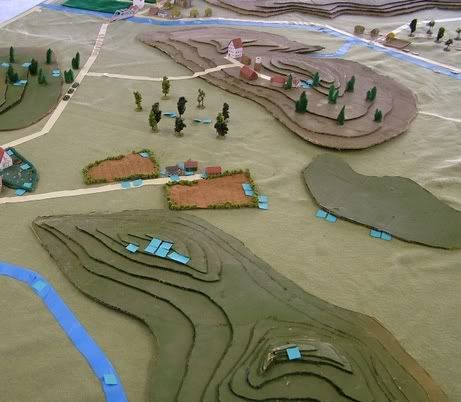
Behind the church, barely visible, is a water tower. Made from a base of the balsa, with a cut section of cardboard tube from a pants hanger as the tank itself. There is also some lichen in the back along the creek. I started with two boxes (small boxes) of colored lichen as my primary means of modelling trees. Bought them when I was about 15 at the model railroad shop. Still have some of that stuff in the kit, although after 30 years its getting a bit dried out. So I gather fresh lichen from the trees around my father-in-law's house when I visit over the holidays. Yep. Still do. He thinks I'm a loon.
Felt cloth table. Corrugated cardboard elevations. Tape roads and rivers. Felt cloth cut-outs with model railroad shrubs and flock for cultivated fields. Cut chenile (like giant pipe-cleaners) mounted on pennies for pine trees. Nails with model railroad shrubs glued to them, mounted on pennies for disciduous trees. Buildings mostly home-made from balsa strips. Bridges scratch made from cut carboard (notice the girder bridge in the distance ... one of my favorites).
I don't spend much on my terrain ... use my money to buy more tanks.

Here I'm mixing my scratch-built stuff on some of Thunder's nice gaming boards. I've added sand to make dirt roads, and put my blue tape onto some of his roads to convert them to streams. Some of my buildings are added, most notably the factory complex in the distance. That is another of my el-cheapo approaches. I take plastic packaging and cut/paint it to make buildings. In this case it was the plastic keyboard cover that came with a new computer.

Another view of the factory complex. Also a wooden girder bridge in the background, again scratch-built from cut carboard.


And finally a couple looks at what can be done just by cutting and painting plastic packaging. These buildings housed some parts I bought at the auto parts store, I think. Can't possibly remember what was in them. Don't even own the car anymore. But I still have the plastic from the packaging!
(Oh, and the aircraft are also scratch-built. The Gazelles are newest ones here, and I made them more than 20 years ago! )
)
Hope that helps.
This stems from my own early gaming days in Jr. High and High School, not that I was so terribly cheap (well, yes, in truth I was), but also there just wasn't very much available way back then (when the earth was waste and void), and I didn't know many other miniatures wargamers to learn from. So I had to make due with what I could find and what I could create from my own imagination.
The Russian peasant hut is balsa. I bought a single long rectangular strip, and a single semi-circular rounded strip, and managed to make about 15 peasant huts. Took some time with a razor to score up the thatched roofs.
Here you can see many of my "made-on-the-cheap" terrain items.
First, my terrain itself is done with a felt table cover and painted elevations. The elevations I have created by cutting up corregated cardboard. Any box that comes in to my home is likely to get carved and painted. Typically green on one side and sand/tan on the other. I often just place my tanks on the cardboard when I spray paint their base-coats, so that I don't even really pay for painting my elevations.
Note the churchyard. The church itself is a commercial model, but the yard has a hedge made from the kitchen scrubbing pad that was mentioned by AuCav above. The grass of the yard is model railroad paper grass -- not too enthusiastic abut that stuff, haven't used it much since. The gravestones I cut from regular cardboard.
You'll notice I also use pipe-cleaners for hedges. I've also sprayed some pipe cleaners stone gray to use as stone walls. Not the best modelling you'll see here, but functional for a quick set-up game.
I also bought a triangular-cut balsa strip. With rectangular and triangular strips you can make almost any shape. So you see many buildings made from the balsa. Total cost for the materials to make about 30 buildings (between peasant huts and whatever else) was about $2.00. I still have plenty of balsa left over. I also taught myself to make molds and do resin castings, so that I could more quickly duplicate those buildings that seemed to come out well.
Behind the church, barely visible, is a water tower. Made from a base of the balsa, with a cut section of cardboard tube from a pants hanger as the tank itself. There is also some lichen in the back along the creek. I started with two boxes (small boxes) of colored lichen as my primary means of modelling trees. Bought them when I was about 15 at the model railroad shop. Still have some of that stuff in the kit, although after 30 years its getting a bit dried out. So I gather fresh lichen from the trees around my father-in-law's house when I visit over the holidays. Yep. Still do. He thinks I'm a loon.
Felt cloth table. Corrugated cardboard elevations. Tape roads and rivers. Felt cloth cut-outs with model railroad shrubs and flock for cultivated fields. Cut chenile (like giant pipe-cleaners) mounted on pennies for pine trees. Nails with model railroad shrubs glued to them, mounted on pennies for disciduous trees. Buildings mostly home-made from balsa strips. Bridges scratch made from cut carboard (notice the girder bridge in the distance ... one of my favorites).
I don't spend much on my terrain ... use my money to buy more tanks.
Here I'm mixing my scratch-built stuff on some of Thunder's nice gaming boards. I've added sand to make dirt roads, and put my blue tape onto some of his roads to convert them to streams. Some of my buildings are added, most notably the factory complex in the distance. That is another of my el-cheapo approaches. I take plastic packaging and cut/paint it to make buildings. In this case it was the plastic keyboard cover that came with a new computer.
Another view of the factory complex. Also a wooden girder bridge in the background, again scratch-built from cut carboard.
And finally a couple looks at what can be done just by cutting and painting plastic packaging. These buildings housed some parts I bought at the auto parts store, I think. Can't possibly remember what was in them. Don't even own the car anymore. But I still have the plastic from the packaging!
(Oh, and the aircraft are also scratch-built. The Gazelles are newest ones here, and I made them more than 20 years ago!
Hope that helps.
-Mark 1
Difficile est, saturam non scribere.
"It is hard NOT to write satire." - Decimus Iunius Juvenalis, 1st Century AD
Difficile est, saturam non scribere.
"It is hard NOT to write satire." - Decimus Iunius Juvenalis, 1st Century AD
-
DeanMartin54
- Posts: 19
- Joined: Mon Jun 25, 2007 4:24 am
- Location: Syracuse, New York
Quick Question.
I have a SdKfz 251/D 1 Hanomag without a machinegun, so i decided to cover the open parts with a tarp. I plan to use Aluminium foil for the tarp and will paint it. But i would really like to put the Nazi flag on the tarp like early war vehicles, so the question is how would i paint a flag that small?? (If my question makes no sense, refer to the picture for the stug IIID, thats what i basically want it to look like
I have a SdKfz 251/D 1 Hanomag without a machinegun, so i decided to cover the open parts with a tarp. I plan to use Aluminium foil for the tarp and will paint it. But i would really like to put the Nazi flag on the tarp like early war vehicles, so the question is how would i paint a flag that small?? (If my question makes no sense, refer to the picture for the stug IIID, thats what i basically want it to look like
"All right, they're on our left, they're on our right, they're in front of
us, they're behind us...they can't get away this time"
- Lewis B. "Chesty" Puller, USMC
us, they're behind us...they can't get away this time"
- Lewis B. "Chesty" Puller, USMC
-
DeanMartin54
- Posts: 19
- Joined: Mon Jun 25, 2007 4:24 am
- Location: Syracuse, New York
How do you all use Styrene for your models. i have a package of it but am totally stumped how to make all the fine details everyone makes such as bags, ammo shells, etc etc. I would really like to make some sandbags, can anyone help?
"All right, they're on our left, they're on our right, they're in front of
us, they're behind us...they can't get away this time"
- Lewis B. "Chesty" Puller, USMC
us, they're behind us...they can't get away this time"
- Lewis B. "Chesty" Puller, USMC
-
Pitfall
- E5
- Posts: 204
- Joined: Tue Mar 14, 2006 5:18 am
- Location: South Bend, IN
- Contact:
-
Mk 1
- E5
- Posts: 2383
- Joined: Fri Dec 24, 2004 3:21 am
- Location: Silicon Valley, CA
Styrene as in sheet styrene? Or some other shapes? Or perhaps plastic putty?DeanMartin54 wrote:How do you all use Styrene for your models. i have a package of it but am totally stumped how to make all the fine details everyone makes such as bags, ammo shells, etc etc. I would really like to make some sandbags, can anyone help?
I have seen some fantastic work done by others here using styrene shapes which can be bought at modeling shops. I have since bought several such shapes myself, from squared/rectangular rods of varying thicknesses to flat sheets, to sheets with patterns.
But in all honesty I haven't done much with it yet. Did build a pontoon bridge (already had the pontoon boats, but no bridge), which I think came out well enough. But that was just a beginner's project, connecting flat strips with cross-bars and putting on curbs.
I have used plastic putty for much of my scratch building, such as the planes above. I created cardboard cut-out profiles of wings and fuselage, then applied putty to them to give them some depth. It is hard stuff to work with ... you basically get it munged into about the shape you want, and then you let it dry. It is much easier to work with using file and razor when dry, than using any shaping tools when still in putty form. But I haven't done much with it for more than 20 years, after I finally figured out that I was allergic to it.
Now, for the subject of sandbags, I recommend self-hardening clay.
I have taken to using what is called "Mexican Red Clay". It is very easy to work with. You buy a block of it for about $4.00 at a crafts store. Keep it in an air-tight bag, or it will dry out. Take some small amount, and role it out, on wax paper, into a long thing rod. Cut the rod into short snips using whatever straight blade you have handy. Then just rock your finger back and forth across the little ships to flatten them. Let them dry overnight, and voila! you have sandbags.
Then just paint them, mount them, and weather them up.
Mexican Red Clay shrinks when it dries. So it is not very good for making ground terrain (like dug-outs, trenches, or firing pits). But shrinkage is GOOD for sandbags at this scale, at least if your are a fumble-fingers like me. I get to make them at a size I can still see them, and then when they're done they get smaller.
-Mark 1
Difficile est, saturam non scribere.
"It is hard NOT to write satire." - Decimus Iunius Juvenalis, 1st Century AD
Difficile est, saturam non scribere.
"It is hard NOT to write satire." - Decimus Iunius Juvenalis, 1st Century AD
-
DeanMartin54
- Posts: 19
- Joined: Mon Jun 25, 2007 4:24 am
- Location: Syracuse, New York
FINALLY
Well here she is. my very first attempt at scenery and at painting these pewter beauties. Some of them are extremely primitive, probably because my first paint job was when i was 15!!
The First Pic is how it was 3 days ago....
....and in two hours it magically transformed into.....
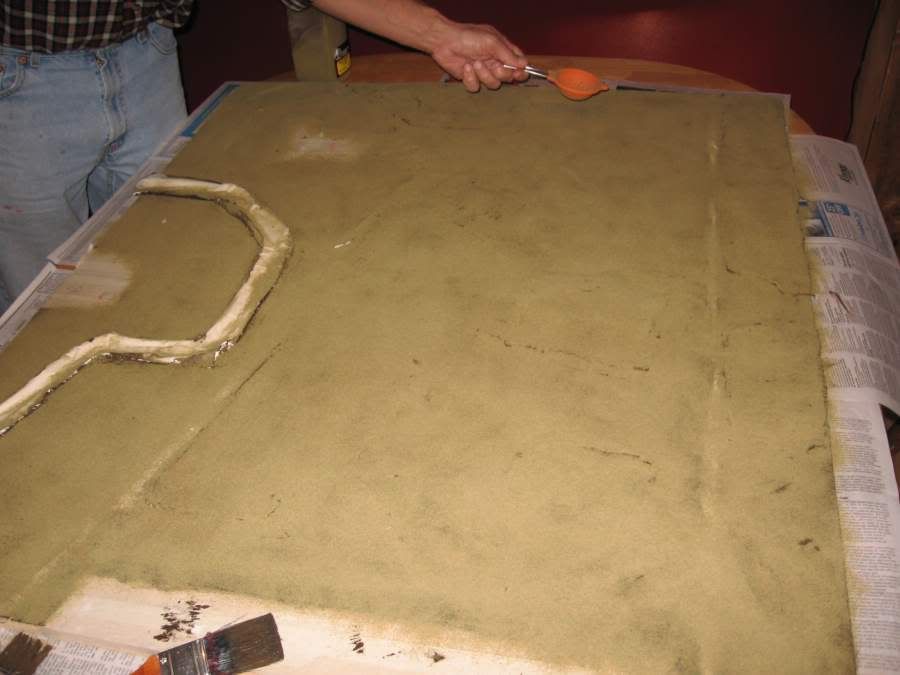
Now for the custom scenery!
Pipe cleaners dipped in elmers glue than rolled around in some Terf...
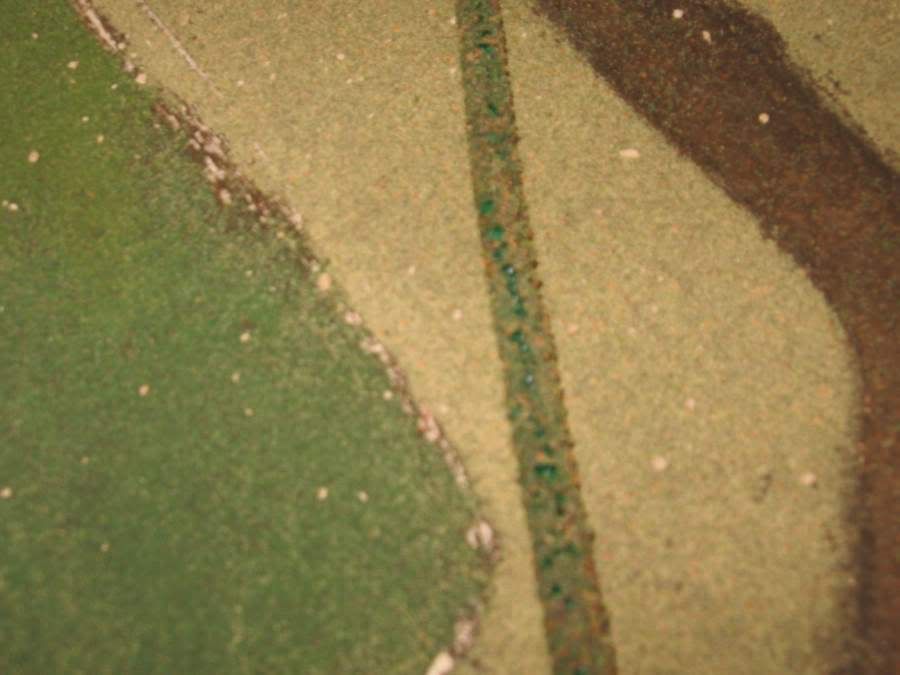
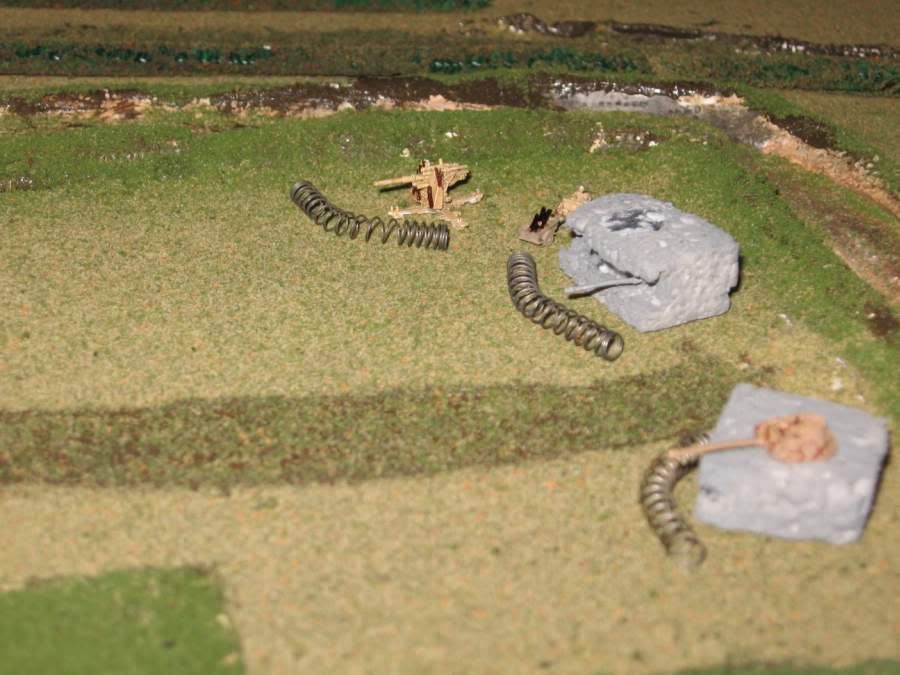
Two Bunkers i made from foam. The one on the left has a spare Jagdpanther gun( no jagdpanthers were hurt in the making of this display) and the one on the right has a spare Panther Turret on top. the barbed wire was slightly rusted. If you notice to the right of the 88, i decided to attach a jeep trailer to a kettenkrad. i snipped some copper wire for shells and now the kettenkrad can make shuttle runs for the 88! Fun fact; the best barbed wire around in my book are the ones from dead clicky pens! they are all i use!!
Please let me know what u think!!!! I will try and upload some more of the layout!
The First Pic is how it was 3 days ago....
....and in two hours it magically transformed into.....
Now for the custom scenery!
Pipe cleaners dipped in elmers glue than rolled around in some Terf...
Two Bunkers i made from foam. The one on the left has a spare Jagdpanther gun( no jagdpanthers were hurt in the making of this display) and the one on the right has a spare Panther Turret on top. the barbed wire was slightly rusted. If you notice to the right of the 88, i decided to attach a jeep trailer to a kettenkrad. i snipped some copper wire for shells and now the kettenkrad can make shuttle runs for the 88! Fun fact; the best barbed wire around in my book are the ones from dead clicky pens! they are all i use!!
Please let me know what u think!!!! I will try and upload some more of the layout!
"All right, they're on our left, they're on our right, they're in front of
us, they're behind us...they can't get away this time"
- Lewis B. "Chesty" Puller, USMC
us, they're behind us...they can't get away this time"
- Lewis B. "Chesty" Puller, USMC
-
Pitfall
- E5
- Posts: 204
- Joined: Tue Mar 14, 2006 5:18 am
- Location: South Bend, IN
- Contact: