Just wondering on what different methods people use for basing their infantry (or tanks for that matter) ...
I find I get stuck with one process and just repeat it, so I was looking for inspiration from others.
For what it is worth:
I mix a bit of brown paint with a bit of PVA and some fine sand. Paint the base. Leave it to dry.
Apply adhesive and flock with woodland scenics fine turf of whatever colour.
When dry I glue bits of coarse turf or snippets of lichen to add interest/texture.
It doesn't look great but it is serviceable!
basing techniques
Moderators: dnichols, GHQ, Mk 1
-
Quartette
- E5
- Posts: 109
- Joined: Sat Nov 15, 2008 10:01 pm
- Contact:
basing techniques
Cave Ab Homine Unius Libri
-
Mk 1
- E5
- Posts: 2383
- Joined: Fri Dec 24, 2004 3:21 am
- Location: Silicon Valley, CA
Since the mid- to late- 1990s I have uses coins as bases. Usually pennies (plentiful and cheep). These days I use Acrylic Gel Medium on the coins. Got the idea from others here on the forum.
Acrylic medium is the stuff that acrylic paints are made from. It is as strong of an adhesive as any white glue. Gel is one of the textures you can get it in. It is thick, like pudding. Thicker than white glue, but not as thick as textured paints.
The medium comes white, but dries to a colorless translucent. Mix about 1/4 to 1/3 acrylic paints into it and it will take that color.
I buy cheap craft paints for my basing needs. Dirt does not need to meet a mil-spec. My current favorite is called "mushroom" ... it is a dull brown, just a bit darker than tan.
Mix the paint with the medium into a dirt-colored goop a small tub (I use the up-turned plastic pulled from a GHQ package). Mix up a fair amount, 'cause you will use a lot of it.
I prime my coins these days. Then I paint the edges/rims. Then slather the goop mix all over the top of the coin. Lay it on pretty thick. Then put the painted figures down into the goop on the coin. Using a fine-tipped brush, gently flow the goop up onto the edges of the base that is cast with the figures. Using that same brush put some goop on the figure's base between the feet or around the legs.
Now sprinkle some small pebbles (large sand), some model RR shrubbery, and some flocking. Let dry. After a generous drying time, pick up, turn over, and tap a few times to get the excess flocking materials off. Then spray two times with dullcote.

French colonial troops (GHQ's Romanian infantry)
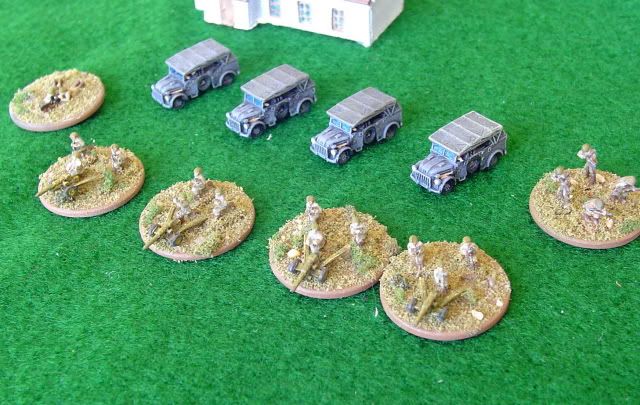
A battery of Romanian 47mm anti-tank / infantry guns (brand X Russian gun crews, 47mm Italian Breda guns, GHQ Romanian infantry for security troops.)

Close-up of Romanian infantry HQ stand.

A company of Italian infantry (in continental uniforms). This was the first unit I did using the technique described above. I used a paint called Sahara Sand (Polly-S) for this unit. Also, I had not yet started adding pebbles or RR shrubbery, so the grassy stands look a bit barren.
Acrylic medium is the stuff that acrylic paints are made from. It is as strong of an adhesive as any white glue. Gel is one of the textures you can get it in. It is thick, like pudding. Thicker than white glue, but not as thick as textured paints.
The medium comes white, but dries to a colorless translucent. Mix about 1/4 to 1/3 acrylic paints into it and it will take that color.
I buy cheap craft paints for my basing needs. Dirt does not need to meet a mil-spec. My current favorite is called "mushroom" ... it is a dull brown, just a bit darker than tan.
Mix the paint with the medium into a dirt-colored goop a small tub (I use the up-turned plastic pulled from a GHQ package). Mix up a fair amount, 'cause you will use a lot of it.
I prime my coins these days. Then I paint the edges/rims. Then slather the goop mix all over the top of the coin. Lay it on pretty thick. Then put the painted figures down into the goop on the coin. Using a fine-tipped brush, gently flow the goop up onto the edges of the base that is cast with the figures. Using that same brush put some goop on the figure's base between the feet or around the legs.
Now sprinkle some small pebbles (large sand), some model RR shrubbery, and some flocking. Let dry. After a generous drying time, pick up, turn over, and tap a few times to get the excess flocking materials off. Then spray two times with dullcote.
French colonial troops (GHQ's Romanian infantry)
A battery of Romanian 47mm anti-tank / infantry guns (brand X Russian gun crews, 47mm Italian Breda guns, GHQ Romanian infantry for security troops.)
Close-up of Romanian infantry HQ stand.
A company of Italian infantry (in continental uniforms). This was the first unit I did using the technique described above. I used a paint called Sahara Sand (Polly-S) for this unit. Also, I had not yet started adding pebbles or RR shrubbery, so the grassy stands look a bit barren.
Last edited by Mk 1 on Sun Apr 07, 2013 3:26 am, edited 1 time in total.
-Mark 1
Difficile est, saturam non scribere.
"It is hard NOT to write satire." - Decimus Iunius Juvenalis, 1st Century AD
Difficile est, saturam non scribere.
"It is hard NOT to write satire." - Decimus Iunius Juvenalis, 1st Century AD
-
Quartette
- E5
- Posts: 109
- Joined: Sat Nov 15, 2008 10:01 pm
- Contact:
-
Mk 1
- E5
- Posts: 2383
- Joined: Fri Dec 24, 2004 3:21 am
- Location: Silicon Valley, CA
Here is what I use:Quartette wrote:I have ordered some Luquitex Matt Super Heavy Gel ...
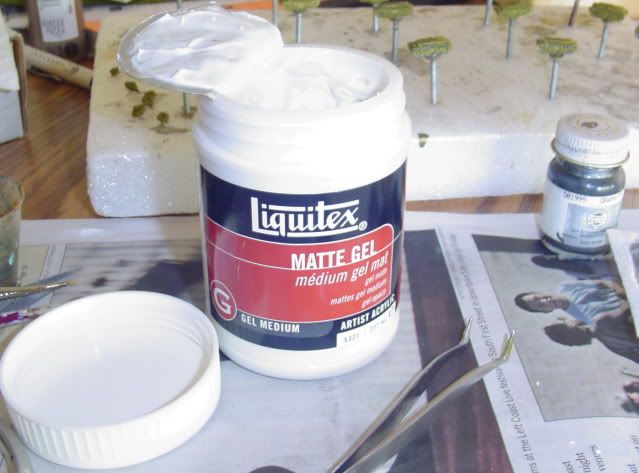
So far, after basing my Italians, my Romanians, and my Colonial French with it, and using it to re-build a yard drain-cap that got chewed up by my lawn mower, I still have about 80% of the jar left.
I fully expect it to last me 20 years at this rate of consumption.
I have been using this technique for about 6 or 7 years now. I learned it from ACWBill here on the forum, and I would guess he had been using it for quite a while before that.which should do the job... So long as the flock sticks...
So far, not one of the units I based has needed any form of re-furb or repair. I haven't lost any figures or enough of the flocking to worry.
But it the units in question have only gotten out onto game tables a few times. I have not been the most active of gamers.
-Mark 1
Difficile est, saturam non scribere.
"It is hard NOT to write satire." - Decimus Iunius Juvenalis, 1st Century AD
Difficile est, saturam non scribere.
"It is hard NOT to write satire." - Decimus Iunius Juvenalis, 1st Century AD
-
Quartette
- E5
- Posts: 109
- Joined: Sat Nov 15, 2008 10:01 pm
- Contact:
-
mark.hinds
- Posts: 31
- Joined: Sun Jun 03, 2007 11:28 pm
- Location: NW Illinois
II prefer an alternative to the "mini diorama" basing technique, which may or may not appeal to you. My goal is to have the models look like they are sitting directly on the terrain, so I use the thinnest possible bases for infantry, and none for vehicles. To my eye, the thick heavy-duty bases, although they can look good individually, when placed on the playing area look like circles or squares, ruining the overall appearance of the game.
I don't have a stock image handy showing this for WWII, but I do have one for 6mm ancients (DBA). In the image below, the figures are mounted on thin plastic card flocked to match the terrain board. On my WWII desert terrain I would use sand-colored paint, which accomplishes the same thing. Originally, I glued a small, undercut plastic block on the corner of each stand, with the idea that I could pick it up with tweezers in order to avoid touching the figures, and this worked fine. However, given the light weight of 6mm figures, I found that I could pick up the figures with slight sideways pressure without damage. The only caveat is that one must keep one's hands clean.
To accomplish the actual basing, I use 5-minute epoxy. A dab is put on the card at the point where each figure will go, and the each figure's feet are dipped in epoxy as well. Figures are then propped up on a piece of scrap cardboard until the epoxy starts to become sticky. Then, I stick the figures on the card, and they remain vertical.


MH
I don't have a stock image handy showing this for WWII, but I do have one for 6mm ancients (DBA). In the image below, the figures are mounted on thin plastic card flocked to match the terrain board. On my WWII desert terrain I would use sand-colored paint, which accomplishes the same thing. Originally, I glued a small, undercut plastic block on the corner of each stand, with the idea that I could pick it up with tweezers in order to avoid touching the figures, and this worked fine. However, given the light weight of 6mm figures, I found that I could pick up the figures with slight sideways pressure without damage. The only caveat is that one must keep one's hands clean.
To accomplish the actual basing, I use 5-minute epoxy. A dab is put on the card at the point where each figure will go, and the each figure's feet are dipped in epoxy as well. Figures are then propped up on a piece of scrap cardboard until the epoxy starts to become sticky. Then, I stick the figures on the card, and they remain vertical.
MH
Last edited by mark.hinds on Mon Apr 08, 2013 9:21 am, edited 11 times in total.
Mark Hinds
-
mark.hinds
- Posts: 31
- Joined: Sun Jun 03, 2007 11:28 pm
- Location: NW Illinois
I base artillery as depicted below. These are from the 1970s, before GHQ had much selection in WWII, so they are not GHQ products. Nowadays, of course, I would use GHQ.
Note that the gun crews are mounted on the plastic card as in my previous post, but the guns are loose. That way, I can show the gun model on the table either with or without the crew. Also, each gun has a limbered and unlimbered model, with the former modified so I can hook it to the rear of the gun tractor (small wire hook epoxied on, and small hole through the ends of the gun trails).

MH
Note that the gun crews are mounted on the plastic card as in my previous post, but the guns are loose. That way, I can show the gun model on the table either with or without the crew. Also, each gun has a limbered and unlimbered model, with the former modified so I can hook it to the rear of the gun tractor (small wire hook epoxied on, and small hole through the ends of the gun trails).
MH
Mark Hinds
-
Quartette
- E5
- Posts: 109
- Joined: Sat Nov 15, 2008 10:01 pm
- Contact:
-
mark.hinds
- Posts: 31
- Joined: Sun Jun 03, 2007 11:28 pm
- Location: NW Illinois
Yes, I prefer a scale-height figure relative the the vehicles, and also prefer to position individual figures for best visual effect on the stand (not in rows). I think that avoiding the massive diorama-style bases gives a much better visual effect to the overall gaming table, as you don't see circles and rectangles.Interesting. It looks like you have cut the metal bases off and glued the legs straight to the base?
The figure mounting procedure still works because of the partially-set glue mechanism I described.
MH
Mark Hinds
-
nashorn88
- E5
- Posts: 614
- Joined: Sun Jun 22, 2008 1:15 am
-
Luca
- E5
- Posts: 364
- Joined: Fri Feb 18, 2005 11:52 pm
- Location: SLC
Hi,
I wanted to expand this topic by asking how do you base the ships. I couldn't find around any description or picture of the basing process of the ships.
I would like to add some waves and some sea foam. But how do you proceed?
I downloaded almost all the pictures of the micronauts topic, but I can't figure out how those waves are so nicely done.
Thank you!
Luca
Ars & Mars
Military vehicles are beautiful because they are built from functional designs which make them real, solid, without artifice. The short timers
Erst wägen, dann wagen (first consider, then risk) von Moltke the Elder
Military vehicles are beautiful because they are built from functional designs which make them real, solid, without artifice. The short timers
Erst wägen, dann wagen (first consider, then risk) von Moltke the Elder
-
Jmrino
- Posts: 27
- Joined: Wed Oct 12, 2005 12:04 am
Ship bases
I use 1/8" plywood bases with a base coat of whatever sea color, then apply a layer of gel medium.... then stipple with a tootbrush to create waves...
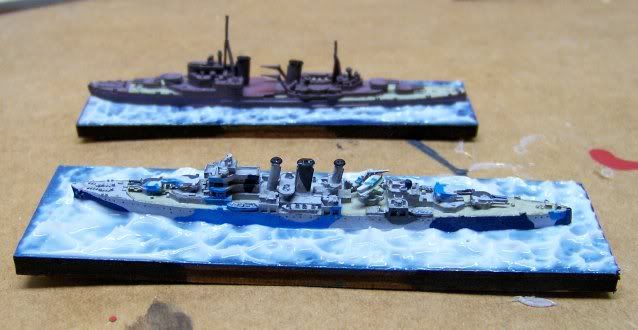
It dries clear......
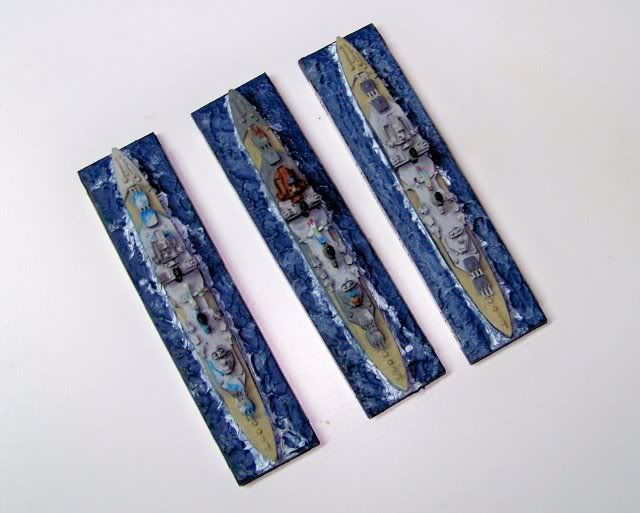
Then dry brush some wake and whitecaps.....
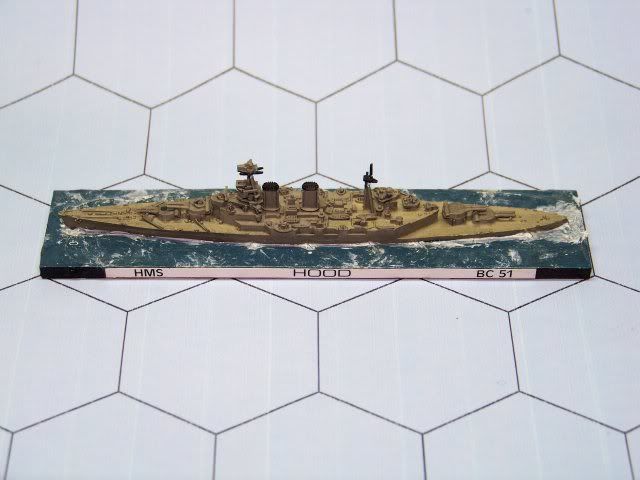
Finally, I hit the whole thing with some clear acrylic.
Anyway, my .02
It dries clear......
Then dry brush some wake and whitecaps.....
Finally, I hit the whole thing with some clear acrylic.
Anyway, my .02
-
Luca
- E5
- Posts: 364
- Joined: Fri Feb 18, 2005 11:52 pm
- Location: SLC
Thank you.
What kind of gel do you use? Is a specific hobby gel or something I can find in an hardware store?
So, you first prepare the base, make the waves, and glue the ship.
I like also the idea of printing the name on the base side.
What kind of gel do you use? Is a specific hobby gel or something I can find in an hardware store?
So, you first prepare the base, make the waves, and glue the ship.
I like also the idea of printing the name on the base side.
Ars & Mars
Military vehicles are beautiful because they are built from functional designs which make them real, solid, without artifice. The short timers
Erst wägen, dann wagen (first consider, then risk) von Moltke the Elder
Military vehicles are beautiful because they are built from functional designs which make them real, solid, without artifice. The short timers
Erst wägen, dann wagen (first consider, then risk) von Moltke the Elder
-
PostHumanRepublican
- E5
- Posts: 138
- Joined: Wed Jul 10, 2013 12:39 am
- Location: Gulf Breeze, Florida
There's a product called Vallejo water effects that you can use that comes in clear, atlantic, pacific, and mediterranean colors. They are from $8-$13 a bottle. I personally use drywall spackle from Walmart which is $3 a tub. I imagine the water effects is probably more durable but after sealing the spackle I've had no issues whatsoever.
My Blog (covers Micro Armor, Micronauts, hobby tricks, and step by step how tos)
http://omnijackalsden.blogspot.com/
http://omnijackalsden.blogspot.com/