scratch building
Moderators: dnichols, GHQ, Mk 1
-
Nazgul
- E5
- Posts: 343
- Joined: Thu Jan 13, 2005 1:24 pm
- Location: Mid Missouri
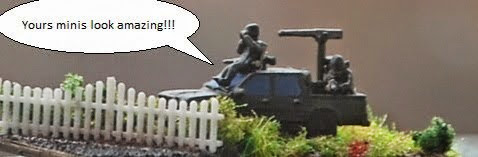
10 to 12 of them !?!.  Wow!
Wow!
Actually I like yours better. Mine are no way accurate, but will work on a table.


I probably made mine like you made yours. I learned making the P.1000s to do it like an assembly line, one part at a time.
If this helps. I did both at the same time:
1. First I cut off a 1mm piece of 7mm styrene tube about 1mm thick. Don't worry about it being perfect. I made sure one end was square and attached it on the platform. After it dried I filed it to about 0.75mm (it turned out that way on both of them).
2. I then attached a rough round piece of 0.75mm sheet styrene on top of that. After it dried I file it until it matched the round base.
3. Using 1mm sheet styrene I cut a strip 3mm wide. I then cut off several pieces 3mm long and attached 2, one on top of the other. I make several and use the best ones after I finish filing and trimming.
4. I used 3mm tube and cemented a cut off toothpick inside for filler. I filled the end with Green putty and waited for it to dry. Using a file I rounded the end and then cut it off at about 7mm. I then attached the "radar section" to the base from step 3 and left it to dry. I then made ammo drums from a round toothpick (should be 2mm rod) and attached them.
5. I then cut a strip of 1mm styrene 5mm wide. This is for the radar support. I cut pieces 5mm long and then used a single edge razor to trim the pieces so that the top was 3mm and the base remained 5mm.
6. A this point I attached the "radar base" to the supports and then attached the assembly to the turntable on the HEMTT. The gun assembly can still be positioned if the plastic cement hasn't set up yet. I then made the side braces (doesn't look like the pictures, but I can live with that) using 1.5mm wide strips of 0.20mm styrene. I trimmed after it dried and then mounted 1mm by 1mm squares of 0.10mm styrene for looks. I had debated on putting the rungs on the supports, but left it for another day.
7. The piece behind the barrel is 1mm thick styrene 3mm wide and trimmed to 1.5mm on one side. Its actually an open brace / support for the barrel maybe I will paint it proper another day. The barrel is 0.5mm rod cut 3mm long.
8. The optics (?) on the radar tower were made from 1mm x 1mm plastic and 0.50 rod cut to 2.5mm.
Sorry this is long winded and hopefully it help.
Cris
-
Nazgul
- E5
- Posts: 343
- Joined: Thu Jan 13, 2005 1:24 pm
- Location: Mid Missouri
I don't normally base my vehicles, but I thought I'd try something new after setting up a board. I kinda of like it and plan to base the other 100+ civilian vehicles I've acquired / scratchbuilt over the years.
Here's what I've done so far. The paint job is VERY basic, but at a couple of feet "it ain't half bad"


And a couple "re-purposed" school buses (Butt ugly close up and in camera, but better at a distance ).


Here's what I've done so far. The paint job is VERY basic, but at a couple of feet "it ain't half bad"


And a couple "re-purposed" school buses (Butt ugly close up and in camera, but better at a distance


-
RedLeif
- E5
- Posts: 784
- Joined: Sat May 21, 2011 3:11 am
- Location: Boise, ID
- Contact:
-
Nazgul
- E5
- Posts: 343
- Joined: Thu Jan 13, 2005 1:24 pm
- Location: Mid Missouri
Thanks, but this is just ground clutter. Now what Allen makes along with the other guys are truly inspirational. (And to the gentleman who wife paints his tanks . . . keep her. In old D&D terms she's a Unicorn - a female gamer - you hear about them, but rarely see one)
Hopefully GHQ or some one else will notice these and think about our requests. These are the "worn" versions, I have yet to mount the "new" vehicles and the few destroyed I've done. I considered trying to make doors and hoods, but that really should be photo etched, something I have yet to try. Anyhow, they should make for some interesting ground hazards and cover.
Hopefully GHQ or some one else will notice these and think about our requests. These are the "worn" versions, I have yet to mount the "new" vehicles and the few destroyed I've done. I considered trying to make doors and hoods, but that really should be photo etched, something I have yet to try. Anyhow, they should make for some interesting ground hazards and cover.
-
chrisswim
- E5
- Posts: 7269
- Joined: Wed Dec 15, 2004 11:22 pm
- Location: Jacksonville, FL
Naz,
Here are a few pics on Chris's Micro Armor page at Facebook.
https://www.facebook.com/chrisswim2
It shows 3 self-propelled Centurions and 1 towed.
I have just read that the military is going to try defense to replace the
Centurions.
-update.com/20141013_cram-2.html?utm_source=Subscribers&utm_campaign=4c6ade3800-Daily_News10_5_2014&utm_medium=email&utm_term=0_3e00b99948-4c6ade3800-165216805#.VD8fGxacy2Y
web.mail.comcast.net/zimbra/h/search?su=1&si=5&so=25&sc=26171&sfi=2&st=conversation&xim=1&action=view&cid=-790983
for more info.
Chris
-
Nazgul
- E5
- Posts: 343
- Joined: Thu Jan 13, 2005 1:24 pm
- Location: Mid Missouri
-
Mk 1
- E5
- Posts: 2383
- Joined: Fri Dec 24, 2004 3:21 am
- Location: Silicon Valley, CA
In another thread I posted a picture of my scratch-built La-5 fighters.
When I started collecting and gaming with Micro Armor in the 1970s, there were no aircraft available in this scale to purchase. Well ... maybe there were, but they were from Skytrex in the UK (back when they did 1/300 stuff -- something they gave up years later), and I didn't know they existed for several years. So for me, there was nothing.
And I wanted something.
So I started scratch-building. This wasn't / isn't kit-bashing. My work was from scratch.
My method was:
- Carefully draw scale profile representations of the aircraft. All the airfoil surfaces and the fuselage (minus canopies). Cut the drawings out. They were now the guides. To help me get the shapes right I often used 1/72 scale models I had built of these aircraft to be my guide (without the internet, it was not easy to find planform drawings of WW2 aircraft).
- Trace the guides onto card stock. Cut out the card stock.
- The cardstock alone would form the airfoil surfaces (wings, stabilizers, and tail. Sometimes the tail was integral to the fuselage form, sometimes separate.
- The card stock of the fuselage would be the "form" for the model. I would apply layers of plastic putty (Green Stuff or Testors) to build up the shape of the fuselage. After the fuselage was completed I added putty for the canopy -- in most cases I did as a separate step from forming the fuselage, as I found it gave a better distinction to the canopy. After the putty was dry I sanded/filed it to smooth and improve the shape, and add slots to fit the wings into.
- Glue it together. Add more putty to the joints to smooth them over. Now paint it. And done!
I made Red Airforce models for my own use. The kid I used to game with in High School did not think it was fair for me to use aircraft when he didn't have any, so I wound up making 2 Me-109s, 2 Stukas, and 2 HS-129s for him. As I recall he paid me $5 each for them. Or something like that. I also vaguely remember making an He-111 for him ... but it is entirely possible that this is an embellishment of my memory. I say this because I still, after ALL these years, have the paper guides for several of the models I scratch-built. But I have no artifacts from the He-111.
So here are some of my models.

My Lavotchkins. The very first scratch-builds I did were an LA-5 and an IL-2. The effort produced a very poor results ... blobs with wings that would only be called airplanes by someone who was being generous. But I learned my technique, and my follow-up work, shown here, was respectable. At least, to me, it was. These have served my wargaming needs for more than 3 decades now.

One of my P-39 Airacobras. Here my skills actually seem to have produced an attractive result. These are still my favorite scratch-builds. They served me VERY well for years.
I don't have any pics of my scratch-built IL-2s. Probably should take a pic sometime. Several years back I bought and painted up some nice commercially-made IL-2m models. At that time I took my old rather feable scratch builds and mod'd them to be early IL-2 single-seaters. That way I don't have to put them side-by-side with the much better looking commercial models.
After High School (and after WRG finally published some rules!) my gaming interest shifted to moderns. I did a lot of Arab-Israeli gaming, and some cold-war Central Europe stuff. So I built a few planes to go into those battles too.

The mid-fuselage wing-mount of these MiG-21s made it difficult to sand/file the fuselages as smooth as I wanted them. And ... the models are showing their age as you can see how the paint has faded on the tail. But they are still in my active forces box. (Mostly because I haven't bought anything new for moderns in about a decade and a half!)

I first did my Mirage-3 for Arab-Israeli gaming. But as I started to collect cold-war and modern French I re-painted it in French markings. The Gazelle 'copters were the last scratch-built aircraft I made. By this time I had finally figured out that the terrible skin rashes I had suffered for years were because I am allergic to plastic modelling putty! So in about 1982 I gave up on my micro-scale aircraft scratch-building efforts.
BTW all the buildings in these pictures are also scratch-built. But none of them required any applications of plastic putty.
As the question was raised, I thought it would be better to post in this thread. As several of these pics have been posted before, I beg forgiveness by those who find my posting redundant.pmskaar wrote: Your La5's look really good. Did you build them totally from scratch? Thirty years ago? That is amazing.
When I started collecting and gaming with Micro Armor in the 1970s, there were no aircraft available in this scale to purchase. Well ... maybe there were, but they were from Skytrex in the UK (back when they did 1/300 stuff -- something they gave up years later), and I didn't know they existed for several years. So for me, there was nothing.
And I wanted something.
So I started scratch-building. This wasn't / isn't kit-bashing. My work was from scratch.
My method was:
- Carefully draw scale profile representations of the aircraft. All the airfoil surfaces and the fuselage (minus canopies). Cut the drawings out. They were now the guides. To help me get the shapes right I often used 1/72 scale models I had built of these aircraft to be my guide (without the internet, it was not easy to find planform drawings of WW2 aircraft).
- Trace the guides onto card stock. Cut out the card stock.
- The cardstock alone would form the airfoil surfaces (wings, stabilizers, and tail. Sometimes the tail was integral to the fuselage form, sometimes separate.
- The card stock of the fuselage would be the "form" for the model. I would apply layers of plastic putty (Green Stuff or Testors) to build up the shape of the fuselage. After the fuselage was completed I added putty for the canopy -- in most cases I did as a separate step from forming the fuselage, as I found it gave a better distinction to the canopy. After the putty was dry I sanded/filed it to smooth and improve the shape, and add slots to fit the wings into.
- Glue it together. Add more putty to the joints to smooth them over. Now paint it. And done!
I made Red Airforce models for my own use. The kid I used to game with in High School did not think it was fair for me to use aircraft when he didn't have any, so I wound up making 2 Me-109s, 2 Stukas, and 2 HS-129s for him. As I recall he paid me $5 each for them. Or something like that. I also vaguely remember making an He-111 for him ... but it is entirely possible that this is an embellishment of my memory. I say this because I still, after ALL these years, have the paper guides for several of the models I scratch-built. But I have no artifacts from the He-111.
So here are some of my models.
My Lavotchkins. The very first scratch-builds I did were an LA-5 and an IL-2. The effort produced a very poor results ... blobs with wings that would only be called airplanes by someone who was being generous. But I learned my technique, and my follow-up work, shown here, was respectable. At least, to me, it was. These have served my wargaming needs for more than 3 decades now.
One of my P-39 Airacobras. Here my skills actually seem to have produced an attractive result. These are still my favorite scratch-builds. They served me VERY well for years.
I don't have any pics of my scratch-built IL-2s. Probably should take a pic sometime. Several years back I bought and painted up some nice commercially-made IL-2m models. At that time I took my old rather feable scratch builds and mod'd them to be early IL-2 single-seaters. That way I don't have to put them side-by-side with the much better looking commercial models.
After High School (and after WRG finally published some rules!) my gaming interest shifted to moderns. I did a lot of Arab-Israeli gaming, and some cold-war Central Europe stuff. So I built a few planes to go into those battles too.
The mid-fuselage wing-mount of these MiG-21s made it difficult to sand/file the fuselages as smooth as I wanted them. And ... the models are showing their age as you can see how the paint has faded on the tail. But they are still in my active forces box. (Mostly because I haven't bought anything new for moderns in about a decade and a half!)
I first did my Mirage-3 for Arab-Israeli gaming. But as I started to collect cold-war and modern French I re-painted it in French markings. The Gazelle 'copters were the last scratch-built aircraft I made. By this time I had finally figured out that the terrible skin rashes I had suffered for years were because I am allergic to plastic modelling putty!
BTW all the buildings in these pictures are also scratch-built. But none of them required any applications of plastic putty.
-Mark 1
Difficile est, saturam non scribere.
"It is hard NOT to write satire." - Decimus Iunius Juvenalis, 1st Century AD
Difficile est, saturam non scribere.
"It is hard NOT to write satire." - Decimus Iunius Juvenalis, 1st Century AD
-
Nazgul
- E5
- Posts: 343
- Joined: Thu Jan 13, 2005 1:24 pm
- Location: Mid Missouri
Mk. 1: Always impressive.
I needed a quick marker for a supply depot and I thought I'd share this. Nothing pretty, basically down and dirty.
Materials:
1 piece of 20 x 15 mm sheet styrene for the base.
1 piece of 10 x 10 x 3 mm balsa (actually hardwood in this case) for the middle.
Lost of round toothpicks.
Model Glue - drys slowly (allowing adjustments) and bonds the wood to the glue better than super glue.
At first I was going to cut the toothpicks at different lengths for the stacked barrels, but decided against it. I cut the toothpicks to 3mm lengths and glued them around the balsa base. I then did a second layer on top of the base and decided to stop there. I have seen them stacked higher, but I figured this was good enough. The stacks are not perfectly straight and at different heights (this could be fixed with putting a tarp over the top layer).


When compared against the individual figures the stacks look a bit short, but compared against a Sherman I think they look almost spot on.

Hope this will help someone.
Cris

-
Mk 1
- E5
- Posts: 2383
- Joined: Fri Dec 24, 2004 3:21 am
- Location: Silicon Valley, CA

-
Cav Dog
- E5
- Posts: 893
- Joined: Wed Dec 29, 2004 1:12 am
There are parts from three different manufacturers in this line up:
The trucks are H&R Bedford Cargo carriers or bulk refuelers, the silver fuel tanks are from CinC's WWII M50 US tankers, the grain bags in the bed of the truck on the right end of the first row are cut up GHQ sandbag walls. The cargo in the truck first row second from left is composed of scratch built 55 Gal. drums.
The trucks are H&R Bedford Cargo carriers or bulk refuelers, the silver fuel tanks are from CinC's WWII M50 US tankers, the grain bags in the bed of the truck on the right end of the first row are cut up GHQ sandbag walls. The cargo in the truck first row second from left is composed of scratch built 55 Gal. drums.
Tactics are the opinion of the senior officer present.