Pibber,
Wonderful work here. Always a delight to see what you've done.
Vietnam Thread
Moderators: dnichols, GHQ, Mk 1
-
Begemot
- E5
- Posts: 241
- Joined: Fri Aug 19, 2011 12:11 am
The summer grasses.
For many brave warriors
The aftermath of dreams.
--- Basho
Please visit my website "Lair of the Begemot": (https://lairbegemot.blogspot.com)
For many brave warriors
The aftermath of dreams.
--- Basho
Please visit my website "Lair of the Begemot": (https://lairbegemot.blogspot.com)
-
BurtWolf
- E5
- Posts: 1083
- Joined: Sun Feb 03, 2013 11:48 pm
- Location: Rochester, NY
Man that terrain looks so good!! Thanks for sharing it is very inspirational. I was using big squares of that insulation but now you have me switching gears. Based on what you described i may do my own hexes. Few questions:
How do you typically do hills?
Can you post a pic or two of your larger cut outs? I am assuming larger terrain features get something larger than a hex?
Do you users frame or how do you keep them right and together when gaming?
Thanks again!!
How do you typically do hills?
Can you post a pic or two of your larger cut outs? I am assuming larger terrain features get something larger than a hex?
Do you users frame or how do you keep them right and together when gaming?
Thanks again!!
-
PolishGI
- E5
- Posts: 833
- Joined: Wed Jun 19, 2013 2:57 am
- Location: SW USA
Hi BurtWolf,BurtWolf wrote:Man that terrain looks so good!! Thanks for sharing it is very inspirational. I was using big squares of that insulation but now you have me switching gears. Based on what you described i may do my own hexes. Few questions:
How do you typically do hills?
Can you post a pic or two of your larger cut outs? I am assuming larger terrain features get something larger than a hex?
Do you users frame or how do you keep them right and together when gaming?
Thanks again!!
Hills are accomplished using the instructions that GHQ provides in their terrain book. In that soft copy, they show you how to create the hill transistions from ground level (1 inch) up to the next level (2 inches). It would be challenging to type that out here but I can see if I can find a link to that if you want.
I will see if I have a pic of the larger terrain pieces. With my pattern, I piece together hexes in groupings of 4, 6, 8 and 9 side by side. Then I cut along the edge of the grouping which turns into a larger piece. From there, I start painting and adding terrain pieces.
I have a pool table upstairs that I play on currently. I place the ping pong table on top of the pool table and then a layer of felt material. From there, I start building the tabletop one hex at a time. I cant say I have run into any issues yet with the hexes moving around.
Ping pong table is nice and large. I leave corners or the edges open for dice and laptops to record everything.
Hope that helps. Sorry for the delay, I will try and check in more frequently.
 Charlie don't surf!
-
dougeagle
- E5
- Posts: 726
- Joined: Thu Mar 23, 2006 10:07 am
- Location: Northern Alberta
-
PolishGI
- E5
- Posts: 833
- Joined: Wed Jun 19, 2013 2:57 am
- Location: SW USA
Great question! Its tough replicating the color on these little guys so I always hope to get close… (open to revising/improving)dougeagle wrote:Wondering about the colours of the US battle fatigues. From the pictures I've seen, they almost look like a dark green tone and if sun bleached maybe a greenish/grey tone.
Any suggestions on it?
Here is what I do for the GIs:
Uniform => XF-65 Field Grey (5 parts), XF-2 Flat White (2 parts) (lighten it up a bit)
Helmets=> XF-13 J.A. Green (then a dab or white or red for various things the GI carried on his helmet like bug juice, cards or gun oil)
Webbing/Equipment => XF-13 J.A. Green (even consider a Khaki)
Weapon=> Combination or just one depending on the weapon. XF-56 Metallic Grey (or a Gunmetal Grey), Military Brown 1701, XF-1 Flat Black
Boots=> XF-1 Flat Black
Face/Skin => Tamiya Flat Flesh Skin Tone or MM Dark Brown 2111
Although lately, I have been staying between Tamiya and Vallejo colors now.
-
whoa Mohamed
- E5
- Posts: 414
- Joined: Tue Nov 04, 2008 10:33 pm
- Location: Central TX
-
PolishGI
- E5
- Posts: 833
- Joined: Wed Jun 19, 2013 2:57 am
- Location: SW USA
So I bit the bullet and went to Litko Accessories for flight stands and pegs. I like the quality for each of the 25 bases and 25 pegs. I made a combo of 2 inch pegs and 3 inch pegs to add height variation.
The main test for this run were my CH-47s… big and heavy and the magnet holds the Chinook to the peg. I just picked up a pair of CH-53s now so that should be interesting to see if the magnets still hold.


3mm magnets via eBay. 300 pieces, 3mm x 1mm.

The raw materials

CH-46s


I wont lie… I was surprised that these magnets held onto the Chinooks without them falling to the ground

Huey Slicks, Gunships and Kiowas…

Chinooks

The main test for this run were my CH-47s… big and heavy and the magnet holds the Chinook to the peg. I just picked up a pair of CH-53s now so that should be interesting to see if the magnets still hold.
3mm magnets via eBay. 300 pieces, 3mm x 1mm.
The raw materials
CH-46s
I wont lie… I was surprised that these magnets held onto the Chinooks without them falling to the ground
Huey Slicks, Gunships and Kiowas…
Chinooks


-
PolishGI
- E5
- Posts: 833
- Joined: Wed Jun 19, 2013 2:57 am
- Location: SW USA
-
Cav Dog
- E5
- Posts: 893
- Joined: Wed Dec 29, 2004 1:12 am
A couple of things from the workbench
A brand new firebase is established:

the defenses are fleshed out with MG bunkers, infantry fighting positions and a M42 Duster to keep the sappers at bay:


The Air Cav checks out the ford, while the Blues platoon Hueys check out the paddies:


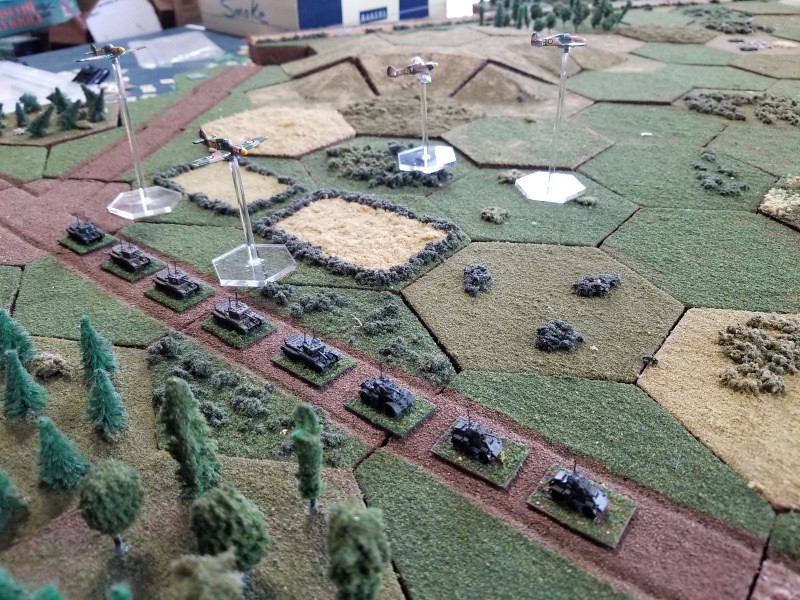
While a couple of Phantoms make a low pass over the village:

But what is this?
Sniper in the tree line, MGs guarding the ford and heavy mortars ready to pound the firebase!


VC sappers sneak through the bamboo and the NVA regulars prepare to liberate the village!


A brand new firebase is established:
the defenses are fleshed out with MG bunkers, infantry fighting positions and a M42 Duster to keep the sappers at bay:
The Air Cav checks out the ford, while the Blues platoon Hueys check out the paddies:
While a couple of Phantoms make a low pass over the village:
But what is this?
Sniper in the tree line, MGs guarding the ford and heavy mortars ready to pound the firebase!
VC sappers sneak through the bamboo and the NVA regulars prepare to liberate the village!
Tactics are the opinion of the senior officer present.
-
PolishGI
- E5
- Posts: 833
- Joined: Wed Jun 19, 2013 2:57 am
- Location: SW USA
-
PolishGI
- E5
- Posts: 833
- Joined: Wed Jun 19, 2013 2:57 am
- Location: SW USA


-
Cav Dog
- E5
- Posts: 893
- Joined: Wed Dec 29, 2004 1:12 am
I use superglue as well. It works fine on the acrylic bases.
It is the GHQ metal stands that I have issues with. The magnets typically aren't strong enough on their own to keep the model attached to the metal pegs, and superglue doesn't bond steel to pewter very well. I have tried an epoxy formulated for metal but it doesn't work well either, probably because there just isn't enough surface area on the peg to grab on to.
I have had success soldering the magnets to the metal pegs but my soldering skills are marginal to say the least so don't look too closely!
Tactics are the opinion of the senior officer present.