GHQ and who ever can help me with this problem.
I positioned the aft vertical piece as shown in the picture provided by GHQ. The piece does not sit right.. So I oriented 180 degrees so that the bottom portion that is chamfered is facing aft. Iit fit perfectly. It also seems to match photos that i saw of the actual vehicle.
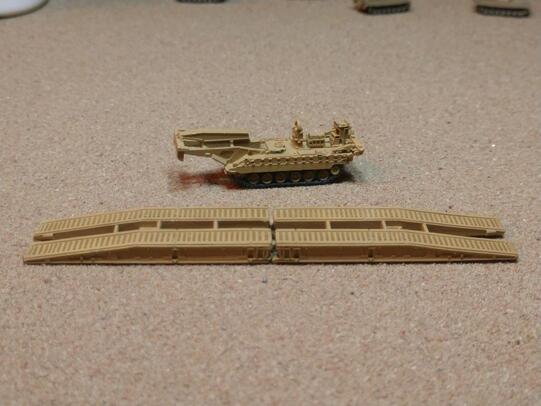
Regardless, in either case, I cannot get the bridge to sit flush to rest on the aft supports. The aft Cross member sits on top of the Aft vertical standing piece. if I push the bridge forward to rest more on the forward support mount, the forward cross member of the bridge interferes with the center structure on the forward part of the vehicle.
What am I missing? I cannot get it to sit correctly as shown on this site or matching pictures of the actual vehicle. is the aft vertical piece suppose to lean forward when the bridge is stowed?
IF anyone has put one together, can the post pictures or explain what is messed up? Please help. this is majorly frustrating.
Titan Bridge Layer... Titan Headache
Moderators: dnichols, GHQ, Mk 1
-
Hoth_902
- E5
- Posts: 1544
- Joined: Wed Jun 18, 2014 11:08 am
- Location: Pacific Northwest
- Contact:
-
Hoth_902
- E5
- Posts: 1544
- Joined: Wed Jun 18, 2014 11:08 am
- Location: Pacific Northwest
- Contact:
So, no one else has purchased the Titan Bridge Layer and tried to put it together? Or am I the only one who has had issues. I know I am not the smartest tool in the shed but I can't be the only one.. Please, someone else tell me they are having a problem.. anyone... GHQ, any input would be helpful.
I will try and post some pictures of the issue I am having.
I will try and post some pictures of the issue I am having.
-
paul
- E5
- Posts: 570
- Joined: Sun Dec 12, 2004 9:06 am
- Location: Orlando Area
Mike,
Here is the Titan is use maybe these pictures could help:
http://www.armedforces.co.uk/army/listings/l0062.html
http://tanknutdave.com/titan-avlb/
The video on the second might allow you to see more details
Here is the Titan is use maybe these pictures could help:
http://www.armedforces.co.uk/army/listings/l0062.html
http://tanknutdave.com/titan-avlb/
The video on the second might allow you to see more details
-
Hoth_902
- E5
- Posts: 1544
- Joined: Wed Jun 18, 2014 11:08 am
- Location: Pacific Northwest
- Contact:
Paul,
Thanks for the Pictures. I think I have the pieces fit in the spots intended. Based on the picture GHQ now shows. The problem is, the Bridge will not rest on the back supports. When you try to install the bridge, the cross remember on the bridge is obstructed by the Aft vertical piece. This causes the bridge to be higher in the back and prevents it from making contact with the aft support attached just above the engine. The only think I can figure is that the Aft vertical center piece must tilt back or GHQ some how either made the cross member too thick or too far back.
Maybe I can trim some of the cross member..
-
Hoth_902
- E5
- Posts: 1544
- Joined: Wed Jun 18, 2014 11:08 am
- Location: Pacific Northwest
- Contact:
-
Hoth_902
- E5
- Posts: 1544
- Joined: Wed Jun 18, 2014 11:08 am
- Location: Pacific Northwest
- Contact:
-
recon110
- Posts: 78
- Joined: Thu Apr 16, 2015 7:16 pm
- Location: Rochester Hills Michigan
Titan fix
All thats needed is to cutout approx 1/8 of material out of large hyrdaulic arm where the bridge sits down on it. See me at Fb 1/285th Scale Wargaming and Modeling. David Farrell. I fixed it.
David Farrell
-
chrisswim
- E5
- Posts: 7288
- Joined: Wed Dec 15, 2004 11:22 pm
- Location: Jacksonville, FL
-
Hoth_902
- E5
- Posts: 1544
- Joined: Wed Jun 18, 2014 11:08 am
- Location: Pacific Northwest
- Contact:
Chrisswim,
That is the bridge layer. However, the crappy thing is that everyone I see, is from a far distance and you can't get a good view. I did find enough pics to figure it out, but its disappointing that there is an error in the model that does not allow it to be assembled correctly.
Recon110,
Thanks for the info and I will be in touch soon.
-
Hoth_902
- E5
- Posts: 1544
- Joined: Wed Jun 18, 2014 11:08 am
- Location: Pacific Northwest
- Contact:
GHQ,
Just curious, are you aware of this issue with the Titan or are we missing something? Also, do you test fit the pieces after the first production parts are made? Since my post, have you tried the fit and found the same thing?
This is the first time I have come across this issue. I love the piece and can't wait to get it painted up?
Loyal customer and big fan of your products.
-
Hoth_902
- E5
- Posts: 1544
- Joined: Wed Jun 18, 2014 11:08 am
- Location: Pacific Northwest
- Contact:
A while back, I finished some adjustments that were necessary to be able to install the bridge section on top of the chassis so that it looked right. Check out my blog for some details. https://warriorbear.weebly.com/blog
With that said, here are some pics of the results.
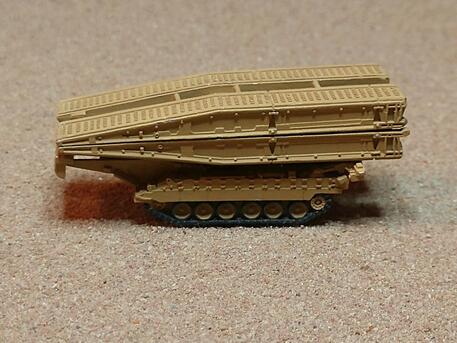
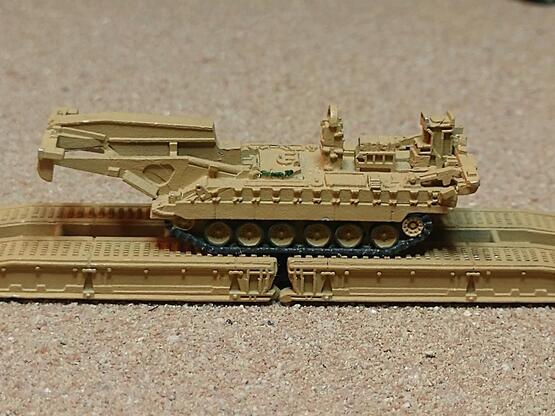
With that said, here are some pics of the results.
-
panzergator
- E5
- Posts: 3472
- Joined: Thu Oct 08, 2015 3:44 am
-
Hoth_902
- E5
- Posts: 1544
- Joined: Wed Jun 18, 2014 11:08 am
- Location: Pacific Northwest
- Contact:
I want to start this response by giving credit to someone. recon110 pointed out that the hydraulic arm needed trimming. I did just that and it worked great. It allowed me to properly fit the Bridge section onto the chassis so it looked right. Thanks recon110.
In addition, thanks everyone for the feedback. I appreciate it. Looking at these close up pictures, I am realizing that i need to touch up some of the paint, because I have never sealed the model with clear coat and its chipping.
In addition, thanks everyone for the feedback. I appreciate it. Looking at these close up pictures, I am realizing that i need to touch up some of the paint, because I have never sealed the model with clear coat and its chipping.