Show us yer stuff!
Moderators: dnichols, GHQ, Mk 1


 Charlie don't surf!
-
chrisswim
- E5
- Posts: 7316
- Joined: Wed Dec 15, 2004 11:22 pm
- Location: Jacksonville, FL
-
BurtWolf
- E5
- Posts: 1083
- Joined: Sun Feb 03, 2013 11:48 pm
- Location: Rochester, NY


-
Hoth_902
- E5
- Posts: 1557
- Joined: Wed Jun 18, 2014 11:08 am
- Location: Pacific Northwest
- Contact:
I know people hate looking at the imagination stuff. However, me and Redleg are trying to keep our threads with actual pictures of GHQ vehicles wrapped in a story. Figured its a neat way to present things. However, knowing people stray away from it.. I am re-posting some of the stuff I recently put up. I thought I would play around with making my stuff look a little more real by putting a background. Let me know what you think. Just FYI, it was not done with Photoshop. Just overlayed my pictures with a horizon picture in powerpoint.
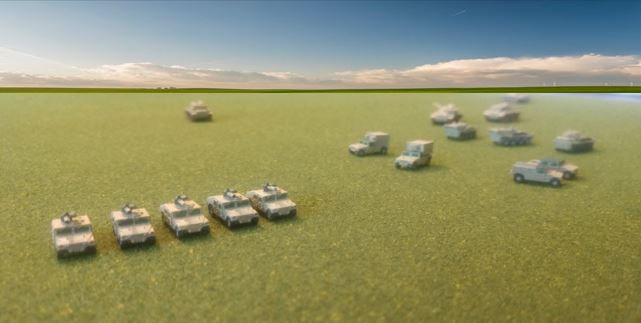
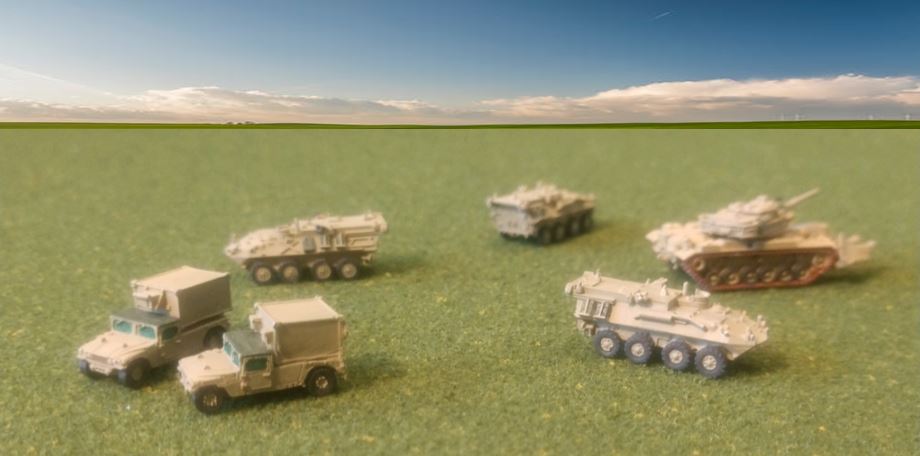
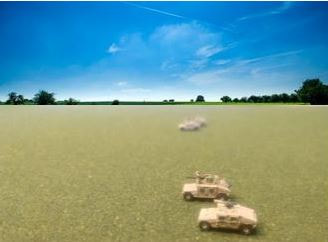
I think, considering I did not use photo shop and a phone camera, not bad.
I think, considering I did not use photo shop and a phone camera, not bad.
-
Mk 1
- E5
- Posts: 2383
- Joined: Fri Dec 24, 2004 3:21 am
- Location: Silicon Valley, CA
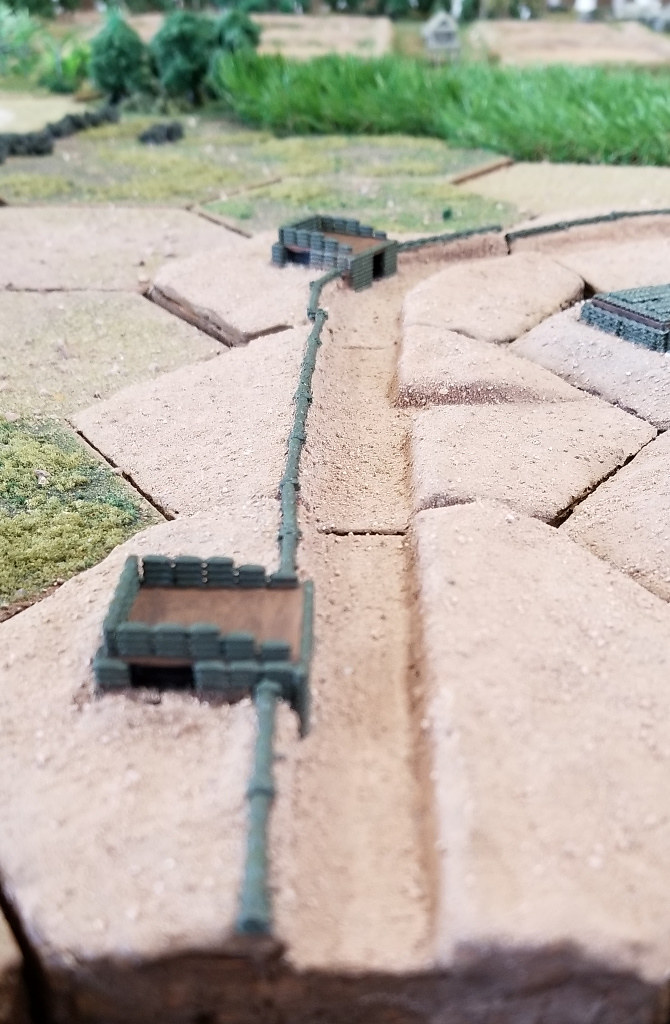
Seeing PolishGI's beautiful handiwork has motivated me to post a couple pics of some of my more recent field improvements.
I have spend a few years now thinking about how to handle entrenched positions at this scale. I am not a big fan of making a foxhole to but a whole squad of infantry in, that is 50m across in table scale. Nor am I much in favor of basing my infantry in fixed positions (infantry-in-a-hole basing), except perhaps in special circumstances.

One special circumstance might be an AA emplacement. I did make a few AAMG gun pits with the crews and guns built right in. In this pic a quad-Maxim AAMG gun pit (carved off of the back of a GHQ GAZ-AA truck).
But how to manage the larger issue of giving my regular grunts some trenches to fight from, when the scenario calls for prepared defenses?
What I really want is something that both looks like a reasonably scaled trench when unoccupied, but also holds my infantry, as I normally base them, when occupied. How could I possibly do this, when my infantry bases (pennies) are 20-40 meters across in table scale?
One of the things I learned in making the AA gun pits was that a color gradient in the pit itself makes it look like the hole is deeper than it actually is. OK, that's a useful trick. So how can I use that in making my trenches....
Here is what I have done. I took self-drying clay, roled it out and flattened it. Then I pushed some pennies into it to make deep impressions for my infantry to occupy. Then I took the pennies out, and carved a trench connecting the front edges of the penny holes. When it had hardened I painted everything earth tone, and then painted the dug-out trenches AND the front edges of the penny holes in a deepening color gradient ... as a continuous trenchline. Then I flocked everything, including the penny holes, but excluding the trenchline (and the front lip of the trenchline).
And voila!

Here is my entrenched position for a platoon, unoccupied. Looks pretty much like a trench.

And here it is with a platoon of my Romanian infantry dropped in.
Seems to me to be a pretty serviceable solution. I kind of like it. BTW this is my THIRD try at finding a solution for trenches, so it's not like I'm claiming a hit on my first pitch. My first two swings wiffed it big time.
Oh, and I've also included my own rendition of concertina wire in front of the trenches. Just to give me a tie in to someone else's post, so this can seem like a continuation of a prior topic rather than an entirely gratuitous seizure of a conversation thread...

I have spend a few years now thinking about how to handle entrenched positions at this scale. I am not a big fan of making a foxhole to but a whole squad of infantry in, that is 50m across in table scale. Nor am I much in favor of basing my infantry in fixed positions (infantry-in-a-hole basing), except perhaps in special circumstances.
One special circumstance might be an AA emplacement. I did make a few AAMG gun pits with the crews and guns built right in. In this pic a quad-Maxim AAMG gun pit (carved off of the back of a GHQ GAZ-AA truck).
But how to manage the larger issue of giving my regular grunts some trenches to fight from, when the scenario calls for prepared defenses?
What I really want is something that both looks like a reasonably scaled trench when unoccupied, but also holds my infantry, as I normally base them, when occupied. How could I possibly do this, when my infantry bases (pennies) are 20-40 meters across in table scale?
One of the things I learned in making the AA gun pits was that a color gradient in the pit itself makes it look like the hole is deeper than it actually is. OK, that's a useful trick. So how can I use that in making my trenches....
Here is what I have done. I took self-drying clay, roled it out and flattened it. Then I pushed some pennies into it to make deep impressions for my infantry to occupy. Then I took the pennies out, and carved a trench connecting the front edges of the penny holes. When it had hardened I painted everything earth tone, and then painted the dug-out trenches AND the front edges of the penny holes in a deepening color gradient ... as a continuous trenchline. Then I flocked everything, including the penny holes, but excluding the trenchline (and the front lip of the trenchline).
And voila!
Here is my entrenched position for a platoon, unoccupied. Looks pretty much like a trench.
And here it is with a platoon of my Romanian infantry dropped in.
Seems to me to be a pretty serviceable solution. I kind of like it. BTW this is my THIRD try at finding a solution for trenches, so it's not like I'm claiming a hit on my first pitch. My first two swings wiffed it big time.
Oh, and I've also included my own rendition of concertina wire in front of the trenches. Just to give me a tie in to someone else's post, so this can seem like a continuation of a prior topic rather than an entirely gratuitous seizure of a conversation thread...
-Mark 1
Difficile est, saturam non scribere.
"It is hard NOT to write satire." - Decimus Iunius Juvenalis, 1st Century AD
Difficile est, saturam non scribere.
"It is hard NOT to write satire." - Decimus Iunius Juvenalis, 1st Century AD
-
BurtWolf
- E5
- Posts: 1083
- Joined: Sun Feb 03, 2013 11:48 pm
- Location: Rochester, NY
Hoth - your tires are well done clearly you still have patience for them!! Great minis and glad you posted them here. I don’t follow the imaginations threads so I bet I’m missing out on work people are posting...
Mk1 that’s a cool idea. I base on pennies- was thinking something similar but just carving straight into my GHQ hexes. Polish GI has done done great work in this respect. Interesting comment on color gradient, I’ll have to try that.
Mk1 that’s a cool idea. I base on pennies- was thinking something similar but just carving straight into my GHQ hexes. Polish GI has done done great work in this respect. Interesting comment on color gradient, I’ll have to try that.
-
Hoth_902
- E5
- Posts: 1557
- Joined: Wed Jun 18, 2014 11:08 am
- Location: Pacific Northwest
- Contact:
BurtWolf,
Thanks, I am not sure its patience, as it is mater of necessity. Being an ** CENSORED ** engineer, its hard to not do the wheels correctly. I had actually put off doing a ton of my vehilces because of the wheels.. They sat base coated but no detail.. Then came the quarantine.. I began trying to bang through some of my stuff waiting for wheels.... Quickly got through alot of them and started to do some other detail work. Built a lot of momentum and it carried me for a while. With that said, don't pat me on the back too hard, I am not above cutting corners.. I found some pictures of some HMMWV's with black wheels. So when I really mess a rim up and can't fix it to my likeing. I just pain the rim black. Serves too purposes.. stops me from stripping and doing it over an gives me variety to the vehicles I have .. Knowing that a combat unit in the field will slowly stop looking uniform to the other vehicles as they wear out and need replacement parts. I will try and post some pictures with the darkened wheels and the ones done correctly.
Thanks, I am not sure its patience, as it is mater of necessity. Being an ** CENSORED ** engineer, its hard to not do the wheels correctly. I had actually put off doing a ton of my vehilces because of the wheels.. They sat base coated but no detail.. Then came the quarantine.. I began trying to bang through some of my stuff waiting for wheels.... Quickly got through alot of them and started to do some other detail work. Built a lot of momentum and it carried me for a while. With that said, don't pat me on the back too hard, I am not above cutting corners.. I found some pictures of some HMMWV's with black wheels. So when I really mess a rim up and can't fix it to my likeing. I just pain the rim black. Serves too purposes.. stops me from stripping and doing it over an gives me variety to the vehicles I have .. Knowing that a combat unit in the field will slowly stop looking uniform to the other vehicles as they wear out and need replacement parts. I will try and post some pictures with the darkened wheels and the ones done correctly.


-
Hoth_902
- E5
- Posts: 1557
- Joined: Wed Jun 18, 2014 11:08 am
- Location: Pacific Northwest
- Contact:
LOL.. you are so very funny Chris. I have plenty to do around my house.. I still have a ton of supply trucks that need to be base coated and then wheels painted. You are funny..
With that said, thanks for all the feedback, glad you the work I did. It feels good to get a lot of my back log wheels done.
With that said, thanks for all the feedback, glad you the work I did. It feels good to get a lot of my back log wheels done.
-
Mk 1
- E5
- Posts: 2383
- Joined: Fri Dec 24, 2004 3:21 am
- Location: Silicon Valley, CA
Well, if wheels are the topic-du-jour ...

This is a pic of some of the variety of trucks available to my Italian force.
The first in line is a GHQ Dovunque 3t medium truck, and the last one is a GHQ 3Ro heavy truck. I don't generally post pics of models from other vendors, but in this case the middle of the three is a Cierano meidum truck from a UK vendor.
I like my armies' motorpools to look like a bit of a gypsy caravan. The pics I've seen indicate that, once in a warzone, there is very little uniformity in what drives down any given road.

Even for any one given vehicle type, I like to put some subtle variety in the shadings if I can. So for example in this (older) pic of my Dovunques you can see some differences in the canvas tarps covering the cabs vs. the cargo tarps.

The motorpool for my Romanian force is a regular hodge-podge of German and French vehicles, with a few Italian and even Polish stuff tossed in for good measure. And that's not to mention the captured Russian trucks they may field as well.

And since we're on the subject of wheels, I thought this might be an amusing pic to toss in. These are some of my WW2 civilians. Mostly just figures from the extras bin with obvious weapons clipped off, painted up in civilian colors. But the farm cart makes an interesting conversation piece.
It is a scratch build, to be sure. The wagon itself is just a bit of balsa. The runners are nylon sprues clipped off of price tags on clothing. The wagoneer is a GHQ seated infantry figure -- maybe from a US Armored Infantry pack, maybe from a Russian 45mm gun + 76.2mm gun + Komsolmolyets prime mover pack (I'm not sure -- just seated infantry from the extras bin).
But ... can anyone guess the source for the wheels?
-Mark
This is a pic of some of the variety of trucks available to my Italian force.
The first in line is a GHQ Dovunque 3t medium truck, and the last one is a GHQ 3Ro heavy truck. I don't generally post pics of models from other vendors, but in this case the middle of the three is a Cierano meidum truck from a UK vendor.
I like my armies' motorpools to look like a bit of a gypsy caravan. The pics I've seen indicate that, once in a warzone, there is very little uniformity in what drives down any given road.
Even for any one given vehicle type, I like to put some subtle variety in the shadings if I can. So for example in this (older) pic of my Dovunques you can see some differences in the canvas tarps covering the cabs vs. the cargo tarps.
The motorpool for my Romanian force is a regular hodge-podge of German and French vehicles, with a few Italian and even Polish stuff tossed in for good measure. And that's not to mention the captured Russian trucks they may field as well.
And since we're on the subject of wheels, I thought this might be an amusing pic to toss in. These are some of my WW2 civilians. Mostly just figures from the extras bin with obvious weapons clipped off, painted up in civilian colors. But the farm cart makes an interesting conversation piece.
It is a scratch build, to be sure. The wagon itself is just a bit of balsa. The runners are nylon sprues clipped off of price tags on clothing. The wagoneer is a GHQ seated infantry figure -- maybe from a US Armored Infantry pack, maybe from a Russian 45mm gun + 76.2mm gun + Komsolmolyets prime mover pack (I'm not sure -- just seated infantry from the extras bin).
But ... can anyone guess the source for the wheels?
-Mark
-Mark 1
Difficile est, saturam non scribere.
"It is hard NOT to write satire." - Decimus Iunius Juvenalis, 1st Century AD
Difficile est, saturam non scribere.
"It is hard NOT to write satire." - Decimus Iunius Juvenalis, 1st Century AD
-
Hoth_902
- E5
- Posts: 1557
- Joined: Wed Jun 18, 2014 11:08 am
- Location: Pacific Northwest
- Contact: