BurtWolf wrote:Polish - what a board! Dying to see it full of marines being swarmed by black clad adversaries! Great work as always, inspiring!
Thank you Burt! At some point, I need to shift gears and quit building in order to start playing more. Lol Thank you.
Hoth_902 wrote:Yea, I would say your work is insanely good polish.
Thank you for the kind words Hoth.
pmskaar wrote:Hi Polish!
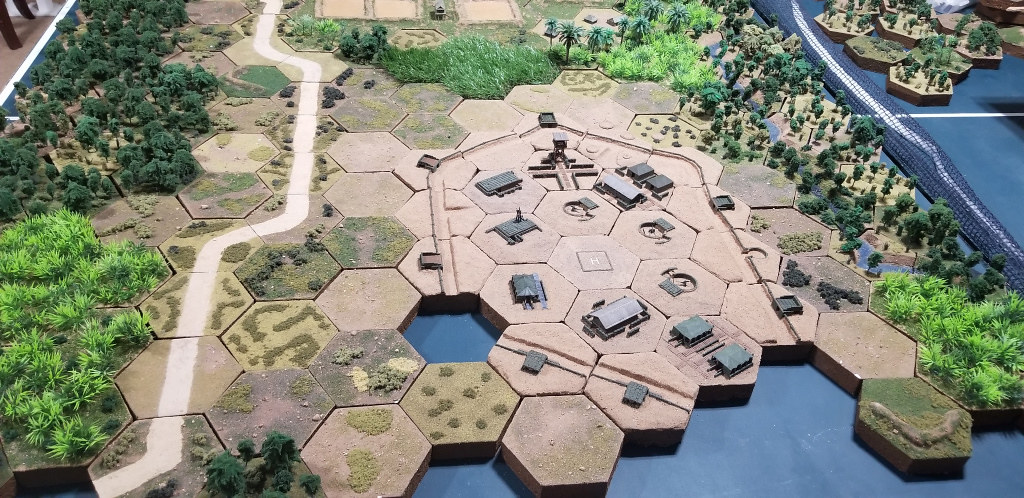
Your terrain really looks excellent! I also use Terrain Maker and yours looks really well done.
Your layout definitely does look like Vietnam.
I am curious as to what you used to texture the bare ground areas. It looks very realistic and convincing.
Pete
Hi Pete! Thank you sir. As far as texturing the ground… the empty hexes? Just dirt? Or the grass as well?
On the hexes, I have found a rhythm that allows me to use multiple layers. After painting the hex with an acrylic brown base coat (white elimination), I cover the hex (top side) in a decent layer of elmers glue. I put it on and use an old brush to cover the hex. Then I lay on old fashioned dirt from outside to cover the hex.
If the hex is intended to be what I call an empty hex (just dirt), I wait for the glue to take in the dirt and start to bleed through. When the glue starts to come through the dirt, I add another layer of dirt for the glue to attach. I continue to do this until the glue no longer comes through the layer of dirt. As it starts to dry, the multiple layers of dirt add texture to the hex so it gives it a cool effect. Whatever I do not use, I shake from the hex back into my dirt container.
Now if the hex contains grass… similar process. I cover the hex in glue so the top is all white. I start with my layer of dirt. Now, as the glue starts to come through, I will add the color of grass that I am looking to achieve. For Vietnam, it is a darker green blend from woodland scenics I believe. So in theory, you have glue as Layer 1, dirt as Layer 2, dark green grass as Layer 3. Sometimes, the glue will even bleed through the dirt and grass, allowing you to add another layer of your choice. Lighter green grass or dead grass for contrast? Or if content with dark green, then just add another layer of dark green.
I hope this helps. I like the process as it allows you to bring a few things together in the hope it adds realism. One thing that is big for me is variety of hexes. No two hexes will ever look like because you do not know where the glue will bleed through. There are times where I need grass to be a major player on the hex and sometimes the glue does not cooperate with coming through the dirt… in that event, once I add a layer of grass on top of the dirt, I use my thumb is gently press the grass down a little forcing it to come into contact with the glue below. Then tap the hex over my grass container in order to shake off anything left over.
Once a hex is dried underneath with the elmers glue, I shoot it with a dullcote on top to seal everything in place. That seems to be working.
With dirt collection… I use and old tin coffee container. Not the monster sized container, the smaller one that allows me to sneak my hand in it. I have a colander that I use as well. So I go outside, move the rock landscape to the side, get a handshovel full of dirt, toss it into the colander and shake the dirt into the coffee container. The colander is nice bc it filters out all of the larger pieces and just gives me the dirt I need. Anything larger and you have scale issues with the 1/285 models.
I am trying to figure out my path for the Northern Africa stuff. Last time we spoke, you pointed me in a direction and I have been off noodling what I can do. Im trying to use actual sand now for the hexes. But the sand I bought is a tad lighter than I would like… so I found myself using a brown weathering wash mixed with water. I use this solution to tint the sand a slightly darker color which appears to have worked. Nice unexpected byproduct is the wash gets in everywhere and starts to highlight individual pieces of sand for added detail in the finished product. Pretty cool effect.
Jeff


 Charlie don't surf!