Show us yer stuff!

This is a general forum for all types of posts related to Military models.

Moderators: dnichols, GHQ, Mk 1

Post Reply
pushbike
E5
Posts: 128
Joined: Sun Mar 13, 2005 5:20 am
Location: United Kingdom

Post by pushbike »

Thanks Hetzen
As far as the Woodland Scenics grass goes even though it seems expensive the 2 shakers I invested in will last forever. I know from experience that if you rely on a nice colour small brand product you might never see it again when you need some more and have to have your new grass in a different colour.
American viewers will probably be shocked by how many pounds Woodland scenics costs here!

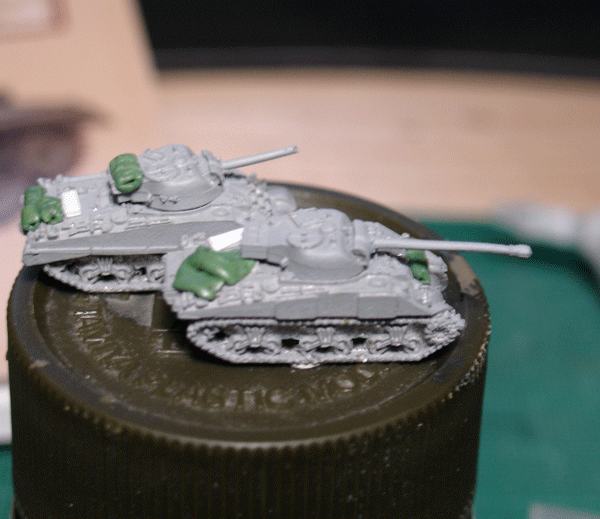
Speaking of Sermans here is my current project,
British Shermans all loaded with equipment,
Note i have discovered a new technique and have started to drill out the dead space between the bogeys and track, Should look wicked when they are painted, Now if only I could decide on the right colour, will probably go with 80% tamiya olive Drab 20% khaki? This looks right but cant decide.


Image

Ritter
E5
Posts: 528
Joined: Tue Nov 23, 2004 10:59 am
Location: BC, Canada
Contact:

Post by Ritter »

WHEW!! Nice drill work on the bogies!! :shock:
The x-tra gear is gonna look hella good too!

Russian MGs painted as promised
Image

Troy

pmskaar
E5
Posts: 2173
Joined: Sun Apr 17, 2005 5:45 am

Show Us Your Stuff

Post by pmskaar »

Pushbike and Ritter

Great stuff once again, guys! I always enjoy seeing your work. My only complaint about doing these great conversions on the infantry is that I still want GHQ to do Russian ATR teams and rifle infantry. If they see your stuff they may think they are off the hook and just expect us to all do this. :roll: I will keep lobbying for more poses and a greater variety of weapons.

Pete - Binpicker, Out!

Ritter
E5
Posts: 528
Joined: Tue Nov 23, 2004 10:59 am
Location: BC, Canada
Contact:

Post by Ritter »

Yes I agree.
I am currently working on :

Falshirmjager Panzerfausts, Rifleman runner converted with solder.

Russian Maxim MMG. Russian HMG with barrel replaced with a maxim type turned on the dremel. Loader added from 50mm mtr.

Russian DP LMG converted to ATR by removing LMG drum/barrel and replced with long brass ATR type. Assistant added from Mtr.

WWII Russian DShK 12.7mm HMG. Vietnam era NVA DShK 12.7mm with helmets fashioned from their hats, wheels added from the recoiless thingy in the H/W pack.

All these 'necessarry' converts take away from my first love of painting. I know GHQ could do them better!

Troy

HMSDiomede
E5
Posts: 490
Joined: Sat Apr 30, 2005 3:11 am
Location: Bowling Green, KY

Post by HMSDiomede »

Ritter wrote: All these 'necessary' converts take away from my first love of painting. I know GHQ could do them better!

Troy
Maybe so, but your work with them sure looks sweet! :D Keep the photos coming. I for one don't mind this being the "show us your infantry" thread. Just wish I could make mine look so good.

David

HMSDiomede
E5
Posts: 490
Joined: Sat Apr 30, 2005 3:11 am
Location: Bowling Green, KY

Post by HMSDiomede »

Oops!, double-posted. :oops:

David

jb
E5
Posts: 2160
Joined: Fri Mar 11, 2005 7:13 am
Location: Antananarivo

Post by jb »

Nice work,Pushbike,and Ritter. Its too bad we are all spread out over the planet. Ithink a wargame with all you you fellas would be a capital idea.
Ritter,what do you use for the radio antennas on your infantry?
John

Ritter
E5
Posts: 528
Joined: Tue Nov 23, 2004 10:59 am
Location: BC, Canada
Contact:

Post by Ritter »

Yes - gaming with everyones incredible minis would be a treat!
Radio antenna is SUPER cheap black nylon paint bristle - sold in a pack of 10 or so, all different color plastic handles, small brushes. Something you might give to a five year old. Work great for MG barrels, Aircraft Pitot tubes, antennas, etc.

Here is a pic of unpainted current projects:
Image
DShK 12.7mm is the most time consuming. Wheels added where the front leg of tripod was. Shield added and hats sanded down. Running SMG fellow crippled up with the needlenose sos he sits pretty.

PTRD-41 from LMG. Muzzle brake and sight added from micro solder. Trying out a 'Foxhole' technique that I saw a fellow gamer John Westra do. :mrgreen: Buried alive is Mr. Grenader, took away his boom-boom and made him point. I wonder if he will fetch?

Lend Lease Bz M1 from Modern Russian RPG. Micro solder, loader is NVA mortar loader. Nice easy convert.

Maxim MG from Gorjunov SG-43 HMG (I think thats the HMG modeled in the Russian H/W pack). Barrel turned on the Dremel. Multi-talented 50mm loader hired to load.

Painted pics to follow.

Keep it coming guys!

Troy

jb
E5
Posts: 2160
Joined: Fri Mar 11, 2005 7:13 am
Location: Antananarivo

Post by jb »

Ritter wrote:Radio antenna is SUPER cheap black nylon paint bristle - sold in a pack of 10 or so, all different color plastic handles, small brushes. Something you might give to a five year old. Work great for MG barrels, Aircraft Pitot tubes, antennas, etc.
Troy
I found out that fishing line 4LB test in particular makes for a much thinner and more to scale antenna. This fishing line also has a few more attributes. You can paint it and it really keeps the color,even without priming. This means that it can be put on after the painting is done. The line also seems to hold to model much better than bristles. I've taken hold of the antennas and tried to intentionally pull them out ,and can't. the bristles I used to use would not hold that well. The line also is flexible even with the paint. You can bend them down,and they pop back up. The bristles would permanently bend or kink. One problem that I initialy didn't care for was the bow or curve that would result from cutting and gluing to the model. To alleviate this problem I took a board with two nails on each end,and strung the fishing line across and back and forth several times-UNDER tension. Once this is under tension I took a hair dryer and applied heat to the under tension line for about five minutes. This gives me a numerous amount of truely straight antennas,and doesn't affect any of the above positve characteristics. (oh, I forgot to mention -its also very cheap!)
I originally got the idea of using fishing line on this forum-thanks guys
Troy , (and all you others)keep those bashed projects coming I love seeing that stuff!
John

Ritter
E5
Posts: 528
Joined: Tue Nov 23, 2004 10:59 am
Location: BC, Canada
Contact:

Post by Ritter »

The fishing line is ok too - Ive used 5 pound fly tippet that tapers to almost nothing over 8 feet but I found that after bending a few dozen times the paint came off. The nylon paint bristles come in varying diameters - from super thin (less than a hair) to pin sized. I found that some of the larger brushes have some that even taper! The added bonus of not having to paint them saves time too. So far, Ive never had any break, let go (i glue them in with CA glue) or bend.

On a different note, the Japanese Officer who appears to be standing at attention and nothing else is just beggin' for a raised sword. Due to the fact that his arms are soldered to his sides, French dude will have to take his place. I added a flap to the back of his Kepi and tapered the top and back to look like a Japanese cap. Lots of work - might only do a couple. The sword is made of solder - looks too kewl.. tried Brass but 3 test subjects lost their arm to the soldering iron!

The pics dont do the fellow justice but...
Image
Troy
Last edited by Ritter on Sun Nov 08, 2009 2:15 am, edited 2 times in total.

Mk 1
E5
Posts: 2383
Joined: Fri Dec 24, 2004 3:21 am
Location: Silicon Valley, CA

Post by Mk 1 »

Wow, Troy! Majorly good work going on there!

When you say you make things from solder, do you fashion them in a molten state on the model? Or fashion them with the metal in a soft solid state, and then heat/solder them in place? Or fashion them in a soft solid state, and glue them in place?
-Mark 1
Difficile est, saturam non scribere.
"It is hard NOT to write satire." - Decimus Iunius Juvenalis, 1st Century AD

Ben
E5
Posts: 547
Joined: Tue Dec 14, 2004 2:42 am
Location: Lehrte, Germany

Post by Ben »

Hi there!

Pete: Everything is fine and cold in Germany :) .
I hope it is the same in your area.

To Troy and others:
I am missing the words to describe what I have seen from you :shock: :o :D ...
Just excellent, the work on the MG teams was absolutely impressive to name an example.

Keep it coming!
Cheers Ben

pmskaar
E5
Posts: 2173
Joined: Sun Apr 17, 2005 5:45 am

Show Us Your Stuff

Post by pmskaar »

Hi Ben

Greetings from Arizona. Everything is fine here just not as cold. Glad all is well with you. Did you get the pictures I sent about 3 weeks ago or so? If not I will start a new thread here and post them for everyone to look at. They are from several of my Mein Panzer games that I have run recently.
Have a great day!

Pete

Ritter
E5
Posts: 528
Joined: Tue Nov 23, 2004 10:59 am
Location: BC, Canada
Contact:

Post by Ritter »

When you say you make things from solder, do you fashion them in a molten state on the model? Or fashion them with the metal in a soft solid state, and then heat/solder them in place? Or fashion them in a soft solid state, and glue them in place?
Thxs Mk1 - the sword is fashioned by first melting a large blob (3/8s diameter or larger) of solder on a piece of wood with a micro torch. The figure is then held in tweezers or small clamps and the hand is dipped into the molten solder. The torch is taken away or reduced to a low heat. The figure is drawn away and a small trail of solder will form on the hand. It is usually necesarry to repeat until a 1/4 inch or more tail is formed. After cooled, flatten the tail with no-grip (smooth jaws)needle-nose pliars. Cut to shape with an x-acto and add a drop of CA glue to strengthen the joint and you are done!

Troy

tstockton
E5
Posts: 715
Joined: Sat Apr 16, 2005 10:55 pm
Location: Indiana
Contact:

Post by tstockton »

Troy,

Excellent work (as usual)!! A "techniques" question, if I may... how do you go about cutting away the "solid metal" under the MG, etc., barrels? My guess is a very fine needle file, a little "elbow grease" and a magnifying glass. But is there a "shortcut", such as preliminary cutting using a cut-off wheel in a Dremel, or carving with the tip of a #11 blade in an Xacto knife?

I know different folks use different techniques, and sometimes those techniques -- for whatever reason -- are never quite mastered. (Myself, I've never quite "mastered" the soldering iron... oh, I can do lamp cords, etc. But on a "modeling scale" -- nope, too "ham-handed" I guess...) It is plain to see you do VERY well with these figures, and I'm hoping you have a "technique" that I can learn from!

Regards,
Tom
"Well, I've been to one World's Fair, a picnic, and a rodeo, and that's the stupidest thing I ever heard come over a set of earphones. You sure you got today's codes?"

-- Major T. J. "King" Kong in "Dr. Strangelove"

Post Reply